How the Right Product Photography Equipment Can Cut Your Return Rate by 30%
Discover the essential product photography equipment for fashion e-commerce. This guide covers cameras, lighting, and AI tools to create stunning brand imagery.
When the sustainable shoe brand Allbirds launched, they didn't just sell shoes; they sold the tangible feeling of their unique wool fabric. Their product photos accomplished this by using a macro lens — a specific piece of product photography equipment — to showcase the intricate, soft texture that justifies their price point. This level of detail is a key driver in reducing returns, as it sets accurate customer expectations from the first click.
High-quality visuals directly impact a brand’s bottom line. In fact, Shopify reports that clear, detailed images are a primary factor in a customer's purchasing decision. Investing in the right gear has a direct connection to your conversion rates and helps slash returns from customers whose expectations didn't match reality.
Of course, the cost of a traditional studio setup is a significant hurdle. A basic, entry-level kit with a camera, lights, and stands can easily exceed $5,000. This is where AI-driven solutions like Picjam are creating a new path for fashion brands, allowing them to bypass the entire physical equipment list and generate studio-quality photoshoots in minutes, saving thousands in the process.
But whether you build a physical studio or leverage AI, understanding the traditional toolkit is the essential first step. Let's break down the non-negotiables.
Your Essential vs. Advanced Gear Checklist
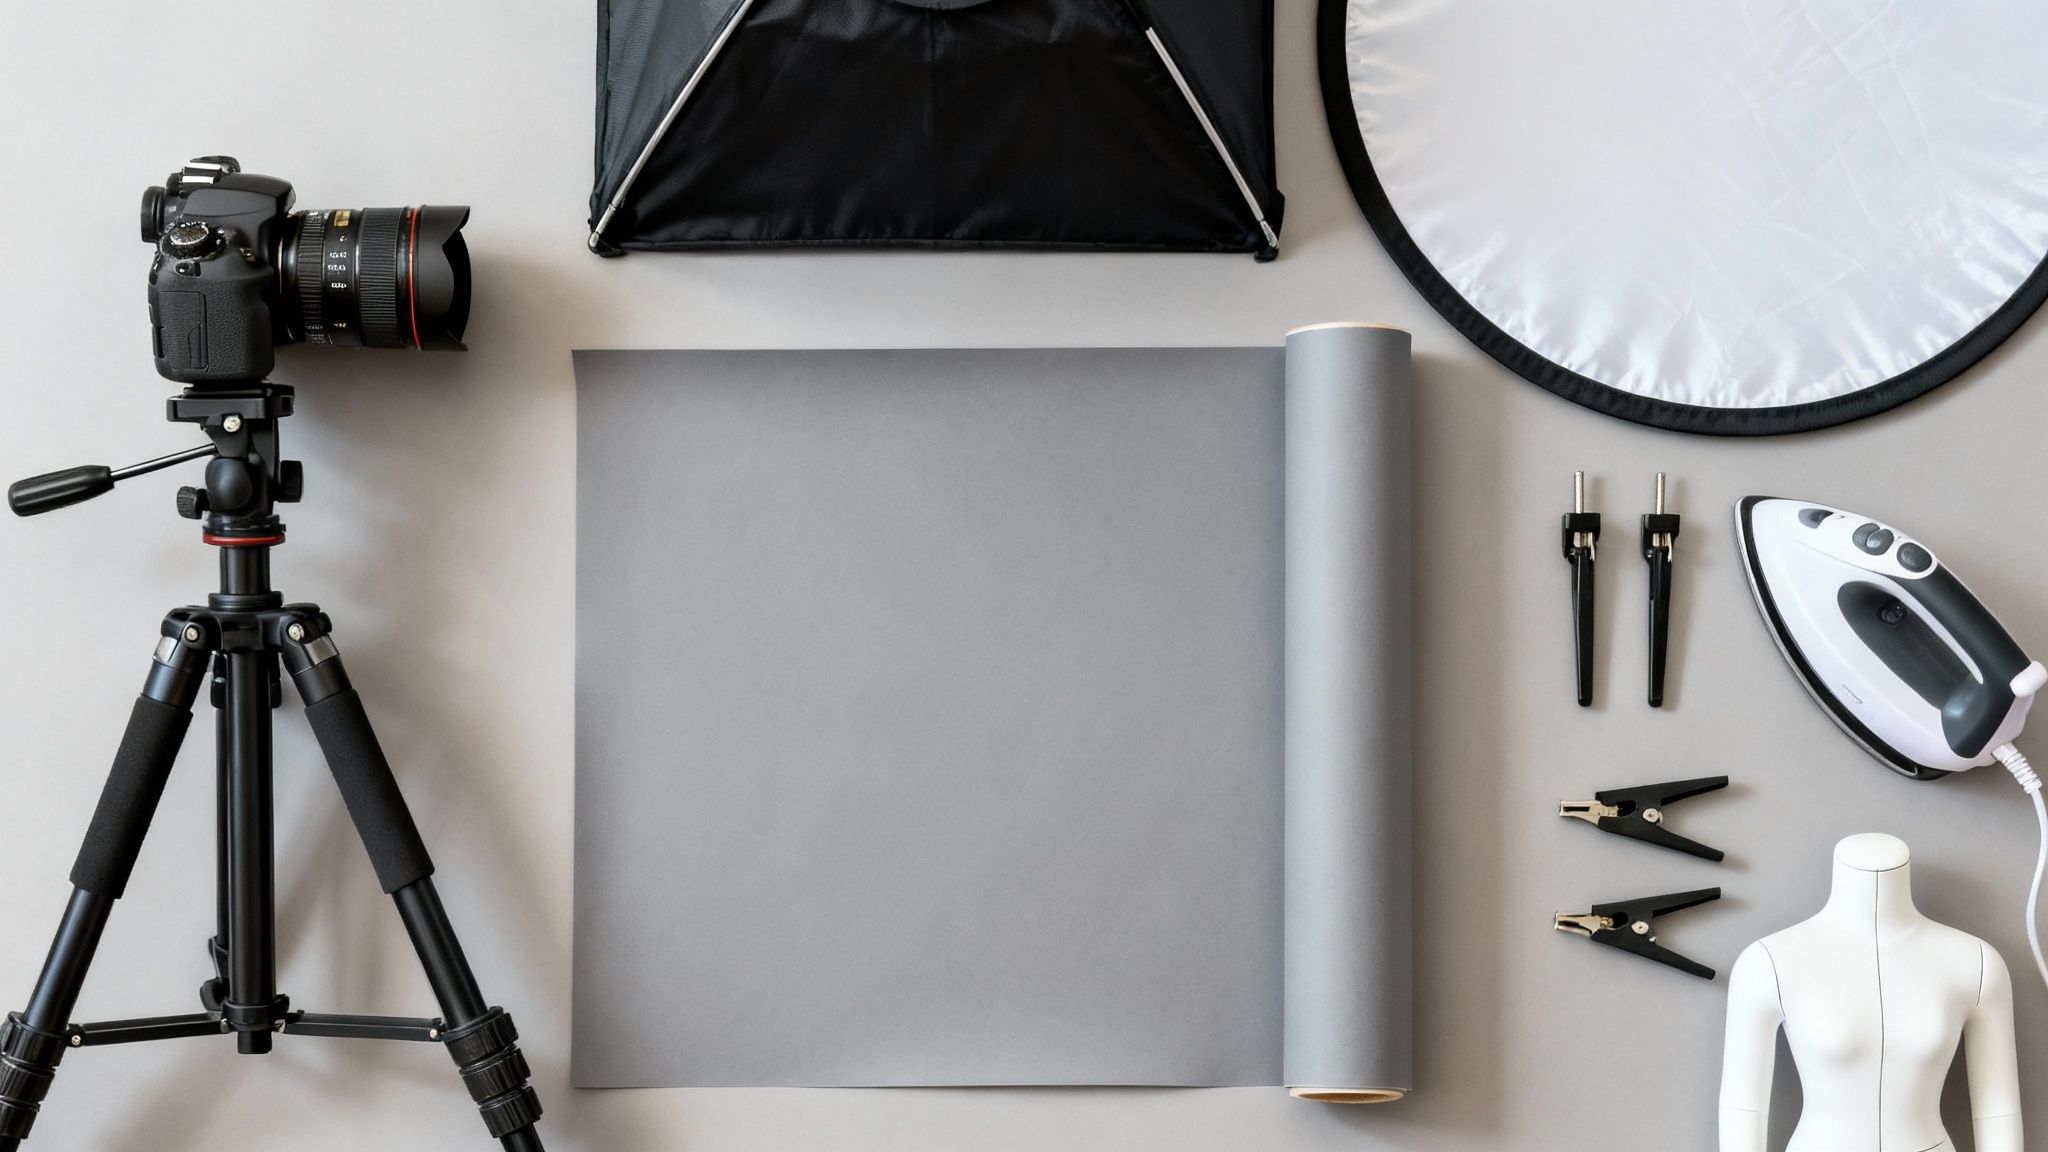
Building an in-house studio can feel overwhelming, but the right product photography equipment can become a competitive advantage. While giants like Zara have sprawling studios, emerging brands can achieve stunning results by focusing on a few key pieces.
Essential vs. Advanced Gear Breakdown
Here’s a comparison to guide your initial investment and future scaling.
This table shows you can start lean. As your needs grow — perhaps for detailed editorials or complex flat lays — you can gradually invest in more specialized tools.
Core Equipment Categories
Cameras and Lenses: The heart of your operation. A mirrorless camera with a versatile 50mm prime lens is ideal for capturing crisp details and true-to-life colors, showing off the delicate stitching on a handbag or the intricate weave of a wool sweater.
Lighting and Modifiers: This is your secret weapon for setting the mood and showcasing texture. A key light, like an LED panel with a softbox, creates soft, flattering light that eliminates harsh shadows and makes fabrics look rich.
Backdrops and Support: These elements create a clean stage. A simple white seamless paper backdrop is the e-commerce gold standard, putting your product front and center. A sturdy tripod guarantees every shot is sharp and consistently framed for a professional look across your site.
How to Select a Camera That Captures True-to-Life Color
Think of your camera as your brand's most important storyteller. For shooting apparel, the right choice comes down to a few features that directly impact how customers see your clothing online. Your camera is the core of your product photography equipment, and your first decision is between a DSLR and a mirrorless system.
Today, modern mirrorless cameras dominate e-commerce for a reason. Their electronic viewfinder (EVF) gives you a live preview of exactly what your final image will look like — exposure, white balance, and color are all visible before you press the shutter. This streamlines your workflow and ensures the cerulean blue of that silk blouse is captured perfectly on the first try.
Full-Frame vs. Crop-Sensor: What’s the Real Difference?
Next, you'll choose a sensor size: full-frame or APS-C (crop-sensor).
Full-Frame Sensors: These are the professional standard, capturing more light for higher-quality images with less noise. They offer a wider field of view, perfect for capturing the sweeping lines of a dress in a campaign shot, something a brand like Reformation would require for its elegant aesthetic.
APS-C (Crop-Sensor) Sensors: These smaller sensors are more budget-friendly. They still perform incredibly well and have a "crop factor" that magnifies your lens's focal length, which can be a bonus for getting tighter detail shots without a specialized lens.
For most startups, a great APS-C mirrorless camera offers the best balance of performance and cost.
Why Your Lens Matters More Than Your Camera
Your lens has an even bigger impact on your final images than your camera body. Forget the standard "kit lens" and invest in glass built for the job.
Here are the 2 must-have lenses for any fashion brand:
The 50mm Prime Lens: The workhorse for product photography. Its focal length mimics the human eye, resulting in realistic proportions without distortion. It’s perfect for everything from full-body looks to on-model shots.
The 100mm Macro Lens: Your tool for showcasing the details that justify your price. A macro lens lets you get incredibly close to reveal craftsmanship. Think of a luxury brand like Bottega Veneta using it to highlight the precise weave of their Intrecciato leather. This is how you visually communicate quality.
Investing in just these 2 lenses provides the versatility to capture entire outfits and zoom in on the tiniest brand details.
How to Use Light to Showcase Fabric Texture and Fit
Lighting is the most critical piece of product photography equipment you’ll own. Great lighting transforms a flat product shot into a compelling image that sells. It eliminates shadows, brings out fabric texture, and ensures color accuracy — a key factor in reducing returns.
The global commercial photography market is valued at $5.1 billion, with e-commerce accounting for a massive 45%. Lighting equipment represents a huge 35% of that investment, signaling its importance in creating images that convert. You can find more product photography statistics at electroiq.com.
Continuous Lighting vs. Strobes: Which is Right for You?
You'll choose between 2 main types of light: continuous or strobes.
Continuous Lights: These lights (like LEDs) stay on, so what you see is what you get. You can adjust the light and see how shadows fall in real-time, making them a fantastic choice for beginners.
Strobes (Flashes): Strobes deliver a powerful burst of light. They require more practice but produce incredibly sharp, crisp images, perfect for freezing motion or capturing intricate fabric details.
For most e-commerce startups, a good set of LED continuous lights is the perfect balance of control, ease of use, and professional results.
Use Modifiers to Shape a Professional Look
A bare bulb creates harsh, unflattering light. To get that soft, high-end look, you need light modifiers — tools that soften or shape the light. The goal isn’t just to make the product visible; it's to make it desirable.
For any fashion setup, these 2 modifiers are essential:
Softboxes: These fabric boxes fit over your light to produce soft, directional light that’s ideal for illuminating clothing evenly. An octabox (an eight-sided softbox) is a favorite for creating natural-looking catchlights in on-model shots.
Umbrellas: Simple and effective. A shoot-through umbrella softens and spreads light, while a reflective umbrella bounces light for a punchier, higher-contrast look.
This flowchart outlines the key decisions when selecting a camera.

As the visual shows, your lens and lighting details truly define your image quality. If you're in a smaller space, read our guide on finding the right light box for product photography.
Elevate Your Images with Backdrops and Support Gear
Backdrops and support gear are the foundational product photography equipment that separates a high-end e-commerce shot from an amateur one. This is about creating a controlled environment where your apparel is the star.
A polished background ensures nothing distracts from a garment's details. A luxury brand like Burberry almost always shoots its trench coats against minimalist backdrops. This is a deliberate choice to let the product’s craftsmanship command all the attention.
Choose a Backdrop That Strengthens Your Brand
The backdrop sets the tone. Most fashion e-commerce relies on a few tried-and-true choices for consistency.
Seamless Paper Rolls: The industry standard. Seamless paper gives you a clean, uniform background. White, light grey, and beige are the most popular picks for a classic, distraction-free look.
Canvas or Fabric Backdrops: For more textured, lifestyle-oriented shots, a painted canvas can add depth and mood. These are perfect for editorials or lookbooks but less common for standard product grids.
For emerging brands, a single roll of white or light grey seamless paper is the smartest investment. We dive deeper in our guide to the best background for clothing photography.
Why a Tripod is Non-Negotiable for Consistency
Support gear is essential for professional consistency and sharpness.
A sturdy tripod is completely non-negotiable. It locks in your framing, angle, and height, ensuring every product is shot from the exact same perspective. This creates a cohesive and trustworthy online store experience.
"A tripod isn't just about preventing blur," says a lead stylist for a major fashion retailer. "It’s a tool for enforcing brand consistency. When every image is perfectly aligned, it signals a level of professionalism that customers notice."
Equally important are backdrop stands to hold your seamless paper, creating a smooth "sweep" that eliminates the harsh line where the wall meets the floor.
The Stylist's Toolkit for Flawless Presentation
A well-stocked styling kit is the secret to making apparel look perfect on camera.
Your kit should include:
- A Steamer: To remove every wrinkle.
- Clamps and Pins: For shaping clothing on a model or mannequin.
- Ghost Mannequin: A modular mannequin that lets you create a filled-out, 3D shape, then easily remove parts in post-production.
- Double-Sided Tape: For securing stubborn labels or collars.
This gear ensures every piece looks pristine, saving you time in post-production.
How AI Slashes Content Costs for Brands Like Zara
Modern fashion brands face a critical choice: build an in-house studio with a major upfront investment in product photography equipment, or adopt an agile, AI-powered approach that transforms capital expense into a lean operational cost.
Building even a basic DIY studio is a significant financial commitment. An entry-level setup can easily run $5,000 or more. For brands needing high-end imagery, that number can triple. And that's just the starting price.
The Hidden Costs of a Physical Studio
Beyond gear, recurring costs quickly add up. Photographer fees can range from $50 to over $250 per hour. Then there are model fees, a stylist's day rate, and studio rental costs. According to Vogue Business, AI has the potential to cut content production costs for major brands like Zara by up to 40% by eliminating these very expenses.
"We used to spend weeks planning and executing a single photoshoot," states the founder of a London-based DTC knitwear brand. "The logistics were a nightmare, and the costs for a single campaign could easily hit five figures."
This friction is exactly what AI-powered platforms are designed to eliminate.
Calculating the True ROI of AI Content Generation
AI completely flips the traditional cost model. With a tool like Picjam, the need for most physical product photography equipment vanishes. You can take one simple photo of your garment and generate an entire on-model campaign in minutes.
The savings are immediate. Photographer, model, and studio fees are eliminated. The time to get a product from warehouse to market-ready imagery shrinks from weeks to hours.
Think of a brand like Ganni, famous for its dynamic marketing. Creating that volume of content traditionally would require a colossal budget. With AI, a small team can generate hundreds of unique on-model shots — testing different ethnicities, locations, and styles for ads — all for a flat monthly fee. Your cost per image plummets.
The e-commerce photography gear market is expected to hit $1.5 billion in 2025, yet steep entry costs remain a major hurdle. You can learn more about the evolving equipment market and its financial barriers here.
Ready to see the difference? Calculate how much your brand could save on photography costs by switching to AI. Use the Picjam Savings Calculator and get your personalized ROI analysis.
Actionable Next Steps for Better Product Photos
Getting your product photography equipment and strategy right is one of the fastest ways to lift your brand’s perceived value and conversion rates. It’s about being smart with your resources.
The broader photography equipment market was valued at $78.675 billion in 2025, with 40% of that driven by AI-powered tech like smart autofocus. This technology helps brands create compelling product shots that turn browsers into buyers at rates 2.5x higher. You can dig into more trends and see how new technology is shaping the photography market on deepmarketinsights.com.
Audit Your Current Setup
Take an honest look at your current equipment. Use the checklist from the beginning of this guide to do a quick audit. Are you missing a sturdy tripod for consistency or a softbox to eliminate harsh shadows? Pinpointing these gaps is the quickest path to a major jump in image quality.
Analyze Your True ROI
Don't just tally the price tags on gear. Factor in the hidden costs of a DIY studio — your time, reshoots, model fees, and slow content production. Stack that total against the speed and cost-efficiency of an AI-powered alternative. For many modern brands, the ability to generate hundreds of on-brand images for a flat fee is a more profitable path.
Takeaway
You have the map; now it's time to choose a path. Here are 3 actionable steps you can take today.
- Identify Your Weakest Link: Use our checklist to find the one piece of missing gear causing the most problems. Fixing it can offer the biggest impact for the smallest investment.
- Run the Numbers: Do a detailed ROI analysis comparing the true cost of your DIY setup with the predictable, scalable model of AI generation.
- Quantify Your Savings: Use the Picjam savings calculator to get a concrete number on how much time and money your brand could save by streamlining content creation.
Ready to see how the numbers stack up for your brand?
Compare your current photography costs with Picjam using our savings calculator.
Your Top Photography Equipment Questions, Answered
Jumping into the world of product photography equipment brings up practical questions. Let's tackle the most common ones.
What is the absolute minimum equipment I need to start?
For a lean fashion startup, focus on a small, high-impact kit.
- Camera and Lens: An entry-level mirrorless camera with a 50mm f/1.8 prime lens.
- Lighting: One powerful LED key light with a large softbox.
- Support: A sturdy tripod and a roll of white seamless paper.
- Reflector: A cheap but effective fill card to bounce light into shadows.
This minimal setup is enough to produce the clean, professional photos seen on successful DTC sites like Everlane.
How often should I upgrade my camera and lights?
Resist the urge to upgrade your product photography equipment annually. Upgrade only when your current gear physically limits your creative vision or when a new feature dramatically speeds up your workflow. A quality mirrorless camera body will serve you well for 3–5 years. Good lighting can last even longer. Investing in better lenses or light modifiers will almost always yield a bigger improvement than a new camera body.
Can I get away with using my smartphone for e-commerce photos?
While smartphone cameras are impressive, they lack the manual control and lens quality needed for main product detail pages. Customers expect a level of clarity and consistency that only a dedicated camera setup can reliably deliver.
However, your smartphone is a powerhouse for social media content. A brand like Glossier masterfully mixes polished studio shots on their site with raw, user-centric content on social media.
This is where AI is changing the game. With Picjam, a well-lit smartphone photo on a mannequin is all you need. That single shot becomes the source file for an entire professional, on-model photoshoot, bridging the quality gap and saving you thousands on gear.
Ready to skip the equipment costs and create studio-quality fashion imagery in minutes? See how much your brand could save with Picjam.

Picjam team
The Picjam team blends AI, product, and creative expertise to eliminate the cost and delay of traditional photography for modern eCommerce brands.

