How to Remove White Background in Illustrator for Flawless Product Photos
Learn how to remove white background in Illustrator with actionable guides for fashion e-commerce. Create clean, professional product photos that convert.
How to start saving money
Lorem ipsum dolor sit amet, consectetur adipiscing elit lobortis arcu enim urna adipiscing praesent velit viverra sit semper lorem eu cursus vel hendrerit elementum morbi curabitur etiam nibh justo, lorem aliquet donec sed sit mi dignissim at ante massa mattis.
- Neque sodales ut etiam sit amet nisl purus non tellus orci ac auctor
- Adipiscing elit ut aliquam purus sit amet viverra suspendisse potent i
- Mauris commodo quis imperdiet massa tincidunt nunc pulvinar
- Adipiscing elit ut aliquam purus sit amet viverra suspendisse potenti
Why it is important to start saving
Vitae congue eu consequat ac felis placerat vestibulum lectus mauris ultrices cursus sit amet dictum sit amet justo donec enim diam porttitor lacus luctus accumsan tortor posuere praesent tristique magna sit amet purus gravida quis blandit turpis.

How much money should I save?
At risus viverra adipiscing at in tellus integer feugiat nisl pretium fusce id velit ut tortor sagittis orci a scelerisque purus semper eget at lectus urna duis convallis. porta nibh venenatis cras sed felis eget neque laoreet suspendisse interdum consectetur libero id faucibus nisl donec pretium vulputate sapien nec sagittis aliquam nunc lobortis mattis aliquam faucibus purus in.
- Neque sodales ut etiam sit amet nisl purus non tellus orci ac auctor dolor sit amet
- Adipiscing elit ut aliquam purus sit amet viverra suspendisse potenti
- Mauris commodo quis imperdiet massa tincidunt nunc pulvinar
- Adipiscing elit ut aliquam purus sit amet viverra suspendisse potenti
What percentage of my income should go to savings?
Nisi quis eleifend quam adipiscing vitae aliquet bibendum enim facilisis gravida neque. Velit euismod in pellentesque massa placerat volutpat lacus laoreet non curabitur gravida odio aenean sed adipiscing diam donec adipiscing tristique risus. amet est placerat imperdiet sed euismod nisi.
“Nisi quis eleifend quam adipiscing vitae aliquet bibendum enim facilisis gravida neque velit euismod in pellentesque massa placerat”
Do you have any comments? Share them with us on social media
Urna ut fermentum imperdiet lacus, elementum etiam maecenas libero nunc, suspendisse massa, nisl, elit curabitur feugiat in quis ut nibh enim in tristique aliquam sed vitae dui, dis adipiscing pharetra aliquam turpis turpis nibh rhoncus enim, pellentesque leo laoreet neque in sed bibendum fermentum suspendisse tempus non purus adipiscing suscipit fringilla adipiscing convallis dolor nulla fermentum facilisis ullamcorper ut vehicula tortor libero metus donec velit, tristique fermentum, dictum euismod diam scelerisque enim non pharetra tristique lectus habitant pharetra est id
When a new collection from a brand like Ganni drops, their design team needs to prep hundreds of product shots for their Shopify store — fast. Getting the white background out of an image in Illustrator is a core skill that makes this possible.
The quickest way is the Image Trace panel — just make sure you check the 'Ignore White' option. For high-end items, like a Telfar handbag, a Clipping Mask made with the Pen Tool offers the precision luxury brands demand.
Learning how to remove a white background in Illustrator is a non-negotiable skill for any modern fashion brand.
Why Clean Product Images Drive 30%+ Higher Conversions
Your product photos are your digital storefront. Before a customer reads a description, they’ve judged your product based on the image. A clean, transparent background isn't just about looking professional; it's about building trust that turns a browser into a buyer.
Marketplaces like Amazon and retailers like Net-a-Porter enforce strict image standards for a reason. Consistency lets the product — whether it's a trench coat from Burberry or a new sneaker — be the star. Cluttered backgrounds add visual noise and devalue the product.
The Data Behind Clean Visuals and Faster Workflows
High-quality photos have a measurable impact. According to a study on e-commerce visuals, products on clean backgrounds can see up to a 34% higher click-through rate and a 28% better conversion rate.
Visual clarity directly impacts revenue. It's why many brands are now exploring AI-powered platforms like Picjam. Instead of a designer spending hours tracing product outlines, you can generate perfectly isolated shots in seconds, freeing up your team for creative and marketing tasks.
This shift toward automation is shaping the future of fashion content. AI tools can cut manual editing time by over 80%, a massive cost-saving measure for brands launching multiple collections per year. If you want to dig deeper, check out our guide on creating pure white backgrounds for product photos.
How Image Trace Slashes Manual Editing Time by 80%
When a new collection drops and you have dozens of product shots to prep, speed is everything. For fashion brands processing images in bulk, Adobe Illustrator's Image Trace feature is the most direct path for stripping a white background from a JPEG or non-transparent PNG.
This tool converts your pixel-based photo into a scalable vector graphic, creating a clean, editable asset in just a few clicks.
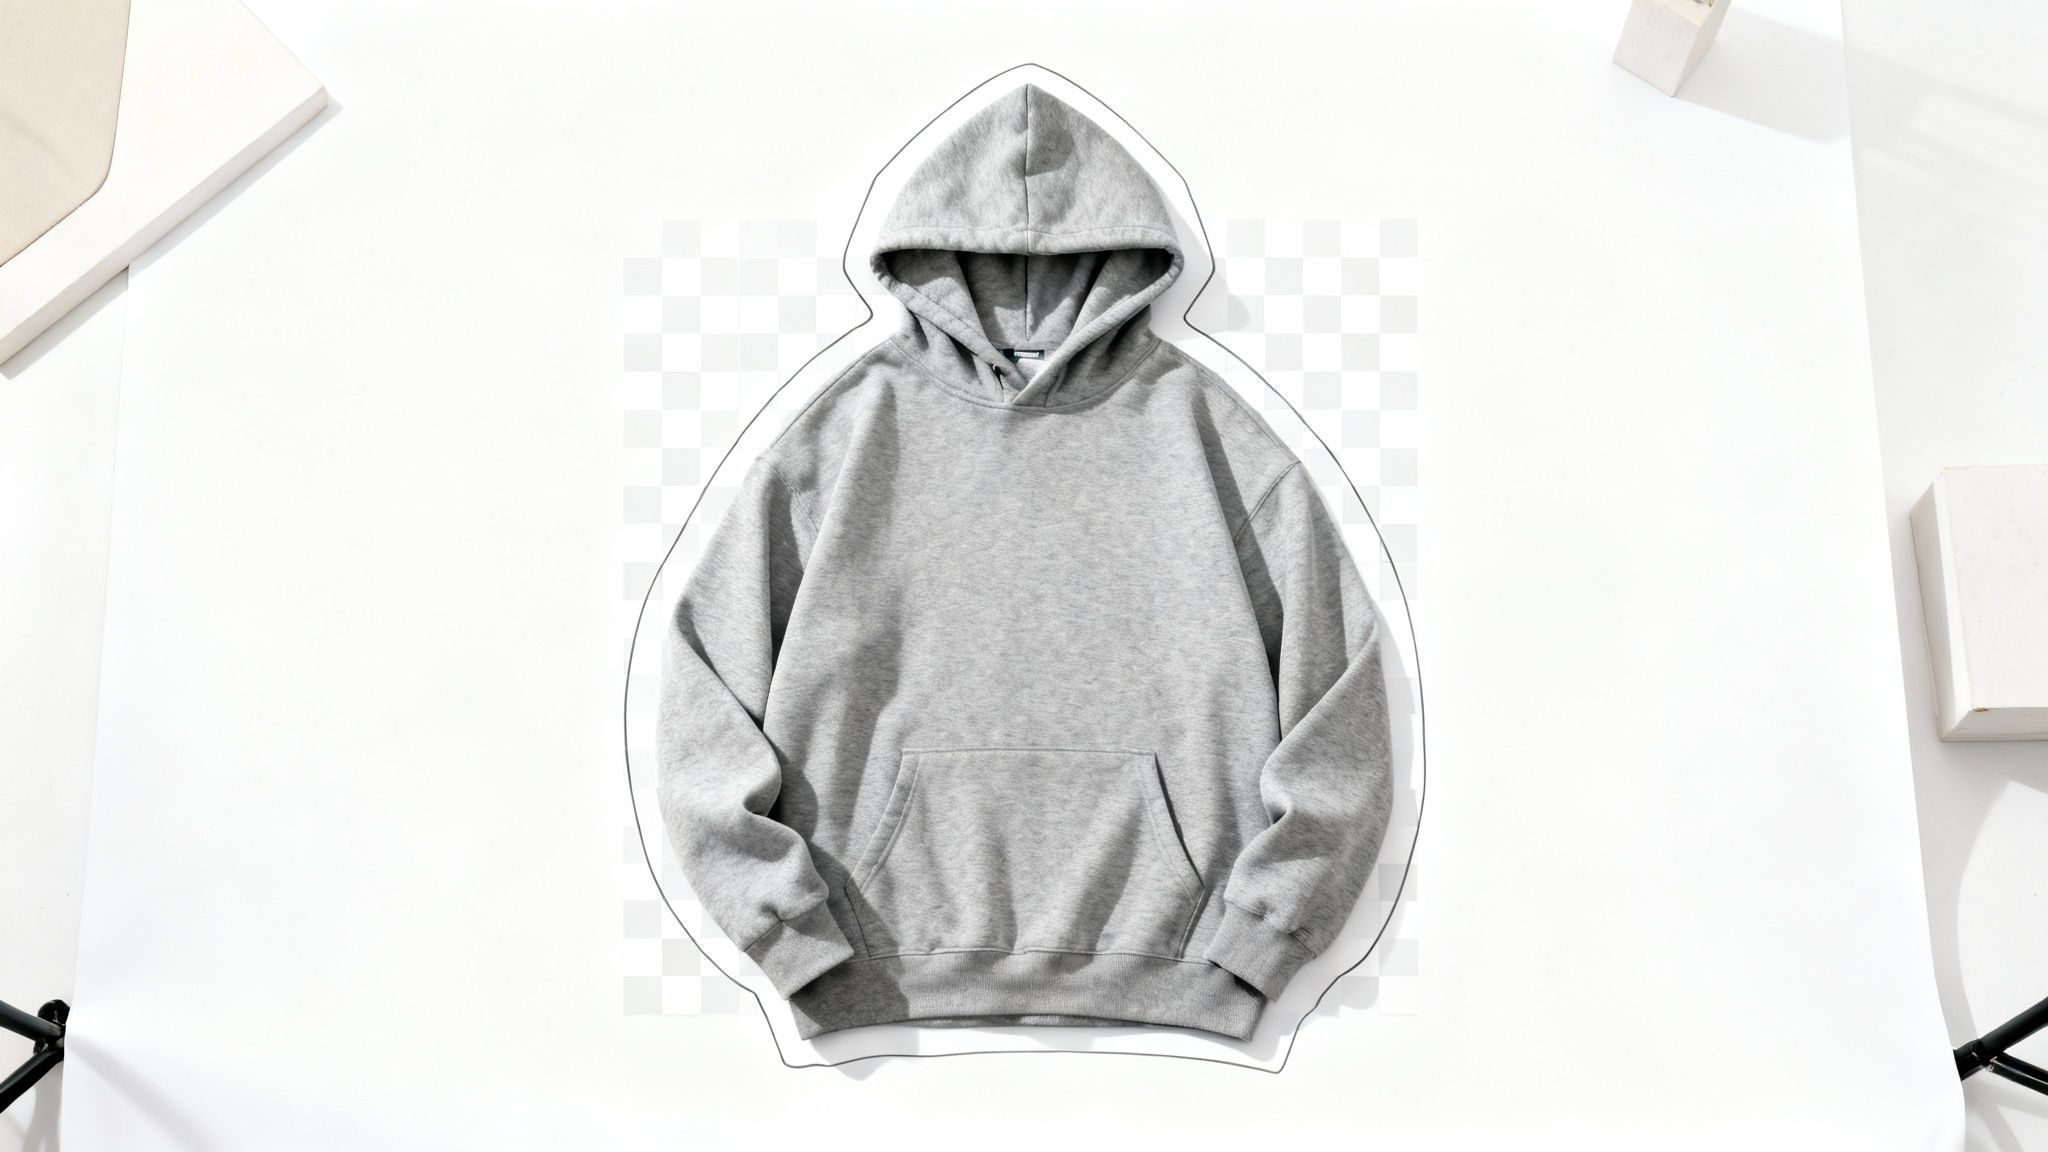
Let's say you have a studio shot of a new hoodie. Select the image on your artboard. This brings up the Image Trace options in your top toolbar. For a detailed product photo, the ‘High Fidelity Photo’ preset is the best place to start.
Fine-Tuning Your Trace for Different Fabrics
Once you pick a preset, open the advanced settings in the Image Trace panel (Window > Image Trace). The most important setting here is a checkbox labeled ‘Ignore White’. Ticking this box tells Illustrator to automatically remove all white areas during the conversion.
After the trace runs, click the ‘Expand’ button in the top toolbar. This crucial step finalizes the conversion, turning your image into editable vector paths. You can then use the Direct Selection Tool (A) to click any stray white bits — like the space inside a drawstring loop — and hit delete.
Vectorizing and removing backgrounds this way can slash manual editing time by roughly 70-80% compared to traditional methods. It’s not uncommon for a team to process 50-100 product images in a single workday. You can learn more about how designers optimize this workflow to reclaim production time.
How to Choose the Right Preset for Any Product
Not all apparel is the same. A simple t-shirt traces differently than a textured sweater or leather sneakers. Getting the best result often requires a quick tweak of the preset.
Matching the preset to the product's complexity is key. A simple, solid-color item can be traced with fewer colors, creating a cleaner file, while a detailed piece needs a preset that captures all its nuance.
Illustrator Image Trace Presets for Fashion Products
Here's a quick guide to help you choose the right preset for common fashion items:
This method turns a once tedious task into a manageable workflow. For brands like Allbirds, which feature footwear with distinct textures, either the ‘6 Colors’ or ‘High Fidelity Photo’ presets would capture the product's essence for their minimalist e-commerce site.
How to Achieve Flawless Edges with Clipping Masks
While Image Trace is great for speed, high-end fashion items demand a precision that automated tools can't always match. For the delicate lace on a wedding dress or the intricate hardware on a Telfar handbag, the industry standard is creating a clipping mask with the Pen Tool.
This technique puts you in complete manual control, guaranteeing every edge is perfect.
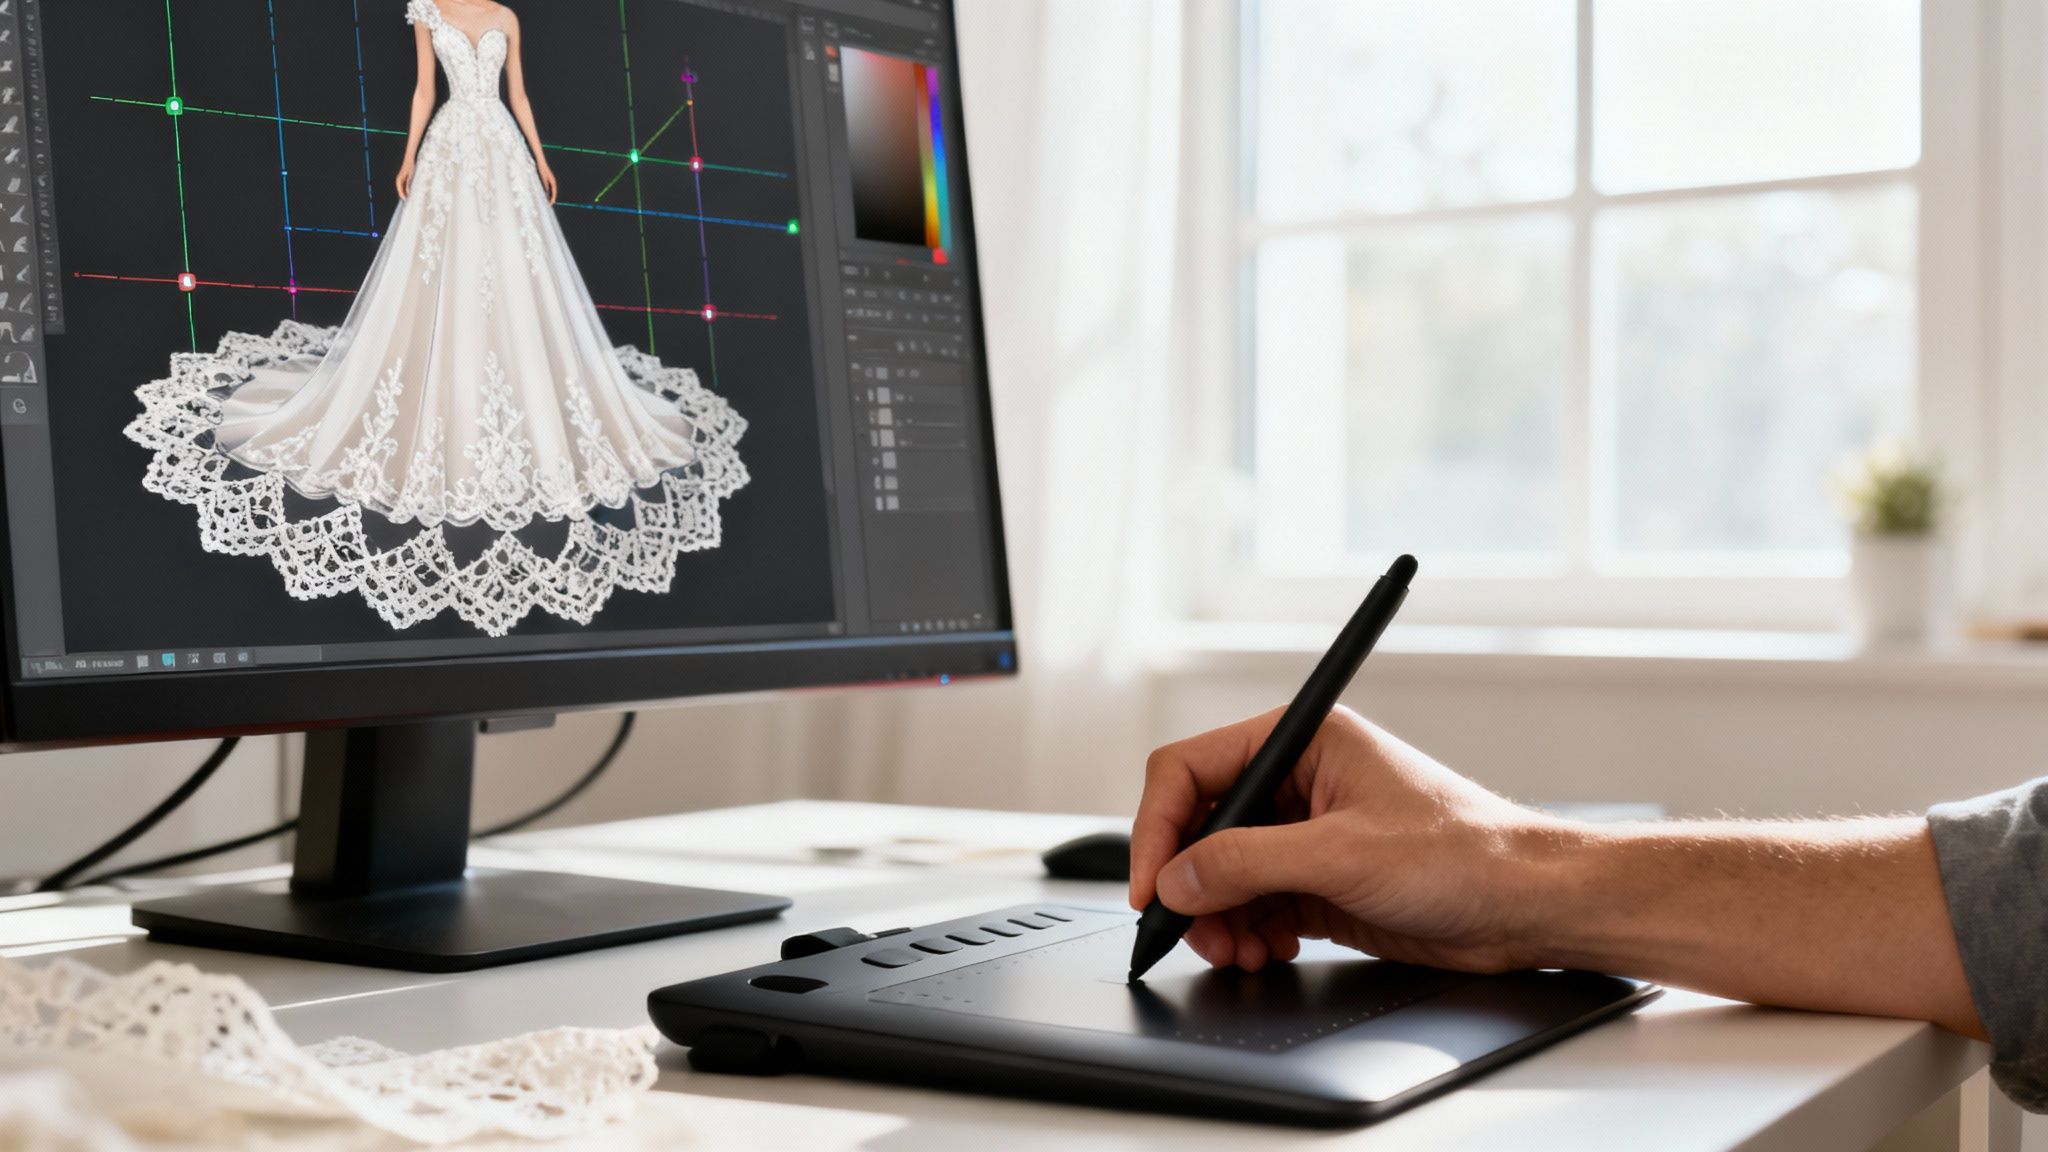
This process involves manually tracing the product's outline by placing anchor points along its edges. Think of it less like erasing a background and more like creating a custom "window" that reveals only the product. The resulting vector path is infinitely scalable and flawlessly clean.
Crafting the Perfect Path
First, grab the Pen Tool (P). In your color panel, set the Fill to 'None' and give your Stroke a bright, contrasting color like magenta. This makes it easier to see your path against the product photo. Now, click around the edge of your item to create an outline.
For straight edges, a simple click works. For curves, click and drag to create Bézier handles that sculpt the line into a smooth arc. This skill is where a designer's touch truly elevates a product image, ensuring the silhouette looks authentic.
From Path to Clipping Mask
Once you’ve traced the entire object and clicked back on your starting point to close the path, the hard part is over. Switch to the Selection Tool (V) and select both your new vector path and the original product image.
With both items selected, right-click and choose ‘Make Clipping Mask’ (or hit Cmd/Ctrl + 7). Instantly, everything outside your path vanishes, leaving a perfectly isolated product on a transparent background. This is the exact technique used for hero shots by brands like Prada.
The Pen Tool is the digital equivalent of a surgeon’s scalpel. It takes more time upfront, but the payoff is a level of quality that builds brand equity. This precision can be the difference between a product that looks cheap and one that justifies its premium price.
How to Streamline Your Manual Workflow
Even a manual process can be faster. Investing in a graphics tablet like a Wacom makes tracing organic shapes feel more natural and is significantly quicker than using a mouse.
Mastering a few key shortcuts also dramatically cuts editing time.
- Hold Spacebar: Temporarily switches to the Hand Tool to pan around without deselecting the Pen Tool.
- Press P: Quickly re-selects the Pen Tool.
- Press A: Jumps to the Direct Selection Tool to tweak individual anchor points.
While these manual skills are invaluable, AI is transforming this workflow. Tools like Picjam can now produce results that rival a manual clipping mask in seconds, not hours. This allows brands to maintain high visual standards while getting products to market faster.
Quick Fixes for Vector Logos and Graphics
In the fashion world, you're constantly juggling vector assets — supplier logos, graphics for tech packs — that often arrive with a stubborn white box around them.
When you need to move fast, Illustrator has a couple of shortcuts that let you skip the manual work entirely. These are perfect for cleaning up a simple graphic for a mood board or a digital mockup.
Think of a brand like Ganni, famous for its bold graphic tees. When their team gets a collaborator’s logo on a white background, they don't have time to trace it. They use quick fixes like these to prep it for a new t-shirt design in seconds.
Instantly Delete All White Objects
When your vector file has a separate white background shape, this is the fastest way how to remove white background in illustrator. The Select > Same command acts like a magnet, grabbing every object with the same property.
First, click the white background with the Selection Tool (V).
Now, navigate to Select > Same > Fill Color. Illustrator selects every object with that exact same white fill. Hit the Delete key, and all unwanted white pieces disappear at once.
For a digital-first brand, efficiency is everything. A junior designer who masters these shortcuts can process 10-15% more assets per day than someone doing it all by hand. That time goes right back into creative work.
Use Blending Modes for Seamless Layering
Sometimes you don't need to delete the white background — you just need it to disappear. This is where the Multiply blending mode comes in. It’s perfect for placing black logos or type onto colored backgrounds.
Here’s the breakdown:
- Place your vector logo (white background and all) on top of another image or a colored shape.
- With the logo selected, open the Transparency panel (Window > Transparency).
- Click the blending mode dropdown and choose Multiply.
This mode makes the white parts of your object transparent, while darker areas stay visible. It's a non-destructive fix for creating social media assets or internal presentations where speed is key.
Exporting Your Images for Shopify, Farfetch, and Beyond
You've successfully removed the white background. The final step, exporting, is what separates the pros from the amateurs on platforms like Shopify or Farfetch.
I've seen countless perfect product shots ruined by faint white halos or jagged edges. These imperfections are often caused by anti-aliasing, which can leave behind a semi-transparent white fringe. An easy fix is to select your object, go to the Appearance panel, click the Fill, and tweak its settings. Sometimes, contracting a clipping mask by a single pixel is all it takes.
How to Set Up Your Export for Flawless Results
Choosing the right export format is a balance between visual quality and page load speed. Getting it wrong can cost you customers.
First, ensure you have clean images to work with. Learning how to download images from websites for e-commerce efficiently can be a game-changer.
Once your artwork is ready, pick the right format.
PNG-24 for Product Photos: This is the industry standard for product images on the web. It supports full transparency, so the background you removed stays gone. When you export (File > Export > Export As...), always choose PNG and set the background option to Transparent.
SVG for Logos and Graphics: For logos, icons, or simple graphics, SVG (Scalable Vector Graphic) is king. An SVG looks perfectly crisp on any screen, and the file sizes are tiny, which boosts your site speed.
A brand like Zara would use PNG-24 for thousands of garment photos but use an SVG for their minimalist logo to ensure it loads fast and looks sharp.
Every marketplace has its own rulebook. It's always a good idea to brush up on specific standards, like these detailed Amazon product image requirements.
Speeding Up Your Workflow
When you're dealing with hundreds of product shots, every second counts. An efficient workflow can cut the time-to-market by 8-14 days per season, according to McKinsey reports on fashion operations.
A slick process might involve vectorizing images with Image Trace, expanding them, and quickly deleting backgrounds. For assets going to multiple channels, the EPS format can be a lifesaver, as it can automatically create a transparent background, saving you a step every time.
Takeaway: 3 Actionable Insights for Fashion Brands
Match the Tool to the Product. Use the Image Trace tool with 'Ignore White' for high-volume, simple products like basic tees to get them online faster. Reserve the precise Pen Tool and Clipping Masks for hero items like handbags or detailed outerwear where quality justifies the time investment.
Optimize Your Export Settings. Always export web product photos as PNG-24 with the 'Transparent' background setting to avoid white boxes. For logos and icons, use SVG to ensure they are crisp on all devices and load instantly, improving both user experience and SEO.
Benchmark Your Manual Costs Against AI. Calculate the hours your team currently spends on manual background removal for one collection. The savings from AI-powered tools like Picjam aren't just financial — they represent creative time that can be reinvested into brand-building activities that drive growth.
Ready to see how much you could save? Compare your current photography costs with our savings calculator.
Frequently Asked Questions
Got a few nagging questions about getting rid of backgrounds in Illustrator? You're not alone. Here are some of the most common issues designers run into, especially when prepping images for e-commerce.
What Is the Fastest Way to Remove a White Background in Illustrator?
This really depends on what kind of artwork you're dealing with.
For a raster image (like a JPEG or PNG photo), your quickest route is the Image Trace panel. Just select your image, pick a preset that fits — 'High Fidelity Photo' usually works well — and pop open the advanced settings. From there, just check the box for ‘Ignore White,’ and Illustrator will strip out the white background as it converts the image to vector shapes.
If you're working with a vector graphic that already has a distinct white object behind it, the Magic Wand Tool (Y) is your best friend. One click on the white area, hit delete, and you're done.
Why Does My Image Still Have a White Box After Exporting as a PNG?
Ah, the classic export trap! This is almost always an issue with your export settings.
When you go to File > Export > Export As... and choose the PNG format, another dialog box pops up. In that window, you have to explicitly set the ‘Background Color’ to ‘Transparent.’ If it's set to ‘White,’ that's exactly what you'll get. Remember, a JPEG will always have a white (or solid color) background because the format simply doesn't support transparency.
How Do I Remove the Background from a Vector Logo?
If your logo was designed with a separate white shape sitting behind the main elements, the fix is simple. Grab the Direct Selection Tool (A) (the white arrow), click directly on that background shape, and hit delete.
Sometimes, that white shape might be grouped with the rest of the logo. If you can't select it on its own, try ungrouping everything first with the shortcut Cmd/Ctrl+Shift+G. For more complex situations where the white is integrated into the artwork itself, our guide on how to remove a white background from an image has some other tricks you can try.
Ready to skip the manual work entirely? With Picjam, you can generate studio-quality product shots with perfect, transparent backgrounds in a single click. See how much time and money you could save by trying our savings calculator.

Picjam team
The Picjam team blends AI, product, and creative expertise to eliminate the cost and delay of traditional photography for modern eCommerce brands.