How to Get Rid of Shadow in Picture for Flawless Fashion Photos
Learn how to get rid of shadow in picture using pro lighting, editing, and AI tools. Get actionable advice for crisp, high-converting fashion photography.
When a customer can't see the true texture of a silk blouse or the exact fit of a pair of pants, they hesitate. Unwanted shadows obscure fine details, warp the true color of fabric, and create an unprofessional look that can erode shopper trust.
Learning how to get rid of shadow in picture isn’t just an editing skill — it's a direct way to protect your brand’s bottom line and improve conversion rates.
In-house creative teams often spend hours manually fixing these issues, creating a costly bottleneck. Platforms like Picjam streamline this process, using AI to generate perfectly lit, conversion-ready images from the start and eliminating the cost of post-production fixes.
How Unwanted Shadows Are Costing Your Brand Sales
Harsh, distracting shadows are like a veil thrown over your products, hiding the very details that justify a purchase. A bad shadow can make high-quality fabric look cheap and flimsy.
It can distort the cut of a garment and turn vibrant, rich colors into something dull and lifeless.
Think about a major online retailer like ASOS. They’ve built an empire on clean, consistent, and completely shadow-free product photography. Every item is shown under bright, even light, letting you see every seam, button, and stitch. That visual consistency builds trust and gives shoppers the confidence to hit "add to cart."
The Hidden Costs of Poor Lighting
Poorly lit photos with distracting shadows create a real financial drain on your business in a few key ways:
- More Returns: When a product arrives looking different from the photo online, it often gets sent right back. A McKinsey report found that 20–30% of all online orders are returned, with poor product representation being a major reason.
- Wasted Time and Money: Fixing shadows in post-production is a massive time-suck. Manually editing hundreds of photos eats up resources and slows down how quickly you can get new collections live.
- Lower Conversion Rates: If a shopper can't clearly see what they're buying, they'll hesitate. That pause often turns into an abandoned cart as they look for a brand with clearer, more trustworthy images.
"In e-commerce, customers can’t touch or feel the product, so the photos have to do all the work," notes a leading fashion photographer. "If your images are unclear, the perceived value of your product drops in an instant."
To nail your visuals every time, it's worth diving into more tips to capture stunning product shots.
Preventing Shadows Before the Shutter Clicks
The most effective way to get rid of shadows in a picture is to prevent them from appearing in the first place. Getting your lighting right during the photoshoot will save you countless hours and a significant chunk of your budget in post-production.
This is the difference between a quick, seamless content workflow and a tedious editing bottleneck that holds everything up.
It’s a core principle behind the clean, minimalist aesthetic of brands like Everlane. Their product pages feature apparel under soft, even light, where every fabric detail is visible and the colors are true to life. That’s the result of a meticulously controlled lighting environment.
Mastering Your Lighting Setup
The foundation of shadow-free photography is a classic technique called three-point lighting. This setup uses a combination of lights to sculpt your product, eliminate dark spots, and create a sense of depth without any harshness.
Here’s the basic breakdown:
- Key Light: Your main, brightest light source, usually positioned at a 45-degree angle to the product.
- Fill Light: Placed on the opposite side, this less intense light "fills in" the shadows created by the key light, softening them.
- Back Light: Positioned behind the product, this light separates it from the background and stops the image from looking flat.
For fashion photography, direct, hard light is your enemy. Diffusers and softboxes are essential tools that scatter the light beam, creating a gentle, wrapping light that flatters textures instead of carving out stark shadows. You can dive deeper into creating a controlled environment with our guide on building a light box for product photography.
Essential Lighting Gear for Shadow-Free Photoshoots
This table provides a starting point, but often, a simple reflector and a single light source are all you need to dramatically improve your images.
The Power of Bouncing Light
You don't always need more lights to kill shadows; sometimes, you just need to redirect the light you already have. This is where reflectors come in.
A simple white foam board or a professional silver reflector can be positioned to bounce light from your key source into darker areas, like under the arm of a jacket or inside a handbag.
A small boutique can achieve a high-end look with just one main light, a large window for fill, and a white reflector. It's a budget-friendly setup that produces remarkably professional, shadow-free images.
The goal is always to create diffuse, multi-directional light. When light comes from several angles and is softened, it wraps around the product, leaving no place for hard shadows to hide.
Camera Settings for a Perfect Exposure
Your camera settings are the final piece of this puzzle. An underexposed image will always have more visible noise and shadows, even with perfect lighting.
Keep your ISO as low as possible (ideally 100–200) to minimize grain. Use a wider aperture (like f/4 or f/5.6) to let in plenty of light, and then adjust your shutter speed to get the exposure perfect. Nailing the exposure in-camera makes all your lighting efforts pay off.
Manually Removing Shadows in Post-Production
Even with a near-perfect lighting setup, subtle shadows can still creep into your product photos. Knowing how to clean them up in post-production is a critical skill for any fashion brand.
For most in-house creative teams, Adobe Photoshop and Lightroom are the go-to tools. They're packed with features designed for the precise work needed for clean apparel photography.
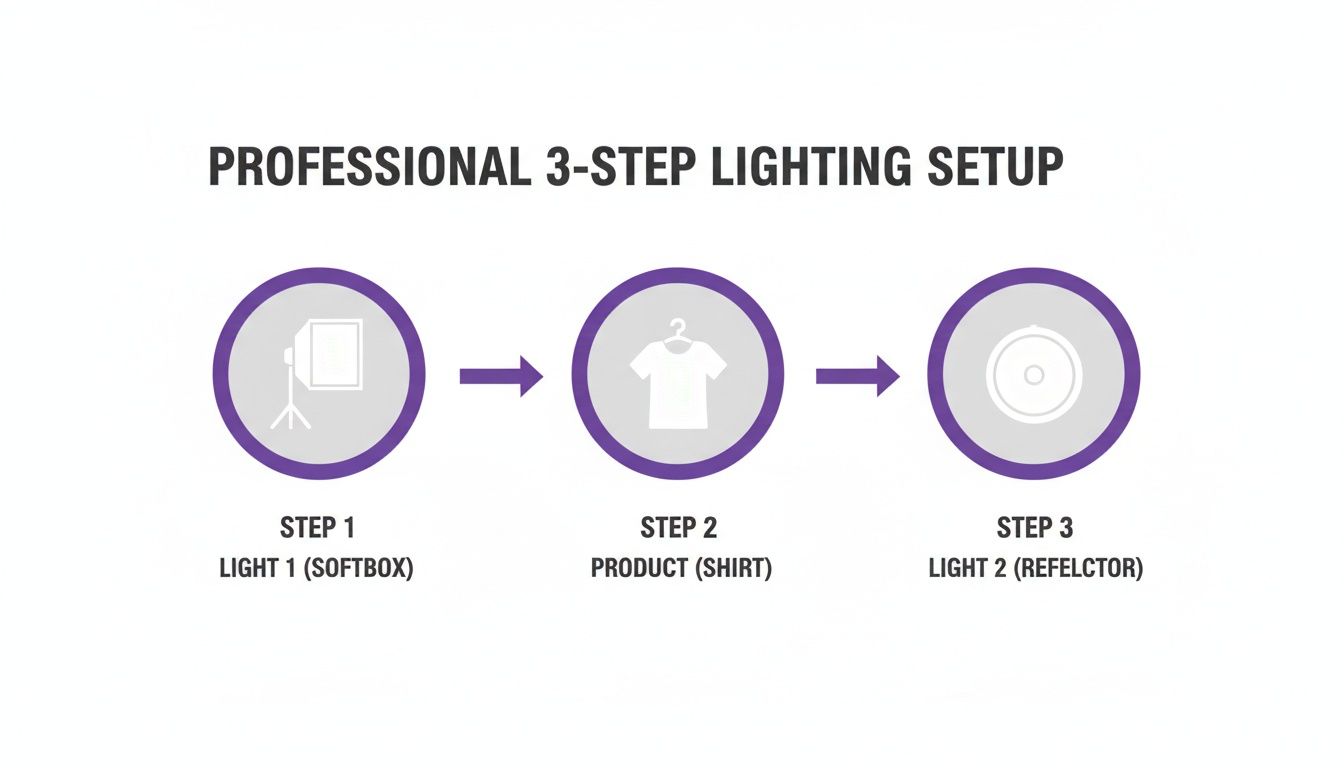
The diagram above shows a simple but effective lighting arrangement that minimizes shadows from the start. Combining a main light with a reflector creates a balanced, wrap-around light that drastically cuts down on heavy editing later.
Core Techniques for Clean Edits
Your most reliable tools for shadow removal are the Clone Stamp and the Healing Brush. The Clone Stamp tool copies pixels exactly, making it perfect for spots with uniform color and texture, like a plain cotton t-shirt.
The Healing Brush is smarter. It blends the texture, lighting, and shading of the pixels you sample with the area you're fixing. This makes it a better choice for fabrics with subtle patterns, creating a more seamless result. For a deeper dive, check our guide on e-commerce photo editing.
A classic mistake is using a brush that’s too hard or big, which creates obvious, blotchy patches. Always use a soft-edged brush and build up the correction gradually with low opacity strokes. The goal is to make the fix invisible.
Advanced Methods for Delicate Fabrics
When dealing with a shadow on delicate lace or a richly textured wool sweater, you need a more advanced technique. Frequency Separation is a method professional retouchers use to separate an image’s texture from its color and tone.
This lets you work on the shadow (the luminosity) without smudging or destroying the fabric's intricate details.
Another powerful method is using Adjustment Layers with Masks:
- Create a Curves or Levels adjustment layer.
- Brighten the image until the shadowed area looks correct.
- Fill the layer mask with black, which hides the adjustment.
- Using a soft, white brush at a low opacity, carefully paint over the shadow on the mask to reveal the brightening effect only where you need it.
This technique gives you incredible, non-destructive control.
How AI Tools Slash Shadow Removal Costs and Timelines
Manual editing delivers precision, but it’s a huge time suck. A skilled editor might spend 15-20 minutes correcting shadows on a single image. For fast-moving fashion brands, that time creates a serious operational bottleneck.
AI-powered shadow removal tools deliver studio-quality results instantly, slashing post-production timelines and costs.
Think of a brand like Zara or H&M; they use this kind of tech to accelerate content production for weekly drops. This automation frees them from expensive and lengthy editing cycles, meaning they get products online and in front of customers faster.
Platforms like Picjam even integrate intelligent shadow correction directly into the AI photoshoot process itself. You can produce entire campaigns with consistent, professional lighting without a single minute of manual retouching. That’s a massive saving in both time and money.
The Tech Behind Instant Shadow Removal
This isn't just a basic filter. The technology gained momentum with events like the NTIRE 2023 Image Shadow Removal Challenge, which used a dataset of 1,200 real shadow and shadow-free image pairs to train AI models.
For fashion brands, where a bad shadow can kill a product’s appeal, this progress is a huge deal. You can discover more about the technical benchmarks of this challenge if you want to dive into the details.
By automating the tedious parts of post-production, AI doesn't replace creativity; it unlocks it. Your team can spend less time on repetitive fixes and more time on compelling campaign concepts.
The Bigger Picture for Brand Operations
Automating tasks like shadow removal is part of a larger trend in ecommerce. To get a sense of the broader impact, just look at how various AI business solutions are reshaping everything from inventory management to customer service.
For fashion brands, this adds up to a more agile content strategy. When you learn how to get rid of shadow in picture using AI, you open up powerful new possibilities:
- Launch Faster: Squeeze your image production timeline from days or weeks to hours.
- Cut Costs: Ditch the need for expensive, specialized retouchers for every product photo.
- Stay Consistent: Ensure every product photo has the same clean, professional finish.
This shift from manual correction to AI generation is the new competitive edge for modern fashion brands. Read more about AI-driven workflows in our guide on how to add background to Photoshop.
Handling Shadows in On-Model and Portrait Photography
Removing shadows from a photo with a person in it is a different ballgame. You need to get rid of distracting shadows without sacrificing natural skin tones, textures, and the features that make the model look human.
If you throw a generic shadow removal tool at a portrait, the results are often a disaster. The algorithm can’t tell the difference between an unwanted shadow and the natural contours of a face, resulting in plastic-looking skin and weird color shifts.
Why Generic Tools Fail on Portraits
For fashion brands crafting lifestyle imagery, authenticity is king. A badly edited on-model photo can shatter customer trust. Standard tools often cause:
- Loss of Texture: Overly aggressive shadow removal can erase fine details like pores, giving the model an uncanny, fake appearance.
- Color Inaccuracy: When you remove shadows incorrectly, you can be left with bizarre green or magenta splotches on the skin.
- Identity Distortion: Harsh editing can literally change the structure of a model's face, smoothing over defining features.
This is why portrait shadow removal has become a specialized field in AI development. Dedicated AI models like GraphFFNet have been trained specifically on facial datasets to handle these nuances with care. You can read the full research on this specialized AI approach to see just how deep the tech goes.
Think about a brand like Glossier. Their entire identity is built on celebrating natural beauty. An artificial, "Photoshopped" look would be completely off-brand. Their success relies on authentic, beautifully lit portraits where the product enhances features, not erases them.
This is a problem that platforms like Picjam’s virtual model studio completely sidestep. Instead of fixing a flawed photo, brands can generate photorealistic models with perfect, studio-quality lighting already built in.
Takeaway: 3 Actionable Steps for Shadow-Free Photos
Prioritize Prevention: Master a simple two-softbox lighting setup. Placing one light at a 45-degree angle and another opposite to fill in shadows eliminates most issues before they start, saving significant post-production time.
Learn Non-Destructive Editing: For manual fixes in Photoshop, use Adjustment Layers with Masks. This technique lets you brighten shadows selectively without permanently altering the original image, giving you total control over the final look.
Automate with AI for Scale: For high-volume product catalogs, integrate an AI tool like Picjam. It automates shadow removal, drastically cutting down on editing costs and time-to-market while maintaining a consistent, professional brand aesthetic.
Curious about the savings? Compare your current photography costs with Picjam's AI-powered workflow using our savings calculator.

Picjam team
The Picjam team blends AI, product, and creative expertise to eliminate the cost and delay of traditional photography for modern eCommerce brands.