A Guide to the Best Flat Lay Photography Tripod Setups
Discover the right flat lay photography tripod to create pro-level product shots. Get expert tips on setup, lighting, and camera settings for ecommerce.
How to start saving money
Lorem ipsum dolor sit amet, consectetur adipiscing elit lobortis arcu enim urna adipiscing praesent velit viverra sit semper lorem eu cursus vel hendrerit elementum morbi curabitur etiam nibh justo, lorem aliquet donec sed sit mi dignissim at ante massa mattis.
- Neque sodales ut etiam sit amet nisl purus non tellus orci ac auctor
- Adipiscing elit ut aliquam purus sit amet viverra suspendisse potent i
- Mauris commodo quis imperdiet massa tincidunt nunc pulvinar
- Adipiscing elit ut aliquam purus sit amet viverra suspendisse potenti
Why it is important to start saving
Vitae congue eu consequat ac felis placerat vestibulum lectus mauris ultrices cursus sit amet dictum sit amet justo donec enim diam porttitor lacus luctus accumsan tortor posuere praesent tristique magna sit amet purus gravida quis blandit turpis.

How much money should I save?
At risus viverra adipiscing at in tellus integer feugiat nisl pretium fusce id velit ut tortor sagittis orci a scelerisque purus semper eget at lectus urna duis convallis. porta nibh venenatis cras sed felis eget neque laoreet suspendisse interdum consectetur libero id faucibus nisl donec pretium vulputate sapien nec sagittis aliquam nunc lobortis mattis aliquam faucibus purus in.
- Neque sodales ut etiam sit amet nisl purus non tellus orci ac auctor dolor sit amet
- Adipiscing elit ut aliquam purus sit amet viverra suspendisse potenti
- Mauris commodo quis imperdiet massa tincidunt nunc pulvinar
- Adipiscing elit ut aliquam purus sit amet viverra suspendisse potenti
What percentage of my income should go to savings?
Nisi quis eleifend quam adipiscing vitae aliquet bibendum enim facilisis gravida neque. Velit euismod in pellentesque massa placerat volutpat lacus laoreet non curabitur gravida odio aenean sed adipiscing diam donec adipiscing tristique risus. amet est placerat imperdiet sed euismod nisi.
“Nisi quis eleifend quam adipiscing vitae aliquet bibendum enim facilisis gravida neque velit euismod in pellentesque massa placerat”
Do you have any comments? Share them with us on social media
Urna ut fermentum imperdiet lacus, elementum etiam maecenas libero nunc, suspendisse massa, nisl, elit curabitur feugiat in quis ut nibh enim in tristique aliquam sed vitae dui, dis adipiscing pharetra aliquam turpis turpis nibh rhoncus enim, pellentesque leo laoreet neque in sed bibendum fermentum suspendisse tempus non purus adipiscing suscipit fringilla adipiscing convallis dolor nulla fermentum facilisis ullamcorper ut vehicula tortor libero metus donec velit, tristique fermentum, dictum euismod diam scelerisque enim non pharetra tristique lectus habitant pharetra est id
When a fashion brand like Everlane shoots its minimalist basics, every photo is perfectly aligned. This precision isn’t an accident — it’s the result of a flat lay photography tripod setup. This gear does more than hold a camera; it eliminates blur, ensures shot-to-shot consistency, and captures the fabric textures that convince customers to buy.
The camera accessories market is growing because brands know that high-quality visuals directly impact sales. For apparel brands wanting to create professional content without the high cost of traditional photoshoots, AI tools like Picjam can transform a single clean flat lay into hundreds of on-model images, drastically reducing content expenses. But it all starts with one flawless source photo.
How a Great Tripod Directly Increases Perceived Brand Value
A shaky, misaligned product photo can signal low quality to a potential customer. This is why a dedicated flat lay photography tripod is a non-negotiable tool for any serious e-commerce brand.
Stability Creates Sharpness
Even a minor handshake introduces motion blur, softening the details shoppers rely on to judge fabric and stitching. A stable overhead tripod locks the camera in place, allowing you to use longer exposures without losing sharpness.
This is the kind of detail that elevates a product listing to the premium feel seen on sites like Net-a-Porter or SSENSE. According to a McKinsey report, brands that invest in superior visual presentation often see a significant lift in conversion rates.
Consistency Builds Brand Trust
When shooting an entire collection, every image needs the same angle, height, and framing. A tripod locks in these variables, creating a cohesive, professional look across your website and social media.
This visual consistency is what makes a brand feel polished and reliable. Look at how a brand like Reformation presents its dresses with a clean, uniform style — a tripod is the quiet workhorse making that consistency possible.
How to Select the Right Flat Lay Photography Tripod Rig
Not every tripod can handle the specific demands of an overhead product shot. Your choice depends on your budget, space, and the products you shoot. A minimalist brand shooting t-shirts can use a lighter setup, while a luxury brand capturing intricate accessories needs a heavy-duty studio stand for rock-solid stability.
Let's break down the hardware. The goal is to find a setup that delivers stability, safety, and versatility for your apparel photography. Get this right, and you'll have the perfect source images for your website or for generating AI model photos.
Comparing Flat Lay Tripod Setups
Choosing the right rig boils down to a few key options, each with its own trade-offs. This table breaks down the most common setups we see fashion brands using.
Ultimately, a C-stand is the studio workhorse for a reason, but a 90-degree column tripod is often sufficient for getting started.
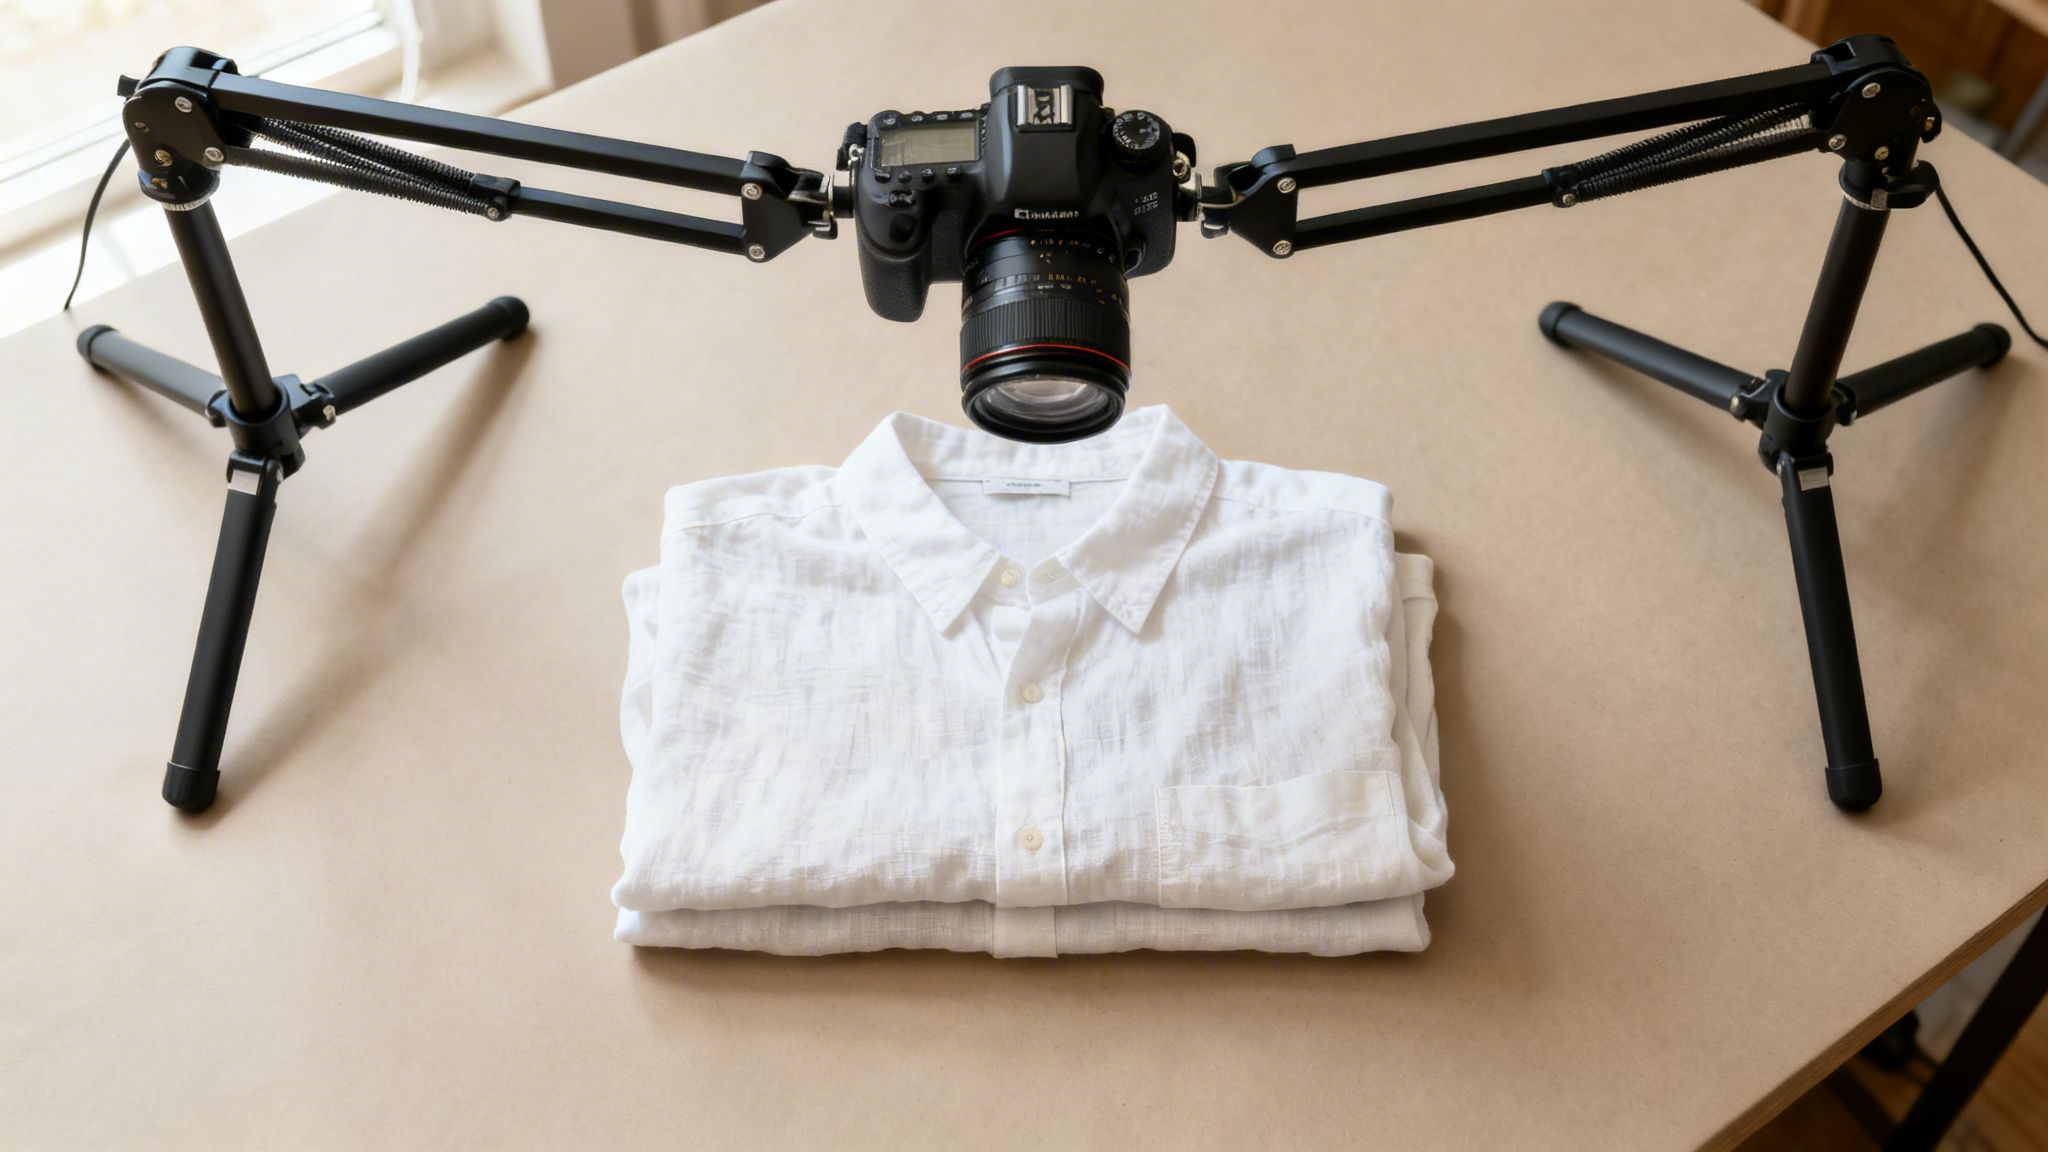
Tripods with a 90-Degree Center Column
This is the most common option for brands starting with flat lays. The center column can be pulled out and reinserted horizontally, allowing you to position your camera directly overhead without the tripod legs getting in the shot.
- Best For: Small to medium-sized apparel like t-shirts and accessories. They are a perfect fit for brands working out of a small studio or office.
- Key Consideration: Always use a counterweight. Hang your camera bag or a sandbag from the opposite end of the arm to prevent the rig from tipping over.
You can easily imagine a brand like Madewell using this setup for clean, consistent shots of their signature denim and leather goods.
C-Stands and Boom Arms
For larger items or greater flexibility, a C-stand with a boom arm is the professional standard. Originating from the film industry, they are incredibly stable and can support heavier camera and lens combinations.
This is the rig for shooting larger apparel like coats and dresses. High-volume brands like Zara, needing to shoot thousands of new items quickly, depend on this kind of robust studio equipment for reliability and speed.
The global tripod market trends at TechSci Research show the market was valued at USD 0.4221 billion in 2024 and is expected to hit USD 0.5474 billion by 2035, driven by brands investing in better visuals.
Getting the Right Setup for Your Workflow
The right rig always comes back to your specific products and workflow. While a C-stand offers ultimate stability, a quality tripod with a 90-degree column might be all you need for smaller shoots.
For a deeper dive into other gear, check our guide on the ideal equipment for product photography. Investing in a stable overhead rig pays for itself by delivering sharp, perfectly aligned images every time.
How to Safely Mount Your Camera for Overhead Shots
Hanging an expensive camera and lens over your products can be nerve-racking. A secure mount isn't just about preventing disaster — it’s about locking in the perfect alignment needed for great e-commerce shots and advanced AI workflows.
First, check the load capacity of your tripod and head. Add up the weight of your camera body, lens, and any adapters. If you're close to the maximum, you are risking an expensive crash.
This quick decision tree can help you determine the support you need for a stable overhead shot.
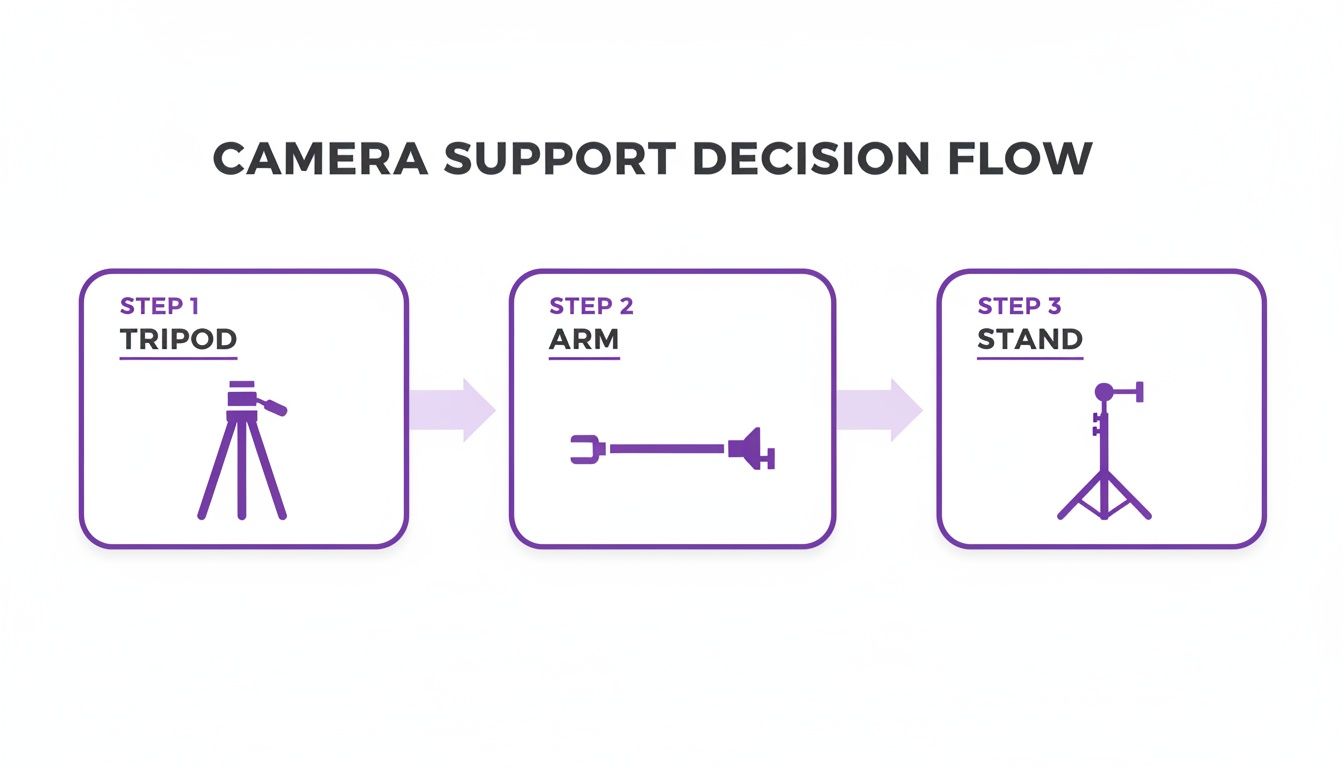
As you can see, the more stability you need, the more robust your rig has to be, escalating from a standard tripod to a full C-stand.
Counterweights Are Non-Negotiable
When you extend your camera on a horizontal arm, a counterweight is your primary defense against gravity. This isn't an optional accessory; it's a fundamental part of the setup.
A simple sandbag or your camera bag, hung on the opposite end of the arm, is all it takes to keep the whole rig from tipping over. A good rule of thumb is to make your counterweight heavier than your camera rig.
Double-Check Every Connection
Once balanced, perform one last safety check. I do this every single time.
- Legs: Are the tripod legs spread as wide as possible for the most stable base?
- Knobs and Levers: Tighten every single knob, from the leg locks to the head adjustments. Then, give the whole setup a gentle but firm nudge to check for wobbles.
- Camera Plate: Is the quick-release plate screwed tightly to your camera and clicked securely into the tripod head? Give it a little wiggle to be sure.
Spending an extra minute on these checks builds the confidence to shoot without worrying about your gear. It turns a stressful process into a reliable, repeatable part of your workflow.
Mastering Camera Settings for Flawless Flat Lays
With your flat lay photography tripod locked in, it’s time to dial in your camera settings. This is where a good shot becomes a high-converting asset.
The goal is a single, perfectly sharp, color-accurate 'master' image. This file becomes the flawless foundation for your e-commerce site or for generating on-model content with AI.
Finding the Sweet Spot for Aperture
For apparel flat lays, the main challenge is getting the entire garment in sharp focus. Many people mistakenly use a wide-open aperture (like f/1.8), creating a shallow depth of field that leaves parts of the product blurry.
To get edge-to-edge crispness, use a smaller aperture, which means a higher f-stop number.
- Recommended Starting Point: I always start with my aperture set to f/8.
- For Thicker Items: For a bulky sweater or puffy jacket, you might need to stop down to f/11 to ensure every detail is sharp.
This ensures everything from the fabric’s texture to the button finish is crystal clear. To truly make your images pop, you need to master pro camera settings for stunning visuals.
Nailing Exposure with ISO and Shutter Speed
The beauty of a tripod is its stability, giving you the freedom to keep your ISO as low as possible. An ISO of 100 or 200 will produce the cleanest image, free of the grainy noise that makes photos look cheap.
Since the camera is stable, you can use a slower shutter speed to compensate for the smaller aperture and low ISO. Simply let more light into the camera over a longer period, using your camera's light meter to find the perfect balance.
The tripod market is projected to grow from USD 735.76 million in 2025 to over USD 1.1 billion by 2032. This growth is partly driven by DTC brands who rely on high-quality flat lays to compete. See more insights about these market trends from Reanin.
Achieving True-to-Life Colors
There's nothing worse in fashion e-commerce than a return because "the color looked different online." Your White Balance setting is the key to preventing this.
While "Auto White Balance" can work, set it manually for total consistency. Use a gray card for perfect accuracy, or set it based on your light source (like "Daylight" or "Tungsten"). This guarantees every product has the same color profile, which is critical for a professional store. Check our guide on the best camera for product photography for more tips.
Pro Styling and Lighting Tips for E-commerce Shoots
Locking your camera down on a flat lay photography tripod ensures a sharp, stable image. But the magic that turns a product shot into something that sells happens with lighting and styling.
A good tripod ensures people see your product clearly. Great styling makes them feel something about it.
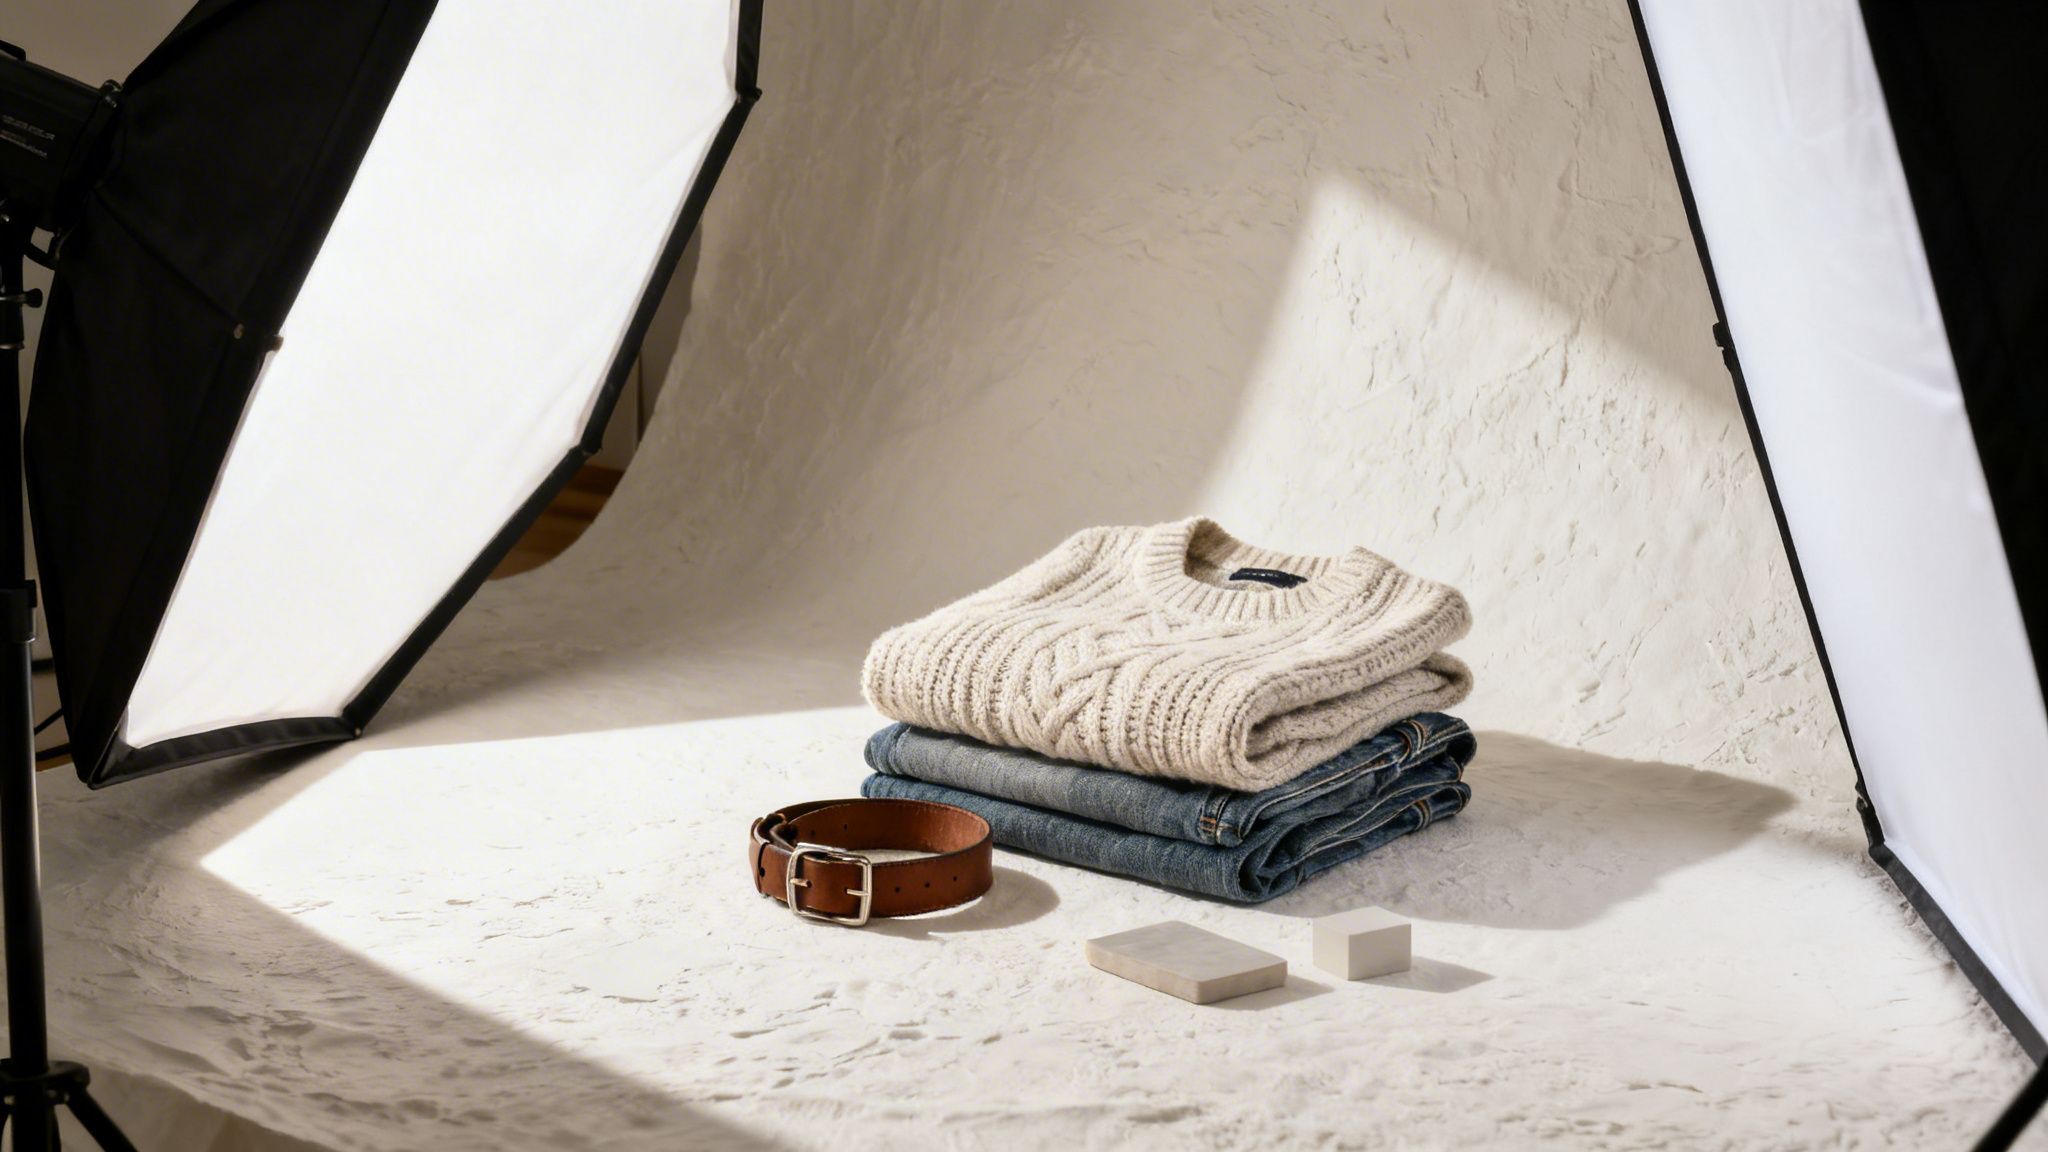
Mastering Your Light Source
For any flat lay, the goal is a big, soft, scattered light source. This mimics natural light from a large window, which is flattering and avoids harsh shadows that diminish product appeal.
A single large softbox, positioned at a 45-degree angle, is the professional go-to. This creates soft shadows that give clothing texture and shape. On a budget, a large, north-facing window on an overcast day provides a similar effect.
If shadows are too dark, use a white foam core board as a reflector. Bouncing light back into the shadows will soften them and reveal more detail.
Creating Authentic Compositions
Styling is about setting a mood and telling the viewer’s eye where to go. A recent Statista study found that 73% of US consumers are more likely to buy after seeing a video of a product — the same principles of visual storytelling apply to your still photos.
Look at how a brand like Allbirds styles its flat lays. The shots feel effortless and natural. A shoelace might be loosely tied, or a pair of shoes angled slightly. This adds a human element that helps a customer picture themselves using the item.
Practical Styling Tips That Convert
You don't need a degree in art direction to create great compositions. Start with these field-tested techniques.
- Create Depth and Layers: Don’t lay everything perfectly flat. A T-shirt with a few wrinkles or a scarf with some volume adds dimension and feels more organic.
- Use the Rule of Thirds: Mentally draw a tic-tac-toe grid over your frame. Instead of centering your product, place it along one of the lines or at an intersection for a more engaging photo.
- Tell a Story with Props: Stick to 1 or 2 small props that make sense. For jeans, a simple leather belt or sunglasses works. Keep it simple and relevant.
For smaller accessories, the details are everything. Check out these Top Jewelry Photography Tips to Boost Your Sales for a deeper dive.
Frequently Asked Questions
When diving into overhead apparel photography, a few questions always come up. Let's tackle the most common ones.
Can I Use a Regular Tripod for Flat Lays?
While I appreciate the hustle, the answer is no — not for clean shots. A standard tripod's legs will inevitably get in the frame when you point the camera straight down. You need a tripod with a 90-degree tilting center column or a separate horizontal arm for an unobstructed top-down view.
What Is the Best Lighting for Flat Lay Photos?
You're looking for light that is large, soft, and diffuse. This is the secret to avoiding harsh shadows that can make beautiful fabrics look cheap.
Brands like Cuyana achieve their clean aesthetic with either a big softbox positioned to the side or by shooting next to a large window on an overcast day. This light wraps around the product, highlighting texture without creating distracting shadows.
How Do I Keep My Entire Product in Focus?
To ensure every detail is sharp, control your depth of field. Use a smaller aperture, which means a higher f-stop number.
I always recommend an aperture between f/8 and f/11. This gives you a much wider depth of field, ensuring the entire product is perfectly crisp. It’s a simple but critical adjustment for professional images that sell.
Takeaway
- Invest in Stability First: Your top priority is a stable overhead setup. Choose a flat lay photography tripod with a 90-degree column or a C-stand to eliminate blur and ensure consistency. This is the foundation of all high-quality product imagery.
- Master Your Camera Settings for Sharpness: Use a small aperture (f/8–f/11) to keep the entire product in sharp focus and a low ISO (100–200) to avoid grainy images. The stability from your tripod makes this possible.
- Leverage a Single Photo for Maximum ROI: A single, perfect flat lay is a powerful asset. Use it as the source image for AI tools like Picjam to generate an entire campaign’s worth of on-model and lifestyle content, saving thousands on traditional photography costs.
Ready to see how much your brand can save? Use our photography cost calculator to compare your current content expenses with Picjam's AI-powered solution.

Picjam team
The Picjam team blends AI, product, and creative expertise to eliminate the cost and delay of traditional photography for modern eCommerce brands.