How to Photograph Jewellery to Boost E-commerce Sales
Learn how to photograph jewellery with expert tips on lighting, camera settings, and AI-powered workflows to create images that sell.
Leading jewellery brands know that exceptional product images are non-negotiable. The secret to learning how to photograph jewellery isn’t just about gear — it’s about managing light and reflections. Using diffused sources like a softbox or a light tent is what separates amateur shots from professional ones, giving you that brilliant sparkle without harsh, distracting glare.
How to Build a Cost-Effective Jewellery Photography Setup
Amazing jewellery photos are the result of a deliberate, controlled setup. It might seem intimidating, but the core pieces are surprisingly straightforward. For global brands like Tiffany & Co. or a solo artisan on Etsy, the quality of their product shots is a direct reflection of their craftsmanship.
This simple breakdown shows the three pillars of a successful jewellery photography setup.

As you can see, your camera, lighting, and backdrop must work together. With platforms like Picjam, a single well-lit shot on a plain background can be transformed into hundreds of on-brand lifestyle images, saving brands significant time and money on traditional photoshoots.
Choosing the Right Camera and Lens for Detail
While a modern DSLR or mirrorless camera works well, the lens is the true star. For jewellery, a macro lens isn't just a recommendation; it's essential. A focal length around 100mm is the industry standard because it lets you get incredibly close to capture tiny details with breathtaking clarity.
A true macro lens offers a 1:1 magnification ratio, projecting an image onto your camera's sensor at its actual size. This is how you get razor-sharp shots that let a customer inspect a piece online. For a deeper dive, check out this guide on how to photograph jewelry for stunning results.
The Critical Role of Lighting in Sparkle and Shine
If you only have the budget to invest in one area, make it lighting. Jewellery is notoriously reflective, and bad lighting is the number one reason photos look amateurish. The goal is to create soft, diffused light that eliminates harsh shadows and tames distracting hot spots.
There are 2 fantastic ways to get this done:
- A Light Tent or Lightbox: This is a cube made of translucent white fabric that diffuses light. You place your jewellery inside and shine lights from the outside, creating an even, soft glow. We have a whole guide on picking the right light box for product photography.
- Softboxes: These are light modifiers you attach to your strobes or continuous lights. A large softbox placed close to the jewellery will produce beautiful, gentle light. I often use 2 — one on each side — for a balanced look.
The real challenge in jewellery photography isn't just lighting the piece; it's controlling what is reflected in the piece. A lightbox essentially creates a clean, white world for the jewellery to reflect, which is precisely why it works so well.
Selecting Backgrounds That Elevate Your Brand
Your background truly sets the stage. For standard e-commerce listings, a pure white or light grey background is the gold standard. It’s clean, removes all distractions, and makes your product the hero. A simple roll of seamless paper is an affordable and effective solution.
For social media and marketing campaigns, you should get more creative. Brands often use materials that match their aesthetic:
- Marble slabs add a touch of luxury.
- Linen fabric gives off a soft, organic vibe.
- Slate or concrete can create a modern, edgy feel.
The key is ensuring the background complements the jewellery without overpowering it. Every texture and color should add context, not visual noise.
How to Dial In Camera Settings for Flawless Focus
Once your setup is ready, the real work of how to photograph jewellery happens inside your camera. The settings you choose separate a blurry snapshot from a crisp, professional image that sells. Mastering aperture, ISO, and shutter speed is key to creating photos that look as valuable as the pieces themselves.

Think of these settings as your primary tools for controlling focus, light, and sharpness. They're how you make sure every tiny facet is rendered perfectly.
Mastering the Exposure Triangle for Maximum Sharpness
The "exposure triangle" — aperture, ISO, and shutter speed — is the foundation of photography. For jewellery, your main goals are maximum sharpness and zero noise.
- Aperture (f-stop): This is your most critical setting. To get an entire ring sharp from front to back, you need a deep depth of field. Use a narrow aperture, like f/11 or f/16. A wide aperture like f/2.8 is wrong for a product shot where customers need to see every detail.
- ISO: Your mantra here is "low as you can go." Always stick to your camera's base ISO, usually ISO 100 or 200. Higher ISOs introduce digital noise, which ruins fine details.
- Shutter Speed: With a narrow aperture and low ISO, your shutter speed will be slow — from 1/15th of a second to a full second or longer. This is why a sturdy tripod and a remote shutter are non-negotiable to prevent blur.
For more on gear, see our guide on the best camera for product photography.
Recommended Camera Settings for Jewellery Photography
These settings are a fantastic starting point. Tweak them based on your specific lighting and the item you're shooting.
Get Flawless Focus Across Intricate Pieces with Focus Stacking
For intricate pieces like engagement rings, even f/16 might not be enough to get every part perfectly sharp. This is where focus stacking comes in. It’s the secret behind impossibly crisp high-end watch and jewellery ads.
Focus stacking is simple in concept: you take multiple photos, slightly adjusting the focus point for each shot without moving the camera. You then merge these images in software like Adobe Photoshop to create a single, flawlessly sharp composite.
This technique ensures that from the closest prong to the furthest edge of the band, every detail is crystal clear. It’s a non-negotiable process for luxury brands like Cartier, where every millimeter must communicate perfection.
Composing Your Shot for Higher Conversion
How you frame the jewellery — its composition — tells a story. While a clean, centered shot is essential for a product page, you'll need more dynamic compositions for social media and ads.
- Rule of Thirds: Imagine your frame divided into a 3x3 grid. Place your product on one of the intersecting lines to create a more balanced and engaging image.
- Negative Space: Don't be afraid to leave empty space around the jewellery. It gives the item room to breathe and creates a feeling of elegance. Brands like Mejuri are masters of this minimalist approach.
- Vary Your Angles: Shoot every piece from multiple angles: a top-down flat lay, a classic 45-degree angle, and a straight-on shot. This gives customers a full picture and provides content for different marketing needs.
How Styling Can Increase Perceived Value
Getting the technical side right is just the foundation. Styling is where your brand's heart really starts to beat. Jewellery sells an aesthetic, a feeling, a lifestyle. This is where you shift from taking a picture to creating an image that connects with your audience.
Great styling transforms a simple product shot into brand storytelling.

It’s all about curating a miniature world that reflects your brand. Every prop, texture, and background choice needs to feel intentional.
Curate Props That Complement, Not Compete
The golden rule of styling: props must always support the jewellery, never overshadow it. Brands like Mejuri and Catbird have mastered this with minimalist props and neutral backdrops to build a sense of accessible luxury.
When picking props, ask yourself what story you're telling.
- For Elegance: Use materials like marble slabs, silk fabrics, and delicate glassware.
- For a Boho Vibe: Incorporate elements like dried flowers, raw linen, and textured stones.
- For a Modern Look: Think about using concrete blocks, metal trays, or bold geometric shapes.
Consistency is key. If your brand is modern and minimalist, stay away from rustic props. Every styling choice should align with your brand identity.
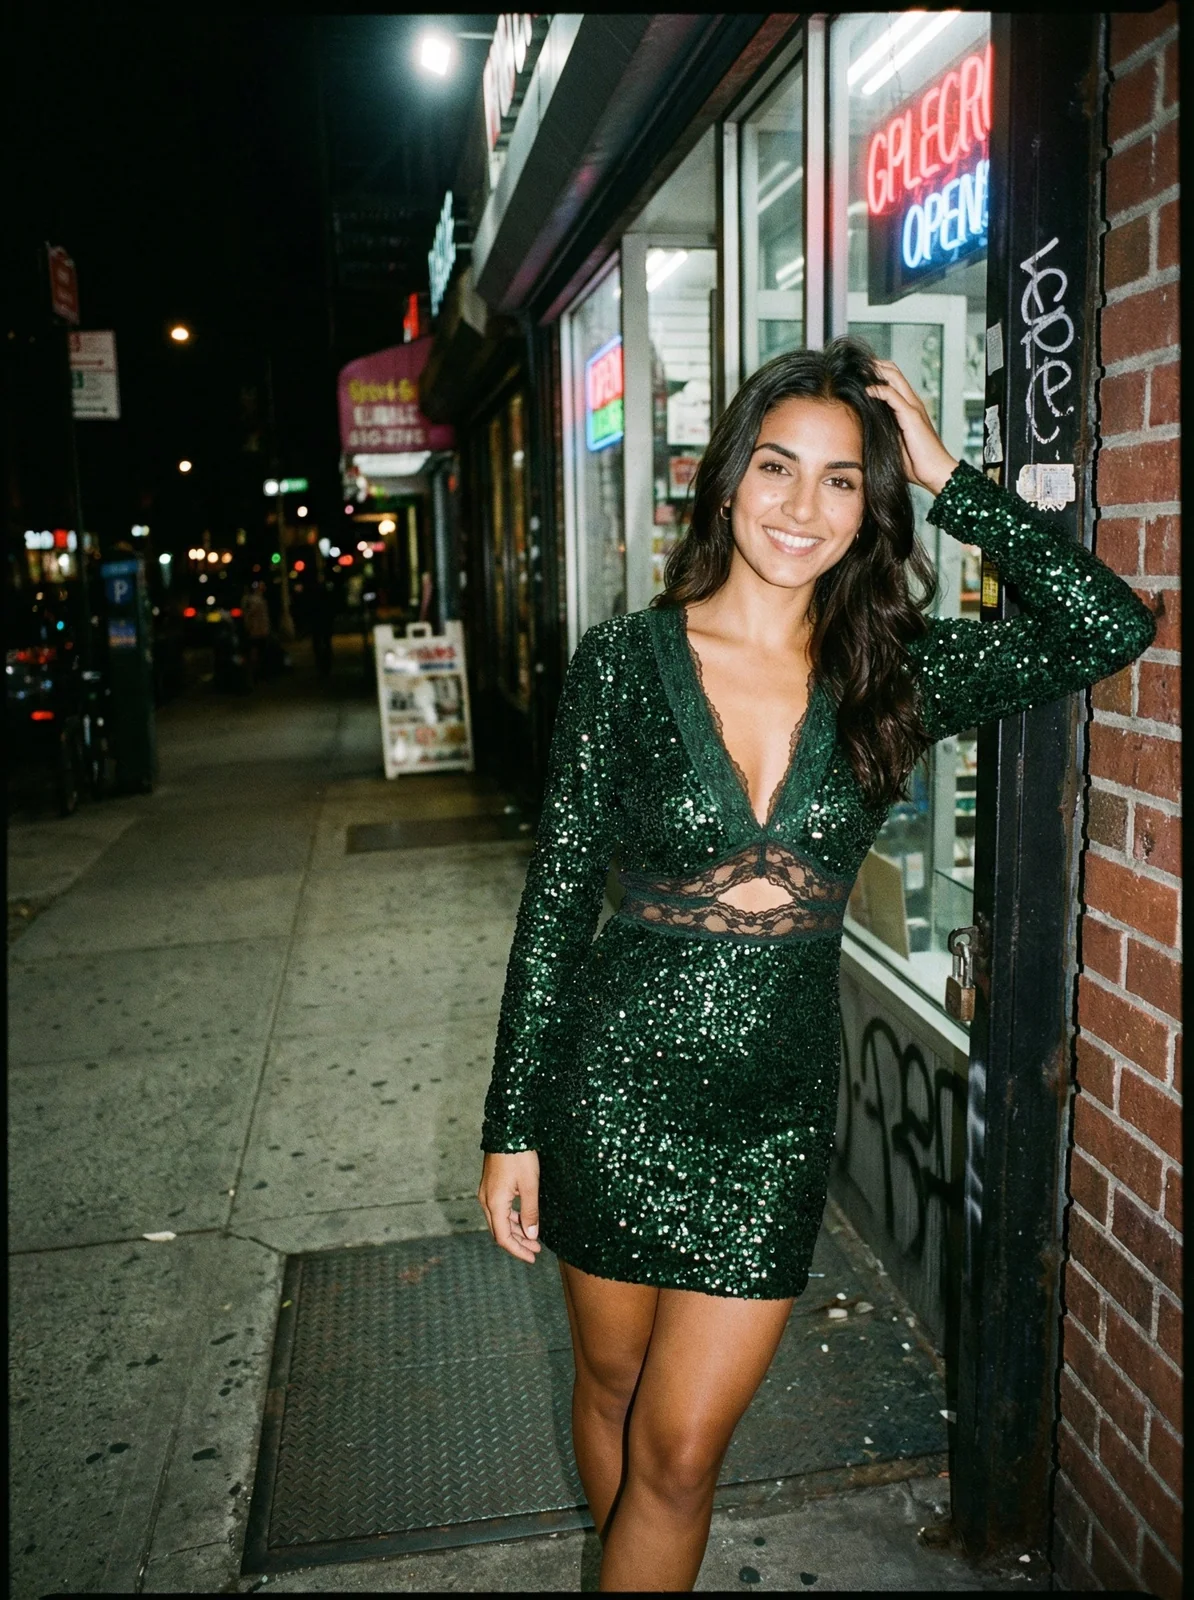
Why On-Model Photography Boosts Sales
Product-only shots are essential for clarity, but on-model photography brings jewellery to life. It instantly answers crucial questions for the customer: How big is that earring? How does that necklace lay?
Showing pieces on a person provides vital context and scale that a simple product shot can't deliver.
Directing a model for jewellery is a specific skill. Aim for natural-looking poses that highlight the piece. For rings and bracelets, focus on relaxed hand gestures. The goal is an image that feels like a believable, aspirational moment.
Vogue Business reports that 82% of fashion brands are already incorporating AI tools into their workflows. This points to a clear trend: static imagery is a path to lost sales, and AI provides the speed needed to keep up.
Avoid These Common Styling Mistakes
Just as good styling can elevate your brand, a few common mistakes can undermine it. Knowing what to avoid is a crucial part of learning how to photograph jewellery.
- Overly Cluttered Compositions: Too many props create visual noise and can make the product look cheap.
- Inconsistent Aesthetics: Using a different style for every shoot shatters brand recognition. Develop a signature look.
- Ignoring Details: Make sure props are spotless and fabrics are clean. Small imperfections distract from your jewellery's quality.
Beyond individual pieces, incorporate styling techniques that add appeal, like stacking. You can learn more about how to stack bracelets to get started.
How Post-Production Polishes Your Final Images
The camera captures the raw material, but the final magic happens in post-production. This is where you transform a great photo into an impeccable one. For any brand figuring out how to photograph jewellery, mastering a few key editing techniques is as critical as the photoshoot itself.
Editing isn't about faking quality; it's about revealing the true beauty that the camera couldn't fully capture. It’s the final step in ensuring your product looks as valuable online as it does in person.
The Essential Retouching Workflow for Jewellery
Your post-production should follow a consistent sequence. Use software like Adobe Lightroom for initial adjustments and then jump into Photoshop for detailed work.
Start with global adjustments before moving to localized fixes. This approach saves time and prevents backtracking.
- Color Correction: Getting the color of metals and gemstones right is non-negotiable. A slight yellow cast can make platinum look like white gold. Use the white balance tool to ensure your colors are true to life.
- Exposure and Contrast: Tweak the brightness and contrast to make the image pop without blowing out highlights or crushing shadow detail.
- Dust and Blemish Removal: Even in a clean studio, tiny specks of dust will land on your jewellery. Zoom in to 100% and use the Spot Healing Brush in Photoshop to meticulously remove every imperfection.
How to Conquer Reflections and Enhance Sparkle
Reflections are the biggest challenge in jewellery photography. Post-production is where you nail the final look. The goal isn't to eliminate all reflections but to clean up distracting ones, like the reflection of your camera.
Carefully use the Clone Stamp Tool to replace unwanted reflections with a clean metal texture. You can find more methods in our guide on how to remove reflections in Photoshop.
To make gemstones sparkle, use selective sharpening and contrast adjustments. In Photoshop, use a layer mask to apply sharpening only to the facets of a diamond. A slight increase in localized contrast will make the stone look more brilliant.
"I still struggle with it," admits jewellery designer Dana Thorup about managing reflections. "I guess what I have learned is to create a white box to keep reflections out. Use good lighting and use photoshop to help clean up the photos." This shows even seasoned creators rely on post-production for a polished look.
How to Optimize Images for E-commerce Success
Once your image is retouched, the final step is exporting it correctly for the web. This is a balance between image quality and file size, because slow-loading pages kill conversion rates.
File Format and Sizing:
- JPEG: Use for most product photos. Export at 70-80% quality.
- PNG: Only use when you need a transparent background.
- Sizing: Resize images to the exact dimensions needed for your website, typically 1200 to 1600 pixels on the longest side.
Finally, don't overlook image SEO. Naming your files descriptively is a powerful tactic.
- Bad Filename:
IMG_8475.jpg - Good Filename:
14k-gold-diamond-halo-engagement-ring.jpg
This tells search engines what the image is about, helping you appear in search results.
How to Cut Content Costs with AI Photography
The demand for fresh content never stops. Traditional photoshoots are slow, expensive, and rigid. This is where AI-powered photography makes waves, offering a faster, more cost-effective way to generate high-volume, studio-quality visuals.

The value of great imagery is undeniable. A 2024 report projects the jewelry photography services market to nearly double to US$39,812 million by 2031, driven by e-commerce. This highlights how much brands are investing in visuals. You can dig into the market's trajectory in this detailed report.
Create an Entire Campaign From a Single Shot
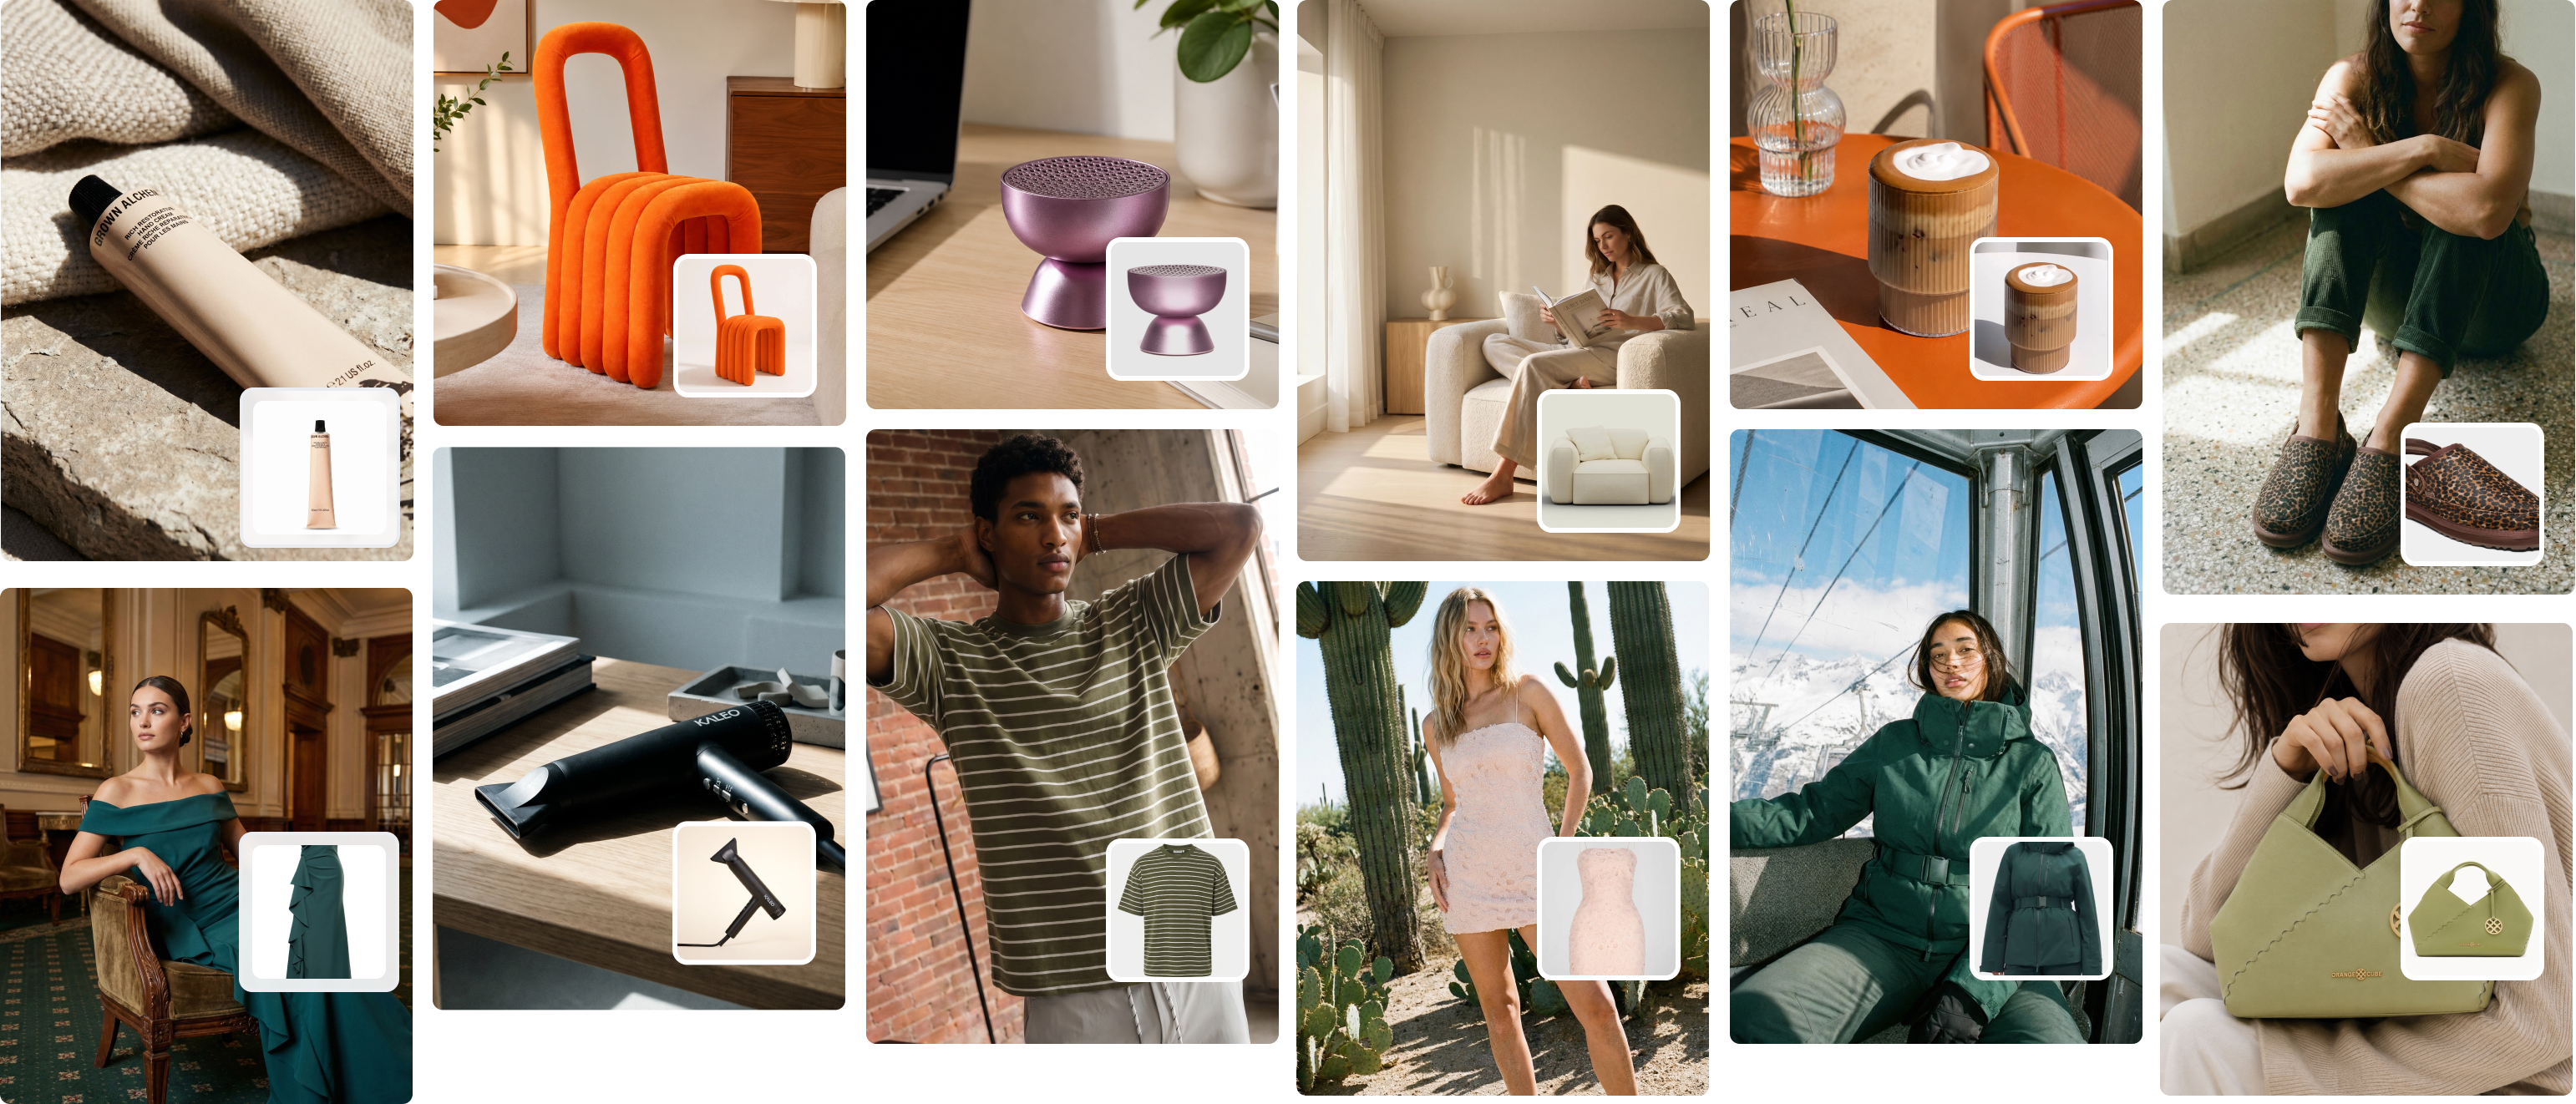
The magic of AI in jewellery photography is its ability to create endless lifestyle shots from one clean product photo. Take one great picture of a necklace on a white background. With Picjam, you can instantly place that same necklace on hundreds of AI models against countless on-brand backdrops — all without booking a model or location.
This flips the script on content creation. Big names like Pandora invest a fortune in campaigns. Now, emerging brands can achieve a similar result for a fraction of the cost, producing images that show context, scale, and an aspirational feel.
One product photo becomes the seed for a campaign's worth of content, ready for social media, email newsletters, and product pages. This saves brands thousands in production costs.
Automate Tedious Post-Production Tasks
AI tools also automate the most tedious parts of post-production. Tasks that took a skilled retoucher hours can now be done in seconds.
- Background Removal: Instantly place your jewellery on a transparent background.
- Reflection Cleanup: AI algorithms can spot and soften distracting reflections on shiny metal.
- Shadow Generation: Add realistic, soft shadows that make the product look authentic in its AI-generated scene.
This automation frees your team to focus on creative strategy. For anyone learning how to photograph jewellery, building these tools into your workflow creates a scalable process from the start.
Test Creative on the Fly to Boost Ad Performance
One of the most powerful uses for AI imagery is performance marketing. Instead of a pricey photoshoot to test a new campaign idea, you can generate dozens of variations in minutes.
Curious if a beach scene converts better than a cityscape for your summer launch? AI lets you A/B test these concepts quickly and cheaply, using data to drive your creative choices. Your marketing transforms from a guessing game into a data-backed science.
Takeaway
Mastering how to photograph jewellery is a game-changer for any brand. Here are 3 actionable takeaways:
- Prioritize Diffused Lighting and Sharp Focus: Your camera can be simple, but your lighting setup and focus must be precise. Use a lightbox and a tripod, and set your camera's aperture to f/11 or higher to ensure every detail is crisp. This is the foundation of a high-value product shot.
- Style with Intention: Choose props and backgrounds that reinforce your brand's unique story. Whether minimalist like Mejuri or luxurious like Cartier, every visual element should feel cohesive and intentional to build brand recognition and justify your price point.
- Leverage AI to Scale Content Creation: Once you have a perfect product shot, use a platform like Picjam to generate endless on-model and lifestyle variations. This dramatically cuts costs and time, allowing you to A/B test ad creative and keep your marketing channels constantly refreshed.
Ready to see the savings? Plug your current photography costs into our savings calculator and compare it with Picjam's AI solution.

Picjam team
The Picjam team blends AI, product, and creative expertise to eliminate the cost and delay of traditional photography for modern eCommerce brands.