How to Photograph Jewellery to Elevate Your E-Commerce Brand
Learn how to photograph jewellery with our expert guide. Master camera settings, lighting, and AI workflows to create stunning images that boost online sales.
How to start saving money
Lorem ipsum dolor sit amet, consectetur adipiscing elit lobortis arcu enim urna adipiscing praesent velit viverra sit semper lorem eu cursus vel hendrerit elementum morbi curabitur etiam nibh justo, lorem aliquet donec sed sit mi dignissim at ante massa mattis.
- Neque sodales ut etiam sit amet nisl purus non tellus orci ac auctor
- Adipiscing elit ut aliquam purus sit amet viverra suspendisse potent i
- Mauris commodo quis imperdiet massa tincidunt nunc pulvinar
- Adipiscing elit ut aliquam purus sit amet viverra suspendisse potenti
Why it is important to start saving
Vitae congue eu consequat ac felis placerat vestibulum lectus mauris ultrices cursus sit amet dictum sit amet justo donec enim diam porttitor lacus luctus accumsan tortor posuere praesent tristique magna sit amet purus gravida quis blandit turpis.

How much money should I save?
At risus viverra adipiscing at in tellus integer feugiat nisl pretium fusce id velit ut tortor sagittis orci a scelerisque purus semper eget at lectus urna duis convallis. porta nibh venenatis cras sed felis eget neque laoreet suspendisse interdum consectetur libero id faucibus nisl donec pretium vulputate sapien nec sagittis aliquam nunc lobortis mattis aliquam faucibus purus in.
- Neque sodales ut etiam sit amet nisl purus non tellus orci ac auctor dolor sit amet
- Adipiscing elit ut aliquam purus sit amet viverra suspendisse potenti
- Mauris commodo quis imperdiet massa tincidunt nunc pulvinar
- Adipiscing elit ut aliquam purus sit amet viverra suspendisse potenti
What percentage of my income should go to savings?
Nisi quis eleifend quam adipiscing vitae aliquet bibendum enim facilisis gravida neque. Velit euismod in pellentesque massa placerat volutpat lacus laoreet non curabitur gravida odio aenean sed adipiscing diam donec adipiscing tristique risus. amet est placerat imperdiet sed euismod nisi.
“Nisi quis eleifend quam adipiscing vitae aliquet bibendum enim facilisis gravida neque velit euismod in pellentesque massa placerat”
Do you have any comments? Share them with us on social media
Urna ut fermentum imperdiet lacus, elementum etiam maecenas libero nunc, suspendisse massa, nisl, elit curabitur feugiat in quis ut nibh enim in tristique aliquam sed vitae dui, dis adipiscing pharetra aliquam turpis turpis nibh rhoncus enim, pellentesque leo laoreet neque in sed bibendum fermentum suspendisse tempus non purus adipiscing suscipit fringilla adipiscing convallis dolor nulla fermentum facilisis ullamcorper ut vehicula tortor libero metus donec velit, tristique fermentum, dictum euismod diam scelerisque enim non pharetra tristique lectus habitant pharetra est id
Learning how to photograph jewellery means mastering 3 things: pristine lighting, pin-sharp focus, and brand-aligned styling. For direct-to-consumer brands like Mejuri, whose clean, consistent photos invite customers into a lifestyle, high-quality imagery is non-negotiable. Your photos must showcase every detail — from a clasp to a gemstone’s facets — while telling a story that drives desire and builds trust.
Why Top-Tier Jewellery Photography Drives Sales

In e-commerce, your product photos act as your digital storefront and your most effective salesperson. A McKinsey report highlights that superior online visuals can boost conversion rates by up to 40%. Blurry or poorly lit photos suggest low quality, while professional visuals build instant credibility and justify premium pricing.
The Content Demand Is Outpacing Traditional Methods
The global jewellery photography services market, valued at over USD 22 billion, is projected to nearly double by 2031, according to a detailed analysis of the jewelry photography services industry on OpenPR. This growth is fueled by the relentless need for fresh content for new products, social media, and ad campaigns.
Traditional photoshoots are slow and expensive, creating a bottleneck for agile brands. The cost of a single professional shoot can run into the thousands, making it difficult to scale content production effectively.
How AI-Powered Photography Cuts Costs and Time
This is where platforms like Picjam are reshaping brand strategies. By transforming a single product photo into hundreds of AI-generated visuals, brands can create high-converting assets at a fraction of the cost and time. This AI-driven approach is how future-focused fashion brands are gaining a competitive edge.
Imagine taking one clean shot of a ring. With an AI platform, you can instantly generate images of it on 10 different AI models or in 5 different lifestyle settings, saving thousands on studio and model fees. This isn't just theory — it's a practical way to streamline your content budget.
Essential Pillars of Jewellery Photography
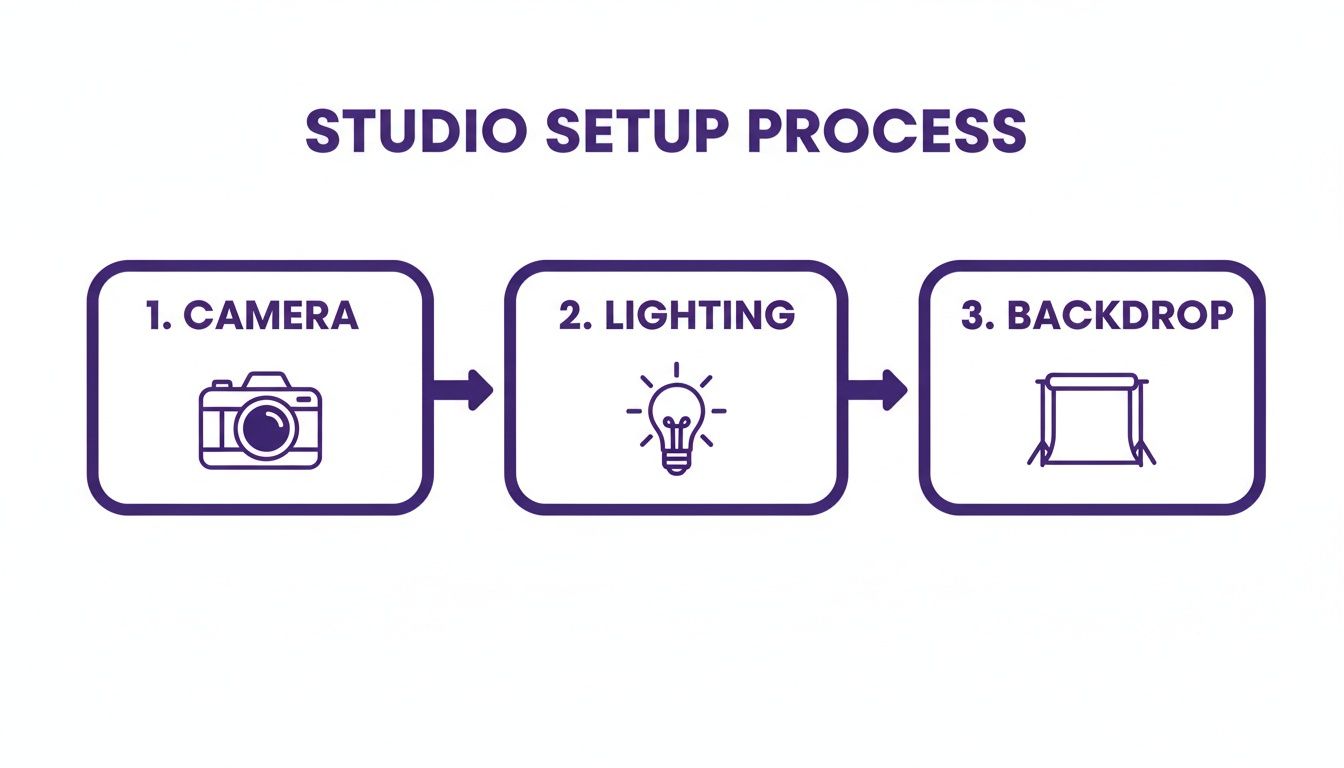
How to Build a Cost-Effective In-House Studio
Setting up a dedicated space for jewellery photography doesn't require a massive budget. Just look at brands like Gorjana, known for delicate, layerable pieces. Their success proves that consistency is more valuable than complexity. Your goal is a repeatable setup that produces clean, sharp, and uniformly lit images every time.
Select a Camera and Macro Lens for Flawless Detail
While a modern DSLR or mirrorless camera is ideal, the macro lens is the true game-changer for jewellery photography. It allows you to get incredibly close to your subject, capturing details like pavé settings or delicate clasps that shoppers obsessively zoom in on. This level of detail builds confidence and reduces hesitation to buy.
- Entry-Level Setup: A crop-sensor camera paired with a 60mm macro lens delivers fantastic results without a huge initial investment.
- Professional Setup: A full-frame camera with a 100mm or 105mm macro lens is the industry standard, providing superior image quality.
A sturdy tripod is just as critical. It eliminates camera shake, ensures your images are perfectly sharp, and allows you to lock in composition for consistency across an entire collection.
Demystify Your Lighting to Eliminate Glare
Lighting is the most challenging part of learning how to photograph jewellery. The main obstacle is reflections. Shiny metals and faceted stones act like tiny mirrors, creating distracting hotspots that wash out detail. Soft, diffused light is the solution.
- Continuous Lighting (LEDs): These lights stay on, so you see the effect in real-time. This "what you see is what you get" approach is ideal for beginners.
- Strobe Lighting (Flashes): Strobes deliver a powerful burst of light, enabling incredibly sharp images with a deep depth of field. They offer more control but have a steeper learning curve.
The goal is always to create a large, soft light source. A large, diffused source wraps light gently around the jewellery, minimizing glare and illuminating every facet. This is why professionals use tools like softboxes and diffusion panels.
Create a Clean Look with Backdrops and Surfaces
Your "studio" can be a simple tabletop. The key is controlling the environment. Start with a non-reflective backdrop to keep the focus on your product. Brands like Catbird NYC master this, using simple, neutral backdrops to make their delicate pieces the hero of every shot.
- Backdrops: A roll of seamless white or light gray paper is a versatile and affordable workhorse for creating a clean, "floating" look.
- Surfaces: Stick to matte, non-reflective surfaces like acrylic sheets, stone tiles, or fine-grained wood to add texture without creating distracting glare.
For a deeper dive into gear, explore our complete guide on essential equipment for product photography. A smart setup streamlines production and cuts long-term costs.
How to Master Camera Settings for Sharp, Professional Images
Mastering a few key camera settings is what separates an amateur snapshot from a professional product image. It’s how brands like Tiffany & Co. produce impossibly crisp photos where every detail sings, building trust before a shopper even reads the description.
Think of aperture, ISO, and shutter speed as your core toolkit. They work together to control light and sharpness. Getting them in sync is the secret to brilliant results.
The Exposure Triangle for Jewellery
The relationship between aperture, ISO, and shutter speed is the "exposure triangle." Understanding it is a game-changer.
Aperture (f-stop): This controls your depth of field — how much of the jewellery is in focus. For product shots, you need a deep depth of field to keep the entire piece sharp. Use a high f-stop, like f/11 or f/16.
ISO: This is your camera's sensitivity to light. For the cleanest images, always use the lowest possible ISO, usually ISO 100. A higher ISO creates digital "noise" or grain that degrades fine details.
Shutter Speed: This is how long the shutter stays open. Since you're using a tripod and a high f-stop, your shutter speed will be slow (e.g., 1/15s). This is perfectly fine for a stationary object.
The professional standard for e-commerce jewellery is razor-sharp focus on every facet. A high f-stop (f/11+) and a low ISO (100) are the non-negotiable starting points.
Achieve Perfect Focus with Focus Stacking
For complex pieces like a statement necklace, even a high f-stop may not be enough. This is where focus stacking comes in. It involves taking multiple photos at slightly different focus points and merging them in software. The result is one image where the entire piece is in flawless focus.
Compose Your Shots to Guide the Customer’s Eye
Once your technical settings are dialed in, focus on composition. This is how you arrange the jewellery to guide the viewer’s attention.
- Rule of Thirds: Imagine your frame divided by two horizontal and two vertical lines. Placing your jewellery along these lines or at their intersections creates a more dynamic photo.
- Leading Lines: Use the jewellery’s own shape to guide the eye. The curve of a necklace can act as a natural line, directing attention to a central gemstone.
Understanding how light interacts with different gems is also critical. There is an art to capturing certain stones, and learning how lighting changes moissanite sparkle and what photographers want you to know can make a huge difference.
How Styling Creates a Narrative That Sells

Great jewellery photography goes beyond technical perfection. It must create aspiration and tell a story. Your styling choices are what turn a simple product shot into a powerful piece of branding that connects with your ideal customer.
The jewellery market is seeing a "price up, units down" trend, with sales value growing by 4.7% even as units sold dropped by 5.6%. This means customers are buying fewer, more special pieces. Your photography must justify that premium price by communicating exclusivity.
Choose Props That Complement, Not Distract
Props should always serve the jewellery, never overshadow it. The goal is to add texture and context that reinforces your brand’s vibe.
- For a Luxury Brand: Think rich textures like raw silk, marble slabs, or polished stone to signal quality and sophistication.
- For a Minimalist Brand: Stick to simple geometric shapes, neutral ceramic dishes, or elegant shadows to emphasize form.
- For a Bohemian Brand: Use organic elements like dried flowers or driftwood to create an earthy, free-spirited feel.
Think in layers and textures. A piece of jewellery on a flat surface can look stark. Adding a simple piece of textured fabric underneath instantly creates depth and visual interest. For more inspiration, check our guide on props for photography ideas.
Use On-Model Shots to Help Customers Visualize
Product-only shots show detail, but on-model shots sell the dream. Seeing jewellery on a person helps customers understand scale and imagine themselves wearing it. The model you choose is a direct reflection of your brand and target customer.
Posing should highlight the jewellery naturally.
- For earrings: A simple turn of the head or tucking hair behind an ear draws the eye.
- For necklaces: An open neckline or a hand resting near the collarbone works beautifully.
- For rings: Have the model interact with a prop or rest their hand on a surface for a relaxed look.
For more styling ideas, you might find great tips in this guide on a simple way to style your jewelry.
How AI-Powered Post-Processing Transforms Your Workflow
Post-processing is where good jewellery photos become exceptional. While traditional editing in tools like Adobe Lightroom or Photoshop is essential, new AI-powered workflows are changing the economics and speed of content creation for jewellery brands.
Streamline Traditional Retouching with AI
The first editing pass is about perfection: correcting color, sharpening details, and removing dust or fingerprints. Traditionally, this is painstakingly slow work. A professional retoucher can spend hours on a single complex image.
Today, AI-powered tools can automate much of this. They can instantly spot and remove blemishes, clean backgrounds, and even tackle tricky reflections with surprising accuracy. What once took hours can now be done in minutes, dramatically reducing labor costs. For a closer look, see our guide on how to remove reflections in Photoshop.
Go from a Single Product Shot to a Full Campaign with AI
The real game-changer isn't just cleaning up photos; it's creating entirely new ones. With an AI tool like Picjam, one perfect studio shot of a necklace can become the seed for an entire campaign.
You can instantly generate dozens of on-model variations with diverse AI-generated models. You can also swap the plain background for a Parisian café or a sun-drenched beach, allowing brands to test endless creative concepts for ads and social media at a previously unimaginable speed.
How to Optimize Images for SEO and Discovery
A polished image is useless if no one sees it. Image SEO is a crucial last step in learning how to photograph jewellery for e-commerce.
- File Naming: Instead of
IMG_8432.jpg, use a descriptive format likebrand-product-description.jpg(e.g.,gorjana-parker-gold-necklace.jpg). - Alt Text: This text is read by screen readers and search engines. Be concise and accurate, like "A woman wearing the Mejuri bold pearl drop earrings."
- File Size: Large image files slow down your website, hurting your search ranking. Compress images to the smallest possible size without sacrificing quality.
Comparing Traditional vs. AI-Powered Photography
AI makes it possible to generate a volume of content that would be financially and logistically prohibitive with traditional methods, opening up new opportunities for marketing and A/B testing.
Takeaway
We've covered a lot, but turning knowledge into action is what drives sales. Here are 3 actionable takeaways.
Audit Your Current Imagery: Pull up your product photos next to a top competitor's. Honestly assess gaps in clarity, lighting, or styling to create a clear roadmap for improvement.
Master One Simple Lighting Setup: Focus on perfecting a repeatable two-light setup with softboxes. This one skill will give you a consistent, professional look and streamline your entire workflow.
Experiment with AI to Cut Costs: Take your best product shot and upload it to an AI platform like Picjam. Generate new on-model and lifestyle shots to see how you can transform your creative potential while saving significant time and budget.
Ready to see the savings? Compare your current photography costs with Picjam's AI studio using our savings calculator.
Common Questions About Jewellery Photography
As you dive into photographing your jewellery, a few common questions are bound to pop up. Let's tackle some of the practical hurdles that most brands run into.
What's the Best Camera for Jewellery Photography?
While a professional DSLR or mirrorless camera offers the most control, many modern smartphones can produce great results for social media, especially when paired with good lighting.
For serious e-commerce, however, a camera with interchangeable lenses is best. The most important component isn’t the camera body but the macro lens. It's essential for capturing the intricate details that justify a premium price.
How Do You Avoid Reflections in Jewellery?
Reflections are the number one headache in jewellery photography. The trick is to control the environment.
- Use Large Diffusers: Place a softbox or a large white sheet between your light source and the jewellery to create soft, wrapping light that minimizes glare.
- Try a Polarizing Filter: A circular polarizing filter (CPL) screws onto your lens and can be rotated to eliminate the worst reflections. It's a game-changer.
- Watch Your Angles: Sometimes, a tiny adjustment in your camera angle is all it takes to make a distracting reflection disappear.
How Do I Photograph Small, Intricate Pieces?
Making tiny details look magnificent on screen comes down to the right lens and technique. A dedicated macro lens is non-negotiable for getting close enough to capture details the naked eye might miss.
For ultimate sharpness on a complex piece, use focus stacking. This involves taking several shots at different focus points and merging them in post-production. The result is one impossibly sharp image where the entire piece is in perfect focus.

Picjam team
The Picjam team blends AI, product, and creative expertise to eliminate the cost and delay of traditional photography for modern eCommerce brands.