How a Product Photography Light Box Elevates Your E-commerce Visuals
Learn how to choose and use a product photography light box to capture professional, consistent images that elevate your eCommerce brand and drive sales.
How to start saving money
Lorem ipsum dolor sit amet, consectetur adipiscing elit lobortis arcu enim urna adipiscing praesent velit viverra sit semper lorem eu cursus vel hendrerit elementum morbi curabitur etiam nibh justo, lorem aliquet donec sed sit mi dignissim at ante massa mattis.
- Neque sodales ut etiam sit amet nisl purus non tellus orci ac auctor
- Adipiscing elit ut aliquam purus sit amet viverra suspendisse potent i
- Mauris commodo quis imperdiet massa tincidunt nunc pulvinar
- Adipiscing elit ut aliquam purus sit amet viverra suspendisse potenti
Why it is important to start saving
Vitae congue eu consequat ac felis placerat vestibulum lectus mauris ultrices cursus sit amet dictum sit amet justo donec enim diam porttitor lacus luctus accumsan tortor posuere praesent tristique magna sit amet purus gravida quis blandit turpis.

How much money should I save?
At risus viverra adipiscing at in tellus integer feugiat nisl pretium fusce id velit ut tortor sagittis orci a scelerisque purus semper eget at lectus urna duis convallis. porta nibh venenatis cras sed felis eget neque laoreet suspendisse interdum consectetur libero id faucibus nisl donec pretium vulputate sapien nec sagittis aliquam nunc lobortis mattis aliquam faucibus purus in.
- Neque sodales ut etiam sit amet nisl purus non tellus orci ac auctor dolor sit amet
- Adipiscing elit ut aliquam purus sit amet viverra suspendisse potenti
- Mauris commodo quis imperdiet massa tincidunt nunc pulvinar
- Adipiscing elit ut aliquam purus sit amet viverra suspendisse potenti
What percentage of my income should go to savings?
Nisi quis eleifend quam adipiscing vitae aliquet bibendum enim facilisis gravida neque. Velit euismod in pellentesque massa placerat volutpat lacus laoreet non curabitur gravida odio aenean sed adipiscing diam donec adipiscing tristique risus. amet est placerat imperdiet sed euismod nisi.
“Nisi quis eleifend quam adipiscing vitae aliquet bibendum enim facilisis gravida neque velit euismod in pellentesque massa placerat”
Do you have any comments? Share them with us on social media
Urna ut fermentum imperdiet lacus, elementum etiam maecenas libero nunc, suspendisse massa, nisl, elit curabitur feugiat in quis ut nibh enim in tristique aliquam sed vitae dui, dis adipiscing pharetra aliquam turpis turpis nibh rhoncus enim, pellentesque leo laoreet neque in sed bibendum fermentum suspendisse tempus non purus adipiscing suscipit fringilla adipiscing convallis dolor nulla fermentum facilisis ullamcorper ut vehicula tortor libero metus donec velit, tristique fermentum, dictum euismod diam scelerisque enim non pharetra tristique lectus habitant pharetra est id
For fashion brands like Nike, presenting products with flawless consistency isn't just a goal — it's a core part of their brand identity. Every sneaker is shot under identical, clean lighting, creating a uniform shopping experience that builds trust. This level of professionalism was once reserved for high-budget studios, but a product photography light box makes it accessible for any brand looking to elevate their in-house content.
Think of it as a portable mini-studio. It provides built-in LED lighting and a seamless white background, all designed to eliminate harsh shadows and create catalog-ready images with minimal effort.
Why a Light Box Cuts Costs and Boosts Brand Consistency
In e-commerce, your photos are the storefront. According to recent industry data, an overwhelming 75% of online shoppers rely heavily on product photos when making a purchase decision. A light box ensures every image meets a high standard, directly impacting customer perception and sales.
While a physical setup is a fantastic starting point, brands needing to scale content are increasingly turning to virtual studios. AI platforms like Picjam take a single product photo and generate an entire, on-brand photoshoot, saving thousands on photographer and studio fees.
How a Light Box Solves Key Photography Challenges
A light box creates a controlled environment, solving three major headaches for in-house teams:
- Eliminates Harsh Shadows: The diffused lighting wraps around your product, softening shadows that can hide important details on a handbag or a piece of jewelry.
- Ensures True-to-Life Colors: Inconsistent lighting from a window or office fluorescents can cast a yellow or blue tint on products. A light box provides controlled, neutral light for accurate color representation.
- Streamlines Your Workflow: A standardized setup is repeatable. Anyone on your team can produce consistent, high-quality shots without deep technical photography knowledge.
This accessibility is driving significant market growth. In 2023, the global photography light box market was valued at $150 million and is projected to double by 2032, fueled by the relentless demand for superior e-commerce visuals.
For more foundational tips, explore our guide on generating high-quality product photos.
Takeaway
A product photography light box isn't just equipment; it's a tool for creating clean, consistent visuals that customers expect. It provides control over lighting and color accuracy, building a scalable process that boosts brand credibility. For brands looking to scale further, AI offers a path to generate diverse content without the cost of physical shoots.
How to Select the Right Light Box for Your Products
Choosing the right product photography light box is the most critical step toward achieving clean, consistent shots. The goal isn't a one-size-fits-all solution but to match the gear to your specific products, avoiding frustrating results and wasted budget.
The first variable is size. A small 12-inch box might be perfect for a jewelry brand like Mejuri, but it would be useless for a shoe company like Allbirds.
A good rule is to ensure at least 6 inches of clearance around your largest product. This negative space provides flexibility for different camera angles and ensures light spreads evenly.
What Key Features Should You Prioritize?
After determining size, focus on the lighting. Nearly all modern light boxes use LEDs, but quality varies.
Insist on a model with dimmable lights. This feature offers precise brightness control, allowing you to reduce hotspots on reflective items or add subtle shadows for depth.
Also consider portability and accessories. A collapsible tent-style box is more practical for small spaces than a rigid one. Check for included backdrops; while most offer black and white, some provide neutral grays or colors that expand creative options.
One of the most common mistakes is buying a light box based on price alone. Spending a little more on a model with better light diffusion, dimmable LEDs, and multiple shooting angles will save you countless hours in post-production and deliver a far more professional result.
This table breaks down what to prioritize based on your product category.
Light Box Feature Comparison for Different Product Types
While the box handles lighting, image quality depends on your camera. Ensure you pair your setup with the right gear by reading our guide on choosing the best camera for product photography.
How to Create a Repeatable In-House Shooting Workflow
A solid, repeatable workflow is what transforms a product photography light box from a simple tool into a consistent content engine. This process ensures anyone on your team can achieve professional, brand-aligned results every time.
First, assemble the box and position the built-in LED lights to create soft, even illumination that wraps around your product. For an item like a handbag, position the main light source slightly above and to the front. Use a second, dimmer light or a white reflector card to fill in any remaining shadows.
Why Standardized Camera Settings Are Non-Negotiable
Whether using a DSLR or a smartphone, a few key settings make a world of difference. Using a tripod is essential to eliminate blur and maintain consistency.
- Aperture (f-stop): Set this to a higher number, like f/8 or f/11, to achieve a greater depth of field and keep the entire product in sharp focus.
- ISO: Keep your ISO as low as possible — ideally 100 or 200 — to eliminate digital noise and produce a clean image. The controlled lighting in a light box makes this easy.
- White Balance (WB): Avoid 'Auto' for reliable results. Set a custom white balance using a 'Daylight' preset or a specific Kelvin temperature (around 5500K) to match the LED lights and capture true-to-life product colors.
This quick checklist can help you choose the right light box before you start shooting.
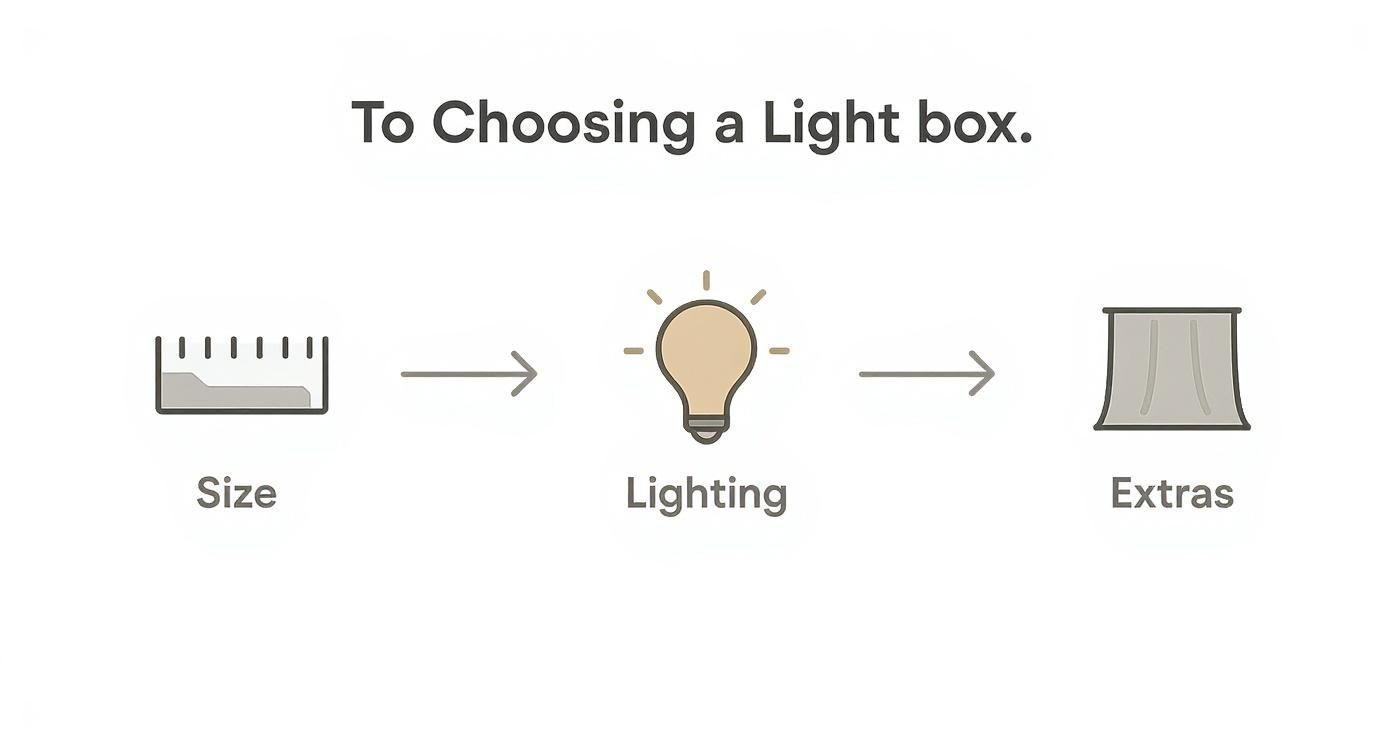
As the infographic shows, the decision comes down to your product's size, your need for lighting control, and any extra features like different backdrops.
How to Style Products to Align with Your Brand
With the technical setup locked in, you can focus on creative styling. This is where you bring the product to life. A minimalist fashion brand like Everlane, for instance, uses clean, uncluttered styling to let the product remain the hero, perfectly supporting their brand aesthetic.
“The camera is just one piece of the puzzle. Great product photography is the result of thoughtful lighting, exposure, styling, and post-processing decisions.”
- Jeff Delacruz, Co-founder of Product on White Photography
When shooting accessories, tell a story. A leather wallet could be shot closed, then open to show compartments, and again with a card peeking out to demonstrate function. Aim to shoot every product from the same 3–5 angles to create a cohesive shopping experience.
Final refinements can be made with tools like our improved photo and video editor. Even with a perfect setup, minor tweaks to brightness and contrast can make an image pop.
Takeaway
First, standardize camera settings with a checklist (Aperture: f/8, ISO: 100, WB: 5500K) to ensure technical quality. Second, define a shot list with 3–5 core angles for each product category to maintain catalog consistency. For brands needing to create hundreds of lifestyle scenes, AI-driven platforms like Picjam offer a scalable alternative to a physical workflow.
How to Solve Glare and Other Common Light Box Issues
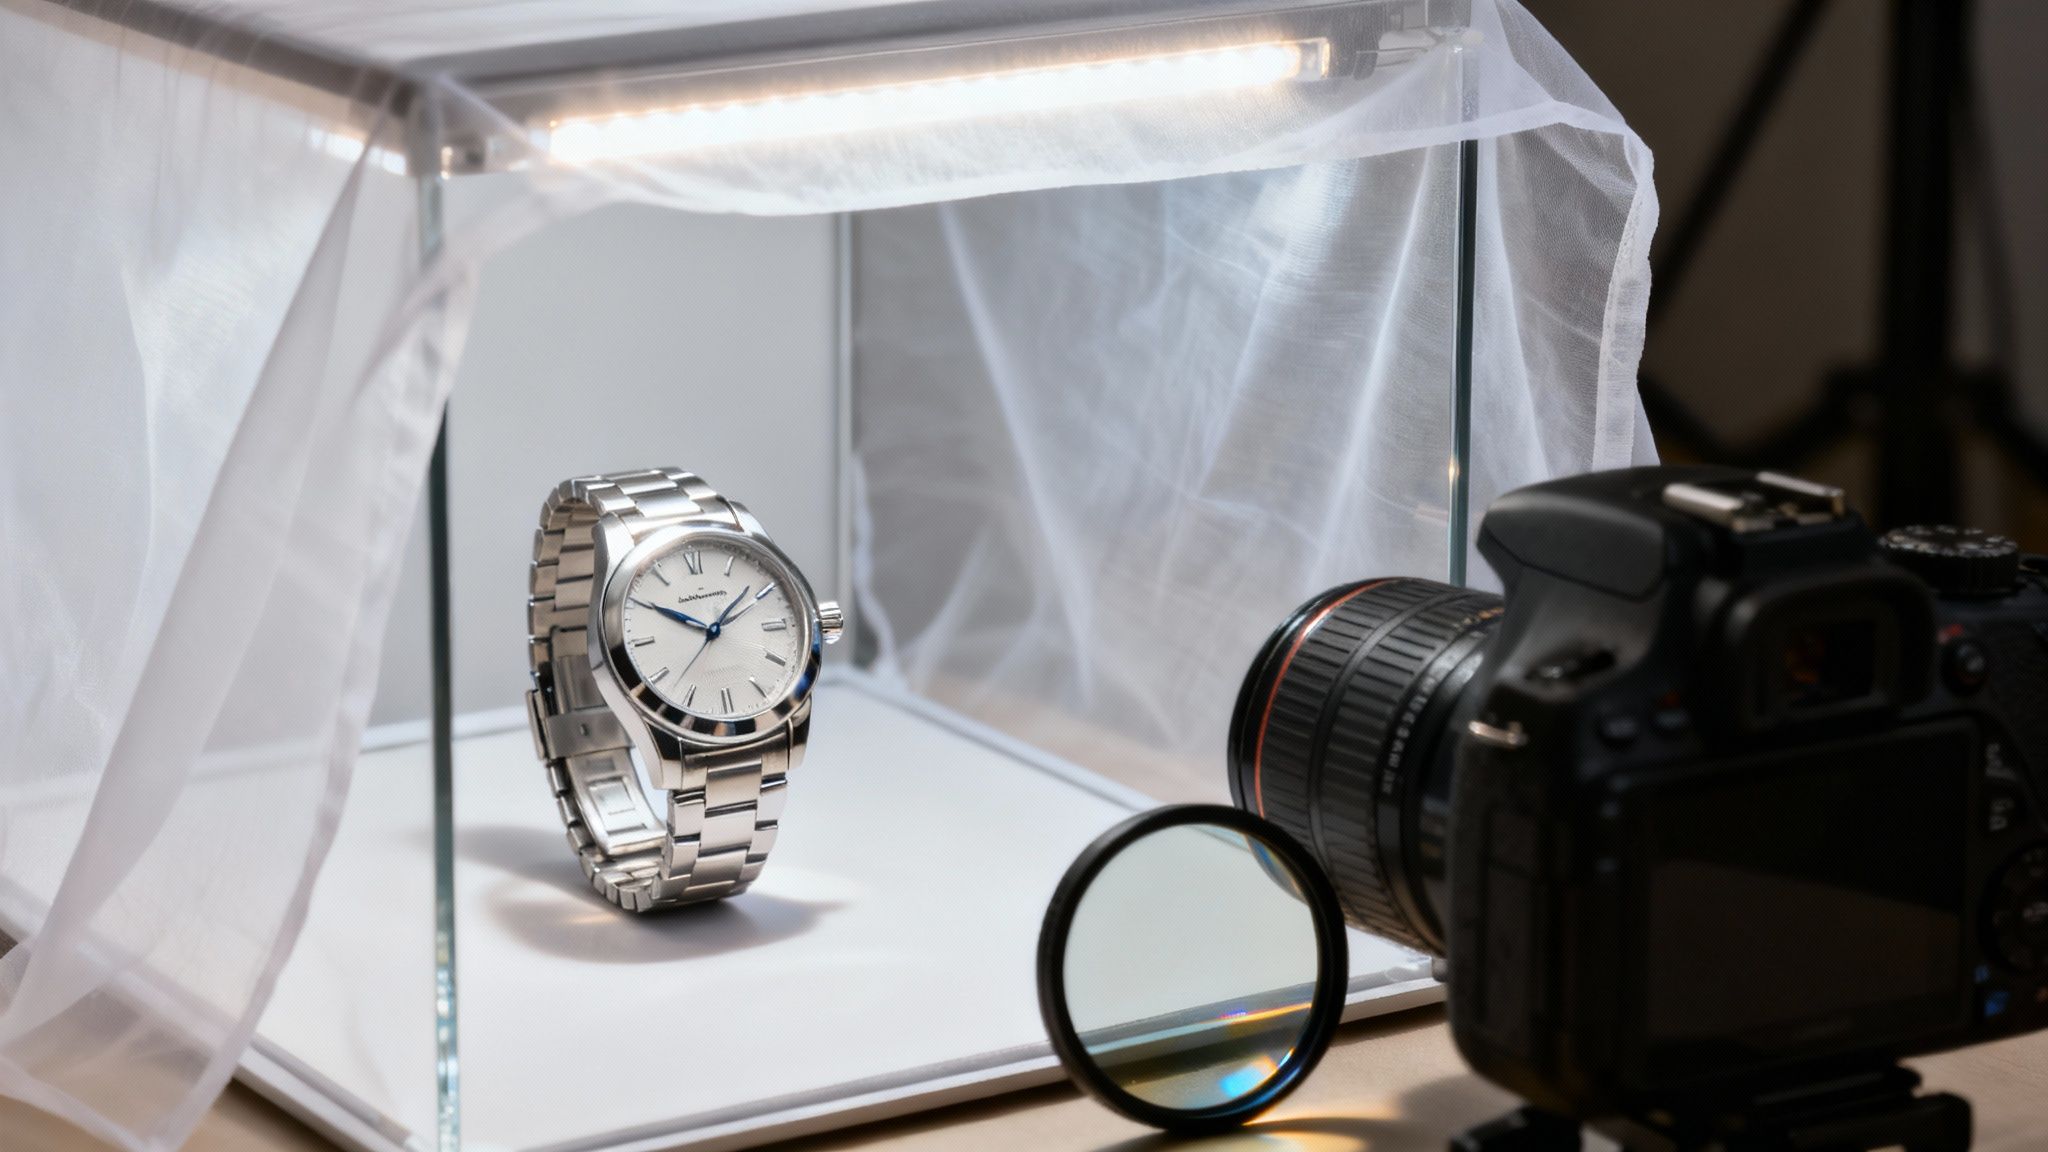
Even with an excellent setup, you will encounter issues like glare on shiny products or a white background appearing gray. These are common challenges with straightforward fixes.
The e-commerce photography equipment market, valued at $1.5 billion in 2025 with a projected 12% annual growth rate, shows how heavily brands are investing in perfect visuals. You can dive into more market research on this trend.
How to Eliminate Glare on Reflective Products
Glare is especially frustrating for items like watches or sunglasses, where brands like Ray-Ban need to showcase fine details. When fighting glare, diffusion is your primary tool.
- Add More Diffusion: Drape a thin white sheet over your light box to add another layer of diffusion between the LEDs and your product, softening harsh reflections.
- Use a Polarizing Filter: For DSLR users, a circular polarizing filter (CPL) is a game-changer. Rotating the filter allows you to visibly reduce or eliminate reflections on non-metallic surfaces.
- Adjust Your Angle: Sometimes, a slight shift in your camera angle or product position is all it takes to move a distracting reflection out of the shot.
Reflections don't just look sloppy — they hide the very details you're trying to show off. Your goal isn't to eliminate all highlights, but to create soft, flattering ones that define the product's shape instead of obscuring it.
How to Achieve a Pure White Background
Another common issue is a "not-quite-white" background that appears light gray. This happens because your camera's meter tries to find a neutral exposure, often underexposing the white sweep.
The solution is to use your camera’s exposure compensation setting (the +/- symbol). Increase it by one or two stops (+1 or +2) to tell the camera to let in more light, brightening the scene and turning the gray background into brilliant white.
While these manual fixes are crucial skills, they highlight the time required for a single shot. This is where AI-powered tools like Picjam excel, generating images with flawless white backgrounds instantly and saving significant time on troubleshooting.
Takeaway
To manage glare on reflective items like sunglasses, use an extra layer of diffusion or a polarizing filter. To get a pure #FFFFFF background, use your camera’s exposure compensation setting to increase the brightness by +1 or +2 stops.
How a Virtual Studio Outperforms a Physical Shoot for Fashion Brands
A product photography light box is an excellent tool for controlled, consistent shots. However, it has limitations. When a brand needs to produce a high volume of content quickly and cost-effectively, a physical setup becomes a bottleneck.
Imagine launching a new collection with hundreds of SKUs or needing diverse lifestyle images for a campaign dropping next week. With a physical shoot, every shot demands manual setup, styling, and post-production. The hours and costs add up fast.
How AI Enables Content Production at Scale
Fast-fashion brands are a prime example. A company like SHEIN, which adds thousands of new styles weekly, cannot rely solely on traditional photography. The logistics would require a massive team of photographers and stylists, making costs astronomical.
This is why AI-powered content generation is becoming essential. A platform like Picjam allows a brand to take one simple product photo and instantly generate an entire on-brand photoshoot.
Think about it: you could create dozens of unique lifestyle images — with different models, backgrounds, and lighting — in the time it takes to set up a single shot in a physical light box. This isn't just efficiency; it's a strategic advantage that turns content creation from a cost center into a growth engine.
For anyone exploring modern alternatives, solutions like AI Product Photoshoots demonstrate just how scalable visual content has become.
How AI Transforms Content Production Costs
The financial case for AI is compelling. A McKinsey report suggests generative AI could add up to $275 billion to the operating profits of the apparel, fashion, and luxury sectors, much of it from smarter, cheaper content creation.
A virtual studio eliminates recurring costs such as:
- Photographer and stylist fees
- Studio and equipment rentals
- Model sourcing and booking
- Shipping products for shoots
A light box reduces some of these costs, but it doesn't eliminate the time and labor involved in every photograph. For a refresher on the gear required for a physical shoot, see our guide on equipment for studio photography.
Takeaway
First, assess your content needs against your production capacity. If you are shooting over 50 SKUs a month or require diverse lifestyle imagery, a physical light box will slow you down. Second, calculate the true cost of your current workflow, including time, labor, and reshoots, to see the potential savings from an AI-powered solution.
Ready to see how the numbers stack up for your business? Compare your current photography costs with Picjam’s AI solution using our savings calculator.

Picjam team
The Picjam team blends AI, product, and creative expertise to eliminate the cost and delay of traditional photography for modern eCommerce brands.

