A Fashion Insider's Guide to Product Shots White Background
Discover how to create product shots white background that convert, with setup tips, styling ideas, and recommended AI tools.
How to start saving money
Lorem ipsum dolor sit amet, consectetur adipiscing elit lobortis arcu enim urna adipiscing praesent velit viverra sit semper lorem eu cursus vel hendrerit elementum morbi curabitur etiam nibh justo, lorem aliquet donec sed sit mi dignissim at ante massa mattis.
- Neque sodales ut etiam sit amet nisl purus non tellus orci ac auctor
- Adipiscing elit ut aliquam purus sit amet viverra suspendisse potent i
- Mauris commodo quis imperdiet massa tincidunt nunc pulvinar
- Adipiscing elit ut aliquam purus sit amet viverra suspendisse potenti
Why it is important to start saving
Vitae congue eu consequat ac felis placerat vestibulum lectus mauris ultrices cursus sit amet dictum sit amet justo donec enim diam porttitor lacus luctus accumsan tortor posuere praesent tristique magna sit amet purus gravida quis blandit turpis.

How much money should I save?
At risus viverra adipiscing at in tellus integer feugiat nisl pretium fusce id velit ut tortor sagittis orci a scelerisque purus semper eget at lectus urna duis convallis. porta nibh venenatis cras sed felis eget neque laoreet suspendisse interdum consectetur libero id faucibus nisl donec pretium vulputate sapien nec sagittis aliquam nunc lobortis mattis aliquam faucibus purus in.
- Neque sodales ut etiam sit amet nisl purus non tellus orci ac auctor dolor sit amet
- Adipiscing elit ut aliquam purus sit amet viverra suspendisse potenti
- Mauris commodo quis imperdiet massa tincidunt nunc pulvinar
- Adipiscing elit ut aliquam purus sit amet viverra suspendisse potenti
What percentage of my income should go to savings?
Nisi quis eleifend quam adipiscing vitae aliquet bibendum enim facilisis gravida neque. Velit euismod in pellentesque massa placerat volutpat lacus laoreet non curabitur gravida odio aenean sed adipiscing diam donec adipiscing tristique risus. amet est placerat imperdiet sed euismod nisi.
“Nisi quis eleifend quam adipiscing vitae aliquet bibendum enim facilisis gravida neque velit euismod in pellentesque massa placerat”
Do you have any comments? Share them with us on social media
Urna ut fermentum imperdiet lacus, elementum etiam maecenas libero nunc, suspendisse massa, nisl, elit curabitur feugiat in quis ut nibh enim in tristique aliquam sed vitae dui, dis adipiscing pharetra aliquam turpis turpis nibh rhoncus enim, pellentesque leo laoreet neque in sed bibendum fermentum suspendisse tempus non purus adipiscing suscipit fringilla adipiscing convallis dolor nulla fermentum facilisis ullamcorper ut vehicula tortor libero metus donec velit, tristique fermentum, dictum euismod diam scelerisque enim non pharetra tristique lectus habitant pharetra est id
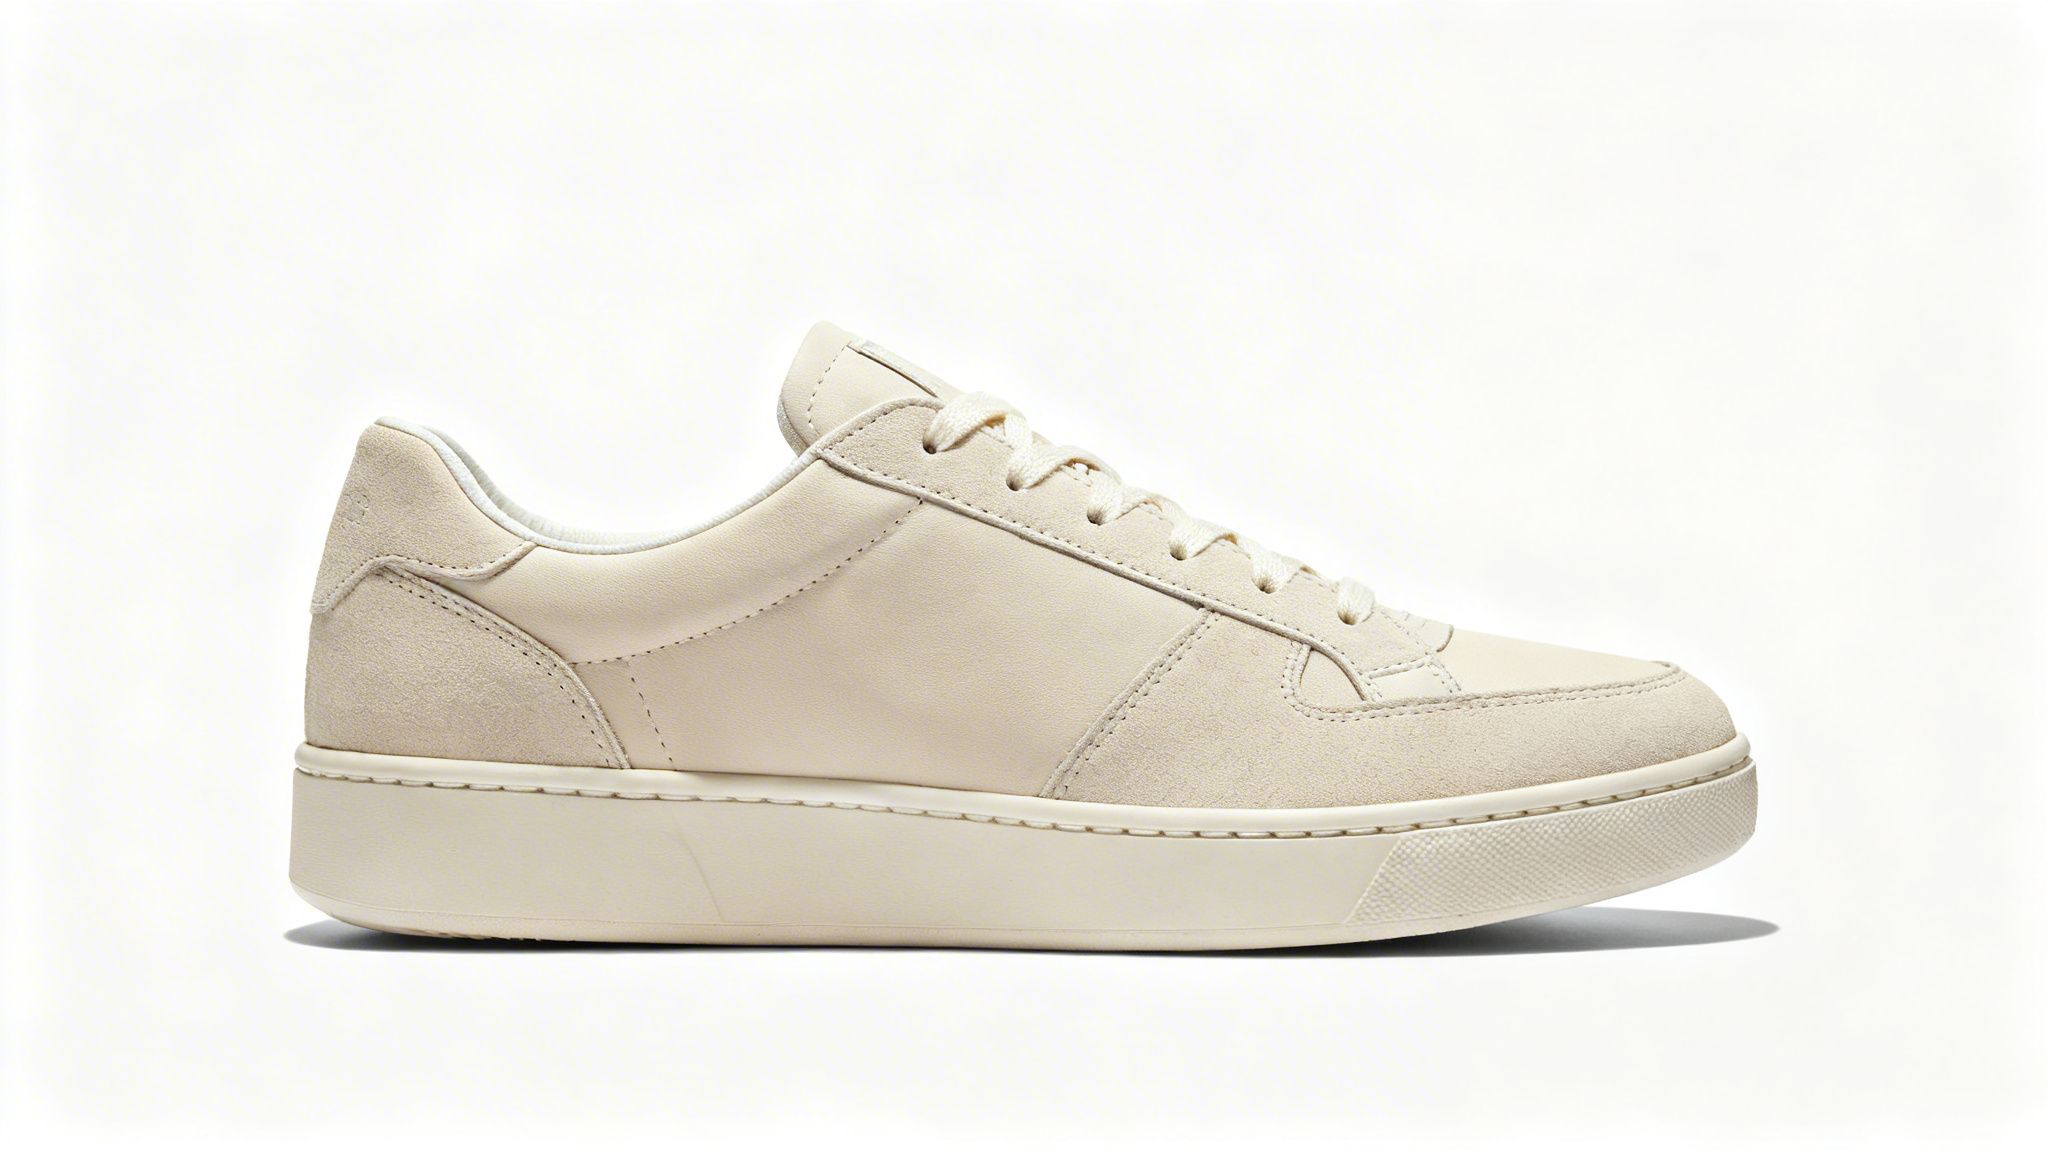
When the direct-to-consumer brand Cuyana launches a new leather tote, the first images customers see aren't elaborate lifestyle shots — they're clean, crisp photos on a pure white background. This isn’t a coincidence. The simple product shots white background style builds instant trust, eliminates distractions, and puts the focus squarely on craftsmanship. For turning browsers into buyers, it's a proven, high-converting strategy.
How White Backgrounds Drive Conversions and Cut Costs
Marketplaces like Amazon and Net-a-Porter don't just prefer this style — they often require it. This uniformity creates a clean, professional shopping experience that helps customers compare products without visual clutter.
Fashion brands like Everlane and Allbirds built their visual identities on this minimalist foundation. Through clean imagery, they communicate quality and transparency before a customer even reads a product description.
The data supports this approach. According to McKinsey, fashion brands now use an average of 8 images per product. This visual-first demand is why the e-commerce photography market is projected to hit USD 342.27 million by 2031.
The Strategic Value of Simplicity
A clean white backdrop does more than just look good. It's a strategic move that directly impacts your sales and brand perception.
Here's a quick look at why this simple choice packs such a punch.
| Key Benefits of White Background Product Shots |
| :--- | :--- | :--- |
| Benefit | Impact on Brand | Impact on Customer |
| Product Focus | Highlights design, texture, and quality, letting craftsmanship shine. | Eliminates distractions, allowing a clear view of product details. |
| Consistency | Creates a professional, cohesive look across the entire store and all channels. | Offers a seamless, predictable browsing experience that builds trust. |
| Versatility | Images are easily repurposed for ads, social media, and marketplaces. | Ensures product colors are accurate and true-to-life without color cast. |
| Trust & Authority | Projects an image of a serious, established, and reliable brand. | Feels more like a standard retail experience, boosting buying confidence. |
A white background removes friction from the buying process. It gives the customer exactly what they need to see, clearly and professionally.
A few more reasons this approach is so powerful:
- It Minimizes Distractions: The customer’s eye goes right to the important stuff — the texture of the fabric, the quality of the stitching, and the true color of the garment.
- It Builds Trust: When your entire catalog looks consistent and professional, it signals that you're a reputable brand. It’s a visual promise of quality.
- It Ensures Versatility: These images are workhorses. You can use them on your website, in marketing emails, social media, and for optimizing product images for Google Shopping Ads.
How AI Streamlines the Classic Workflow
Getting this polished look used to mean a massive studio budget and weeks of editing. Modern AI tools are changing that equation, letting brands create studio-quality assets from simple photos.
Tools like Picjam handle the entire process, turning basic images into polished, marketplace-ready product shots white background images in minutes. This can save brands up to 90% on content production costs, freeing up budget for performance marketing.
It's the best of both worlds: the timeless appeal of classic photography combined with the speed and savings of AI. For more tips, see our guide on pure white backgrounds for product photos.
Your Essential Toolkit for Flawless Apparel Photos

Creating crisp, professional product shots white background images is more accessible than ever. Building an in-house studio gives you a massive strategic edge over brands stuck paying expensive day rates.
Investing in a few core pieces of gear delivers reliable, high-quality results. This hands-on control means you can shoot new arrivals on your schedule, not a studio's.
Camera and Lens: The Right Combination
A DSLR or mirrorless camera gives you the manual control needed for ultimate precision, but high-end smartphones are also incredibly capable. Brands like Ganni often mix polished studio shots with more organic content shot on a phone.
The lens, though, is where the magic happens for apparel. A 50mm prime lens is the perfect starting point. It captures clothing naturally, avoiding the distortion that wider lenses can cause. That’s critical for showing a garment’s true fit and proportions.
Lighting: How to Create a High-End Look
Great lighting separates an amateur photo from a pro-level shot. Often, one powerful light source is all it takes.
- Softbox: A large softbox diffuses light, creating soft, flattering shadows that define the garment's shape without looking harsh.
- Reflector: This is the ultimate budget-friendly hack. A simple white foam board can bounce light from your main source back onto the product, filling in shadows for even illumination.
For new brands, natural light is a powerful — and free — resource. Just set up near a large window on a cloudy day for beautifully diffused light.
This simple one-two punch can produce the clean lighting you see on product pages for brands like Reformation. It’s all about creating a soft, even glow that lets the product details speak for themselves.
The Background and Support System
To nail those iconic product shots white background images, you need a seamless backdrop. A roll of white seamless paper is the industry standard: it’s inexpensive and provides a clean sweep from wall to floor.
Mount it on a background stand, and you have a portable studio. A sturdy tripod is non-negotiable — it eliminates camera shake and keeps your angles perfectly consistent.
For a complete deep dive, check our guide on equipment for product photography.
How to Dial In Camera Settings for Crisp Product Imagery
Your camera settings are what separate amateur product shots with a white background from images that truly sell. The fastest way to get consistent results is to get comfortable shooting in manual mode.
Think of your core settings — aperture, ISO, and shutter speed — as a recipe. They work together to control the exposure and clarity of your photos.
The Power Trio: Aperture, ISO, and Shutter Speed
Getting these three settings right is the foundation for sharp, clean images.
Aperture (f-stop) controls how much of your image is in focus. For product shots, the goal is to have the entire garment sharp.
- My Recommendation: Start with an aperture between f/8 and f/11. This gives you a deep depth of field, making sure every detail is crystal clear.
ISO is your camera's sensitivity to light. For professional product shots, you want a clean, noise-free image.
- My Recommendation: Keep your ISO as low as it can go, ideally between 100–200. With a good lighting setup, this should be achievable.
Shutter Speed determines how long your sensor is exposed to light. Since your camera should be on a tripod, you don’t have to worry about motion blur.
- My Recommendation: Simply adjust your shutter speed until you get the correct exposure. The tripod does all the heavy lifting to keep the shot stable and sharp.
Always Shoot in RAW Format
This is non-negotiable for professional product photography.
A JPEG file makes permanent decisions about color and compression. A RAW file is a digital negative — it captures all the image data from the sensor.
This gives you incredible flexibility later. You can precisely adjust white balance and correct colors without degrading image quality, which is critical for reducing e-commerce returns.
Recommended Camera Settings for Apparel Fabrics
Different fabrics interact with light in unique ways. This table gives you a solid starting point for common materials.
Getting these settings right ensures your files are packed with detail. This makes your life easier in post-production and gives AI editing tools a higher-quality image to work with.
How to Prep Apparel for a Flawless Photoshoot
The magic behind crisp product shots white background images happens long before the camera comes out. Meticulous prep is what separates an average product listing from a premium brand experience, like how Burberry presents a trench coat where every fold feels intentional.
Every garment needs to be in perfect condition. This signals quality to your customer. Even a tiny wrinkle or a loose thread can erode trust.
The Foundation of a Flawless Shot
First, give the garment a thorough steaming. A professional-grade steamer is one of the best investments an apparel brand can make, working wonders on stubborn creases without the risk of scorching.
Once the garment is perfectly smooth, the real styling can begin.
- Lint Rolling: Go over every inch of the garment with a lint roller. This is non-negotiable for dark fabrics.
- Strategic Pinning: Use fine styling pins and tiny clips to create the perfect shape. Clipping excess fabric at the back of a mannequin creates a tailored, flattering silhouette.
- Stuffing and Support: For handbags or structured blazers, use acid-free tissue paper to fill them out. This gives the product a full, three-dimensional shape.
Choosing Your Presentation Style
How you display your apparel is a strategic choice that influences how customers perceive your products.
Flat Lay Photography
Arranging garments flat and shooting from above is fantastic for showing off details and creating outfit grids. Brands like J.Crew have mastered this look, making their collections easy to browse.
A common mistake is letting the garment look lifeless. Use double-sided tape or slip tissue paper underneath to create subtle volume.
Ghost Mannequin Effect
The ghost mannequin is the industry standard for a 3D, "worn" look without a visible model. It gives customers a clear idea of the garment's true fit and shape but has traditionally been a time-consuming editing process.
On-Model Photography
Showing apparel on a person provides context and creates a stronger emotional connection. However, the costs and logistics can be a headache — hiring models, stylists, and makeup artists adds up fast.
This is where AI is changing the game. Tools like Picjam let brands generate incredibly realistic on-model images without a physical photoshoot, saving thousands in production costs and weeks of time.
A Modern Post-Production Workflow That Converts
You’ve captured the shot — now it’s time to turn it into a sales machine. Strong post-production isn’t about heavy-handed changes. It’s about refining what’s already there to make every image consistent, accurate, and trustworthy.
Why Precision in Post-Production Matters
Inaccurate images actively cost you money. Data shows that 75% of online shoppers rely on product photos to make a purchase, and a staggering 30% of customers return products because the item didn't match the photo.
This is where AI-powered tools are a game-changer. Instead of a designer losing hours on manual tasks, platforms like Picjam automate the most draining parts of the workflow.
This diagram breaks down the prep work that makes post-production so much easier.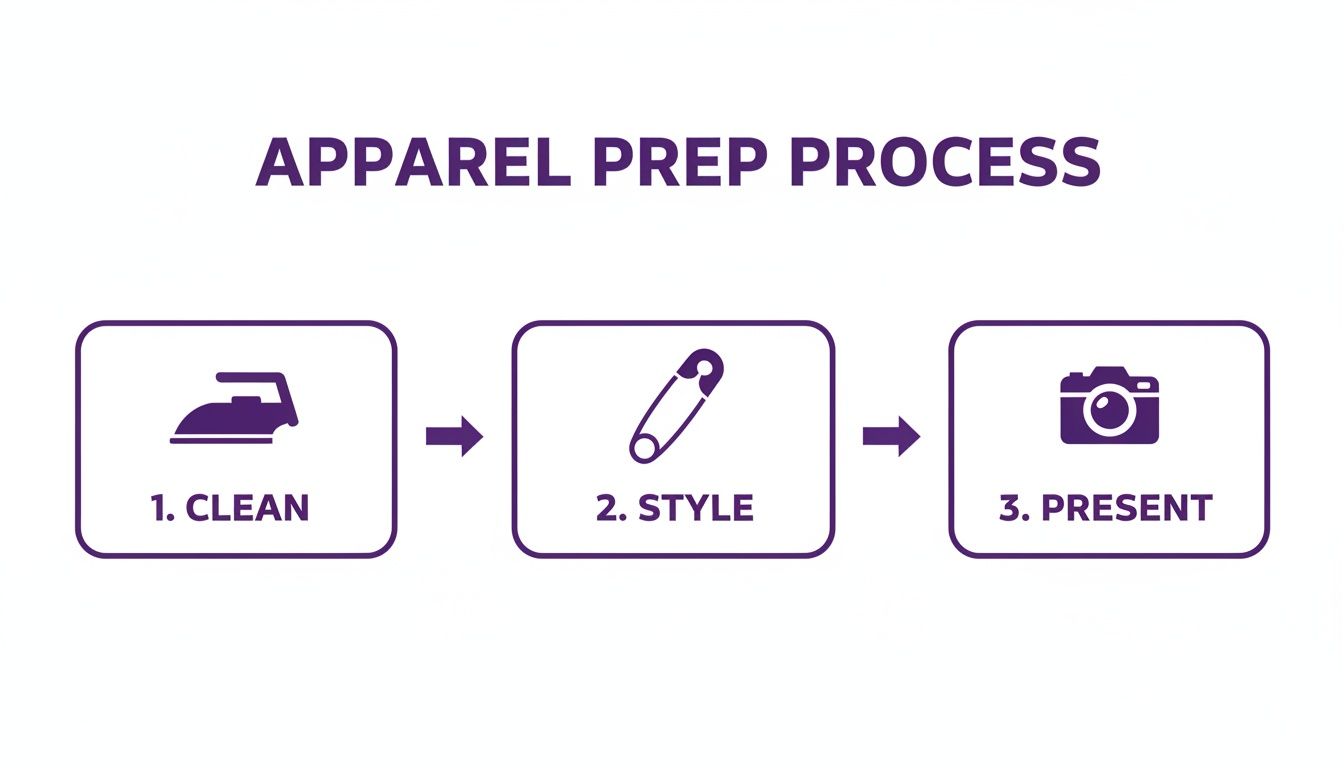
When you nail the prep, you slash the time you'll spend editing later.
Key Edits for High-Converting Apparel Images
With a clean RAW file ready to go, your focus should narrow to a few critical edits.
- Background Removal and Purity: Your background must be pure white (#FFFFFF). Anything slightly off-white will look gray and dingy on a marketplace page.
- Color Correction and Accuracy: This is the single most important step. The color on the screen must be an identical match to the real-world garment, a standard that brands like Nike have mastered.
- Shadow Creation for Depth: Adding a subtle, soft drop shadow grounds the item, giving it weight and making it feel tangible and real.
- Blemish and Distraction Removal: This is your final cleanup pass to clone out any stray dust specks or loose threads missed during prep.
This isn't just about saving time; it's about building a system. For a deeper dive, check out our guide on essential e-commerce photo editing.
Takeaway: Actionable Learnings for Your Brand
Creating incredible product shots on a white background comes down to 3 core actions you can take today.
Prioritize Meticulous Prep. Before you touch a camera, ensure every garment is perfectly steamed, styled with pins, and free of lint. This foundation of quality saves hours in post-production and immediately elevates brand perception.
Master Manual Mode Basics. Get comfortable with your camera's manual settings. Start with an aperture of f/11, an ISO of 100, and adjust your shutter speed to match. This technical control is what creates consistently sharp, professional images.
Integrate AI to Cut Costs. Use an AI tool like Picjam to automate background removal and generate realistic on-model imagery. This can slash your photography budget and reduce content creation time from weeks to minutes, a workflow detailed in this guide to mastering product photography for Amazon.
Ready to see how much your brand can save on content production? Compare your current photography costs with Picjam’s AI solution using our handy cost savings calculator.

Picjam team
The Picjam team blends AI, product, and creative expertise to eliminate the cost and delay of traditional photography for modern eCommerce brands.

