How to Batch Edit Photos for Apparel E-Commerce
Learn how to batch edit photos for apparel catalogs with a repeatable workflow covering presets, color correction, export settings, and marketplace compliance.
A 500-SKU apparel drop can land 48 hours before launch with every file technically usable and still nothing ready to publish. The delay usually comes from inconsistent lighting, weak file naming, hero images mixed in with routine angles, and exports that do not match each channel. Learning how to batch edit photos is not about moving faster inside one tool. It is about setting up a repeatable production workflow that protects garment accuracy and reduces avoidable rework.
At Picjam, that is the line that matters. Repeating an edit is easy. Repeating a reliable result across colorways, angles, channels, and launch deadlines takes a clear process before anyone touches a slider.
Why Batch Editing Is an Operations Problem
Most batch-editing advice starts with a preset or a Sync button. That is only one small part of the job. The real question is this: which images are safe to process together? If the grouping is wrong, a batch edit gives you consistent output that is consistently off. Whites drift warm, blacks lose texture, skin shifts, and fabric detail starts to look different from the actual product.
For apparel e-commerce, treat batch editing like a production line:
- Cull first so weak frames never enter the edit queue.
- Group by capture conditions, including lighting, camera position, lens choice, background, and model setup.
- Build one edit recipe per group from a representative frame.
- Hold hero images out for manual review and final refinement.
- Export by destination instead of pushing one master file everywhere.
- Run visual and technical QA before files move to merchandising or publishing.
- Keep rollback options so a bad batch does not force a full restart.
That structure lines up with how Photoshop itself evolved. Thomas and John Knoll developed the software in 1987, Adobe licensed it in 1988, and Photoshop's first public release arrived on February 19, 1990. Layers arrived in 1994, while the History Panel and Layer Effects appeared in Photoshop 5.0 in 1998, according to Adobe Photoshop's development timeline. Those non-destructive ideas still matter in modern apparel workflows: make controlled edits, preserve the source, and keep the option to revise at any stage.
Working rule: Batch only the images that share the same visual conditions and commercial intent.
A clothing founder building a catalog from scratch can also benefit from begin selling clothes with Trendlytic, particularly when planning product organization and launch requirements before image production begins. The same discipline carries into your product photography workflow, where file handling, approvals, and publishing should connect in one system.
The software is rarely the real bottleneck. The problem is usually a weak handoff between editing, merchandising, and final publishing.
Prepare the Files Before Editing Starts
A clean batch starts with clean inputs. Before Lightroom, Photoshop, or any automation tool comes into play, set up a folder and naming system that makes the files easy to track, review, export, and restore.
A practical folder structure looks like this:
- raw for untouched camera files
- selects for approved frames after culling
- working for active edits and retouching
- masters for approved high-quality finals
- exports/shop for storefront-ready files
- exports/marketplace for marketplace variants
- exports/social for paid and organic crops
- qa for files awaiting final review
- archive for prior approved versions
Use file names for operations, not aesthetics. A format like SKU_style_colorway_view_sequence is easy to search and easy to validate at export. If your team needs channel-specific assets, extend the pattern to SKU_style_colorway_view_channel_v01.
That file naming convention helps with three common problems:
- Missing views, because you can quickly see whether each SKU has front, back, side, detail, and on-model files
- Export mistakes, because marketplace and storefront versions stay distinct
- Rollback, because version numbers make it clear which approved file should be restored if a later batch causes issues
Cull for publishability, not preference
The first review is not about choosing the prettiest frame. It is about removing files that cannot support accurate product presentation.
Check for:
- Obstruction, including hands, tags, straps, hair, or styling that hides key garment details
- Focus failure, especially at labels, seams, trims, closures, texture, and embroidery
- Color mismatch, where the product no longer matches the approved sample or known reference
- Fit distortion, such as twisted hems, compressed fabric, stretched waistbands, or folds that misrepresent drape
- Technical defects, including orientation errors, profile prompts, corrupted previews, or inconsistent framing
Separate hero images from routine angles at this stage. Hero images carry more merchandising weight and usually need manual refinement. Secondary angles are better candidates for controlled synchronization if the capture conditions match.
Grouping is the most important setup step. Adobe's batch guidance recommends applying synced settings only to images shot under the same lighting, then reserving fine-tuning for selected frames. If one group combines daylight, flash, and warm interior light, the same white balance and exposure settings will not produce the same result.
Before rolling an edit recipe across the full group, test 5 to 10 varied images, then inspect thumbnails and 100% views for artifacts, as advised in this batch photo-editing workflow guide. If your workflow includes cutouts, invisible mannequin, or background cleanup, document those output rules in the brief instead of burying them inside a preset. That makes adjacent tasks easier to audit, whether your team is using ghost mannequin removal or handling removing a white background from an image.
Build an Edit Recipe That Can Scale
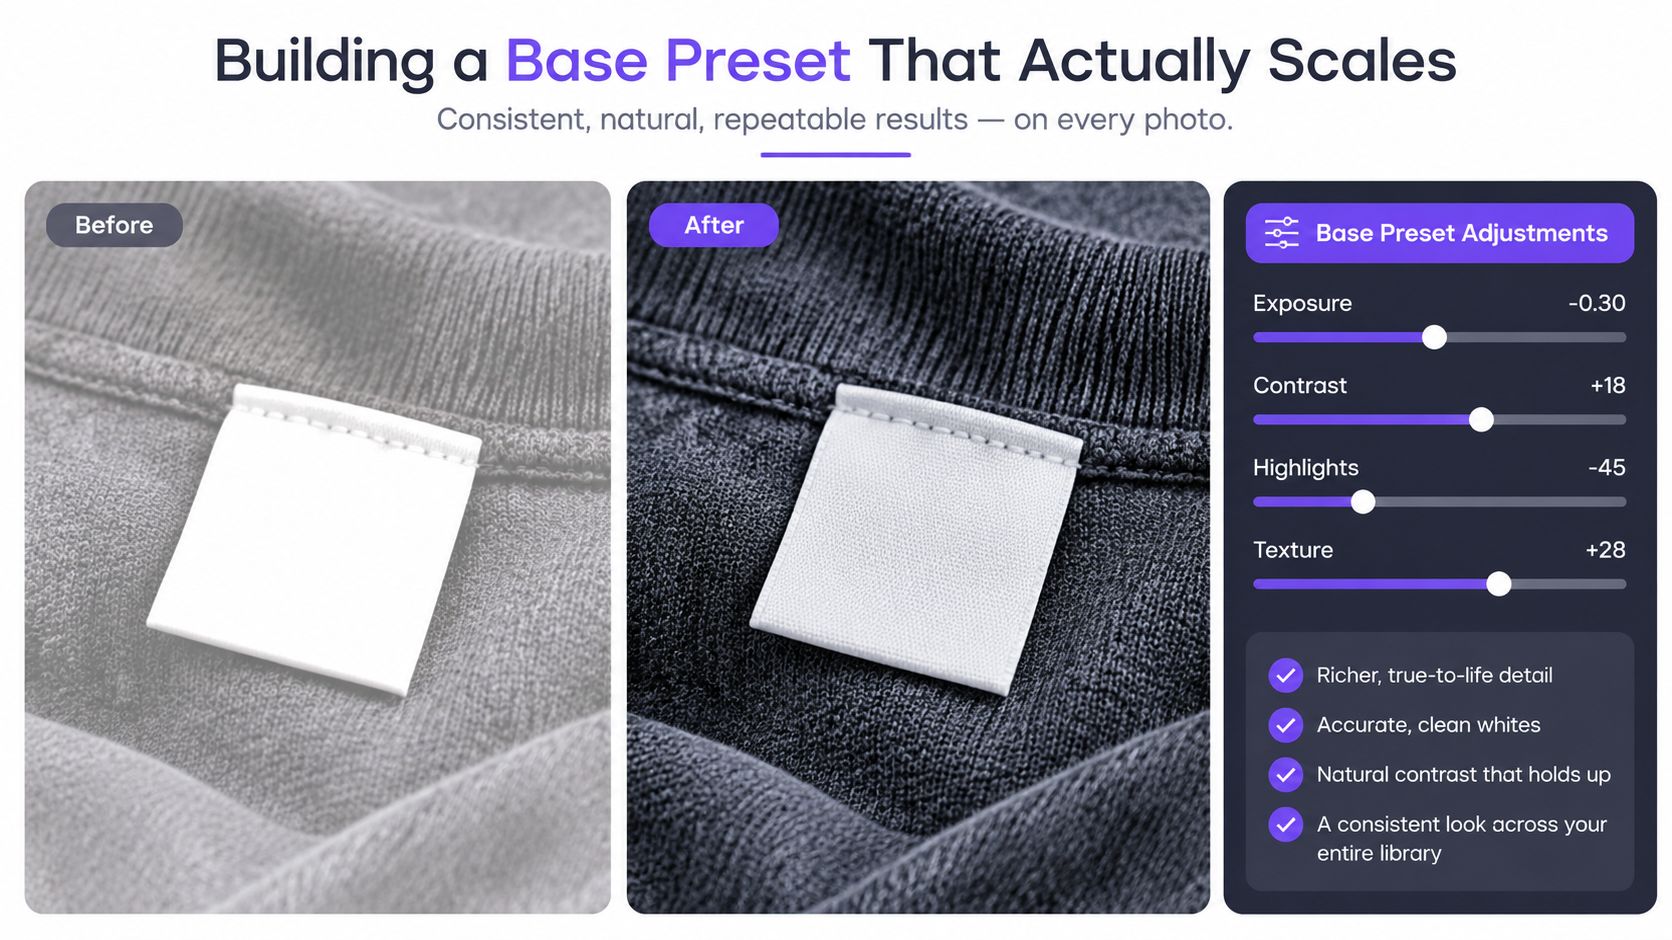
A scalable batch edit should correct shared capture conditions, not force a creative look across the whole catalog. Start from one representative image that shows the hardest parts of the set, such as a black knit, white tee, reflective trim, pale label, saturated colorway, or textured fabric.
For apparel, the base recipe should answer these questions:
- Is exposure consistent with the approved look for this set?
- Is white balance neutral enough that whites, blacks, and skin read correctly?
- Do garment colors still match the real product?
- Is fabric texture visible without looking over-sharpened?
- Are model skin tones consistent and believable across the group?
In Lightroom, start with neutral corrections first. White balance, exposure, contrast, highlights, shadows, lens corrections, and profile settings are often safe when the capture conditions are the same. Texture and clarity need restraint. Enough can help restore fabric structure. Too much can make knitwear look brittle, exaggerate seams, or create edge halos.
Use local adjustments sparingly and manually. Masked fixes, face adjustments, selective shadow recovery on dark garments, and cleanup around jewelry, mesh, or transparent materials should not be synced across a full batch.
Exposure and white-balance checks that catch most problems
Before you sync anything, check these on the representative frame:
- White reference: Confirm that whites are neutral, not blue, yellow, or magenta.
- Black detail: Make sure black garments still show weave and seam separation.
- Skin consistency: Check that skin does not shift too red, too gray, or too orange between frames.
- Colorway accuracy: Compare the image against the product sample or approved reference if available.
- Background consistency: Confirm that the background treatment stays clean without contaminating garment edges.
If one of those checks fails, fix the recipe before it spreads across the set.
Lightroom versus Photoshop
Lightroom is usually the better choice when you need controlled synchronization across a selected set. Adobe's documented sequence is straightforward:
- Edit one photo in the Develop module.
- Select the edited photo and the other target images.
- Click Sync.
- Choose the settings in the Synchronize Settings window.
- Click Synchronize to apply them.
In Lightroom Classic, keep the edited image active while selecting the target files in the filmstrip. The Sync button sits at the bottom right of the editing panel. An Auto Sync mode is also available through the small switch beside Sync, but it should be used carefully because every adjustment can immediately affect the selected group, as explained in this Lightroom batch-editing walkthrough.
Photoshop is better when the repeatable part of the job is procedural: opening files, resizing, sharpening, converting, renaming, and saving. Record an Action, then choose File > Automate > Batch. Select the Action and source folder, and suppress file-open and color-profile dialogs when appropriate so the process does not stop midway, following Adobe's Photoshop batch workflow.
Use Lightroom to synchronize judgment-based edits across a controlled group. Use Photoshop to automate a known sequence. Neither tool can decide whether a navy dress has shifted purple or whether a sheer sleeve now looks opaque. That still requires review.
If you need to scale initial product image creation before batch cleanup, AI product photography can help standardize source assets. The same rule still applies after generation or capture: keep exceptions out of the batch and send them to manual review.
Protect Skin Tone and Garment Color
In apparel commerce, color mistakes are expensive. A batch that looks visually consistent can still fail if skin tones shift between images or the garment no longer matches the real item.
For on-model apparel sets, review skin and garment color separately:
- Skin: Keep tones natural and stable across the set. Watch for inconsistent warmth, green casts, over-recovery in shadows, and over-smoothing.
- Garment: Compare each colorway to a trusted reference. Pay special attention to black, white, cream, red, denim, and saturated seasonal colors.
- Interaction: Check whether nearby garment colors are contaminating skin or whether skin edits are changing the perceived garment tone.
This matters most in mixed sets where the same model wears multiple colorways, or where one lighting setup changes slightly over time. In those cases, one synced recipe may still need small white-balance or exposure corrections by subgroup.
Where Automation Breaks Apparel Realism
Automation is useful when the input conditions are controlled and the review standard is clear. It becomes risky when the system starts changing the product instead of cleaning up the image.
Garment realism usually breaks in predictable places:
- Transparent fabrics pick up hard or opaque edges
- Layered outfits merge where pieces overlap
- Jewelry and trims lose shape
- Smoothing wipes out weave, embroidery, or construction detail
- Shadow recovery flattens fit cues that help shoppers understand drape and proportion
The current move toward bigger browser batches, API workflows, and automated correction pipelines changes the bottleneck from simple throughput to quality control and product integrity, as discussed in this analysis of large-scale AI image processing for commerce.
Review the risk, not just the image
A practical QA pass combines quick scanning with targeted inspection:
- Thumbnail review: Look for silhouette shifts, halos, crop inconsistencies, and obvious color jumps
- 100% zoom: Inspect labels, buttons, stitching, mesh, jewelry, and fabric boundaries
- Colorway comparison: Compare front, back, detail, and on-model views of the same product
- Manual escalation: Pull uncertain files out of the batch instead of forcing a pass
- Source comparison: Keep the original beside the processed file so reviewers can confirm that the product remains truthful
The provided workflow guidance recommends testing 5 to 10 varied images before a full run and spot-checking thumbnails plus 100% zoom for over-processing artifacts. That test should include the hardest garments in the set, not just the cleanest basics.
Product images can be polished. They cannot quietly change the product.
The same principle applies to adjacent production needs, including enterprise swag mockup solutions. Automation helps when the object stays clear. It becomes risky when the system invents material behavior, changes fit cues, or erases important construction detail.
Crop for the Channel, Not for Convenience
A file can be well edited and still fail in production because the crop does not fit the destination. Do not treat cropping as a last-step afterthought.
For apparel teams, crop review should answer three questions:
- Does the crop preserve the full product story for that placement?
- Does it match the destination aspect ratio?
- Does it keep critical details visible, including neckline, sleeve length, hem, footwear, hardware, and silhouette?
Keep one approved master composition where possible, then derive placement-specific crops from it. In practice, that usually means:
- PDP hero crops with clean framing and consistent scale across the category
- Collection page crops that read clearly at small sizes
- Marketplace crops that follow listing requirements
- Paid and social crops built for the actual placement, not guessed from the master
If a crop removes a product feature, it is not a minor issue. It is a merchandising problem.
Export for Multi-Channel Specs
The master edit is only the midpoint. A file can look right in Lightroom and still fail at publishing because the dimensions, file type, color profile, naming, or compression do not match the destination.
Do not build one export preset and send it everywhere. Build a simple channel matrix that records the current requirements for each destination. Platform rules change, so confirm them in each channel's live documentation before locking your workflow.
| Channel | Aspect Ratio | Min Resolution | Naming Convention |
|---|---|---|---|
| Amazon | Confirm current listing ratio | Confirm current minimum | SKU plus angle or sequence |
| Shopify | 1:1 or 4:5, according to placement | Confirm storefront requirement | SKU plus descriptive product name |
| DTC site | Match the component or template | Confirm site requirement | SKU plus view and colorway |
| Social ads | Create placement-specific crops | Confirm campaign requirement | SKU plus campaign and placement |
The table is a working framework, not a substitute for checking the live platform. The verified workflow guidance specifically emphasizes final sizes by channel, checking counts, naming, and aspect ratios, and targeting marketplace requirements before delivery.
Export from an approved master
Keep one high-quality approved master, then derive channel variants from that file. Create separate export presets for dimensions, file type, quality, sharpening, color profile, and destination folder.
Before delivery, run this export check:
- Does the exported count match the approved count?
- Does every SKU include the required hero and secondary views?
- Did any crop hide a product feature?
- Are filenames consistent with the catalog?
- Does the output open correctly and display expected color?
- Did each file land in the correct destination folder?
For teams working in Lightroom, the same discipline applies to social variations and publishing templates. The Lightroom export settings guide for Instagram is useful when documenting output rules by destination instead of relying on memory.
Picjam can also fit into a broader production stack for batch resizing, enhancement, SKU generation, and channel-oriented asset preparation. The goal is simple: automation should create controlled output that a person can verify.
QA, Rollback, and Versioning
Batch editing moves fast, so mistakes spread fast too. That is why versioning matters.
A practical rollback system does not need to be complicated:
- Keep untouched source files in raw
- Save approved selects before batch edits begin
- Store the current approved master in masters
- Add version numbers to exported sets, such as
v01,v02,v03 - Keep a short change log with the date, operator, scope, and reason for the update
If a batch introduces a white-balance error, crop issue, or naming problem, your team should be able to restore the last approved version without rebuilding the full set.
At minimum, log these fields for each rework cycle:
- SKU or style
- View affected
- Issue found
- Action taken
- Operator
- Version number
- Approval status
This gives merchandising, editing, and publishing teams a shared record of what changed and why.
Repeatable Batch Editing Checklist for Apparel Teams
Use this checklist at the handoff between editing and delivery.
- Create the folders. Separate raw files, selects, working files, masters, exports, QA, and archive.
- Apply naming rules. Use a fixed pattern such as
SKU_style_colorway_view_channel_v01. - Cull before editing. Remove blurry, obstructed, duplicated, or misleading frames before automation starts.
- Group by real capture conditions. Do not mix different lighting setups, camera positions, or backgrounds in one batch.
- Mark hero frames. Send priority images to manual refinement instead of treating every frame the same way.
- Build one edit recipe per group. Keep shared adjustments limited to settings that remain accurate across the approved set.
- Check exposure and white balance. Verify whites, blacks, skin, and product color before syncing.
- Protect local detail. Review labels, texture, transparency, jewelry, seams, and fit cues individually.
- Validate crops by channel. Confirm that each crop preserves key product features and matches placement needs.
- Run the export gate. Confirm dimensions, aspect ratio, file type, sharpening, profile, folder, and filename against destination specs.
- Complete final QA. Compare approved and exported counts, review contact sheets, inspect critical details at 100% zoom, and open representative files from the delivery folder.
- Preserve rollback paths. Archive approved versions and keep a simple change log so errors can be reversed quickly.
Batch editing only saves time when the output stays accurate through every step of merchandising and publishing. Use automation for repeatable corrections. Use human review for garment truth, skin tone, color risk, crop safety, and final compliance.
Picjam helps apparel teams turn approved product assets into repeatable fashion content for catalogs, campaigns, and channel delivery. Visit Picjam, then compare your current photography workflow with the AI studio using the savings calculator to see where your next catalog can save time and production spend.

Picjam team
The Picjam team blends AI, product, and creative expertise to eliminate the cost and delay of traditional photography for modern eCommerce brands.