Mastering the White on White Photoshoot for Apparel
Learn how to master the high-converting white on white photoshoot for apparel. Our guide covers lighting, camera settings, styling, and post-processing.
By Michael Pirone, Founder of Picjam & Vidico
this breakdown of white-background product imagery
White-on-white apparel photography looks simple on screen and gets expensive fast when the process is loose.
A white garment on a white set gives you almost no margin for error. If prep is sloppy, the fabric looks tired. If the background is too hot, edges disappear. If white balance drifts, one product turns cream, another turns blue, and the whole collection looks inconsistent.
For ecommerce teams, the job is straightforward. Make the garment read clearly, keep the background clean, preserve texture, and deliver a consistent file set that works across PDPs, collection pages, marketplaces, and paid ads.
This guide breaks that down into the parts that matter: garment prep, styling, lighting separation, exposure, white balance, background control, retouching, and a practical QA process.
Why White-on-White Is Harder Than It Looks
A standard white background shot is usually forgiving enough to survive average lighting and a fast edit. White-on-white apparel is not.
conversion-first Amazon product photography
The garment and the set live in the same tonal range, so the image only works when you protect small differences in edge, fold, seam, and surface texture. Lose those, and the product flattens immediately.
That is why strong white-on-white apparel images depend on control in three places:
- Garment structure so the product has visible shape
- Lighting separation so the outline does not disappear into the set
- Retouching discipline so the background looks clean without washing out the fabric
white background product photography for ecommerce
For ecommerce, the standard is not artistic minimalism for its own sake. The image needs to help the customer understand fit, finish, fabric, and construction fast.
Start With Garment Prep, Not the Camera
Most failed white-on-white shoots are already compromised before the first frame.
If the sample is yellowed, stretched, linty, badly steamed, or pinned carelessly, lighting will expose every problem. A white set does not hide defects. It magnifies them.
Garment prep checklist
Before the product gets anywhere near set, check for:
- Correct white tone: optic white, soft white, cream, and ivory all need to be handled intentionally
- Fabric condition: no yellowing, damage, shine marks, deodorant stains, makeup transfer, or washed-out areas
- Lint and dust: especially on knits, fleece, brushed cotton, and textured fabrics
- Wrinkles and seam distortion: steam properly, then let the garment settle before shooting
- Shape retention: collar points, cuffs, plackets, waist seams, hems, and pockets need to sit cleanly
Ask for the cleanest sample, not just the correct size. If the best sample is not on set, production slows down later in retouching.
Style for Readability, Not for Drama
White-on-white styling works when it gives the camera clear information.
That usually means reducing noise and reinforcing shape. The goal is not to make the garment look over-styled. The goal is to make key selling details visible.
What to style deliberately
Focus on:
- Collars and necklines so they hold shape and do not collapse into the body
- Sleeves so they show volume without looking stuffed or twisted
- Side seams and hems so the silhouette reads cleanly
- Front plackets, buttons, and closures so construction is obvious
- Drape so the product looks intentional, not lifeless
For flatter products, small adjustments matter. A millimeter change in cuff angle or shoulder line can be the difference between a premium-looking image and a dead one.
Build the shot list around what sells the product
Do not spend the whole shoot protecting the hero frame while rushing the support shots. White garments usually need close detail coverage to prove quality.
A practical shot list:
| Shot type | What it needs to show |
|---|---|
| Front hero | Clean silhouette, balanced symmetry, visible edges |
| Three-quarter | Drape, side seam, body shape |
| Back view | Fit line, yoke, seam placement |
| Fabric close-up | Texture, weave, rib, knit, or surface finish |
| Detail crops | Collar, cuff, hem, placket, buttons, labels, stitching |
If the product is premium, detail frames do a lot of the selling.
Light for Separation First
Lighting is the make-or-break step in a white-on-white apparel setup.
The background should be bright, but it cannot overpower the garment. The fabric should look clean, but it cannot clip into featureless white. The solution is not more light. It is controlled light.
Optimal separation requires the white background to receive about 70% of the light intensity hitting the subject, or be lit 1/3 stop brighter. Large, diffused lights placed at 45° angles to the backdrop, with the product kept 8 to 12 inches away, help prevent spill and preserve shadow detail according to Replica Surfaces' guide to plain white backgrounds.
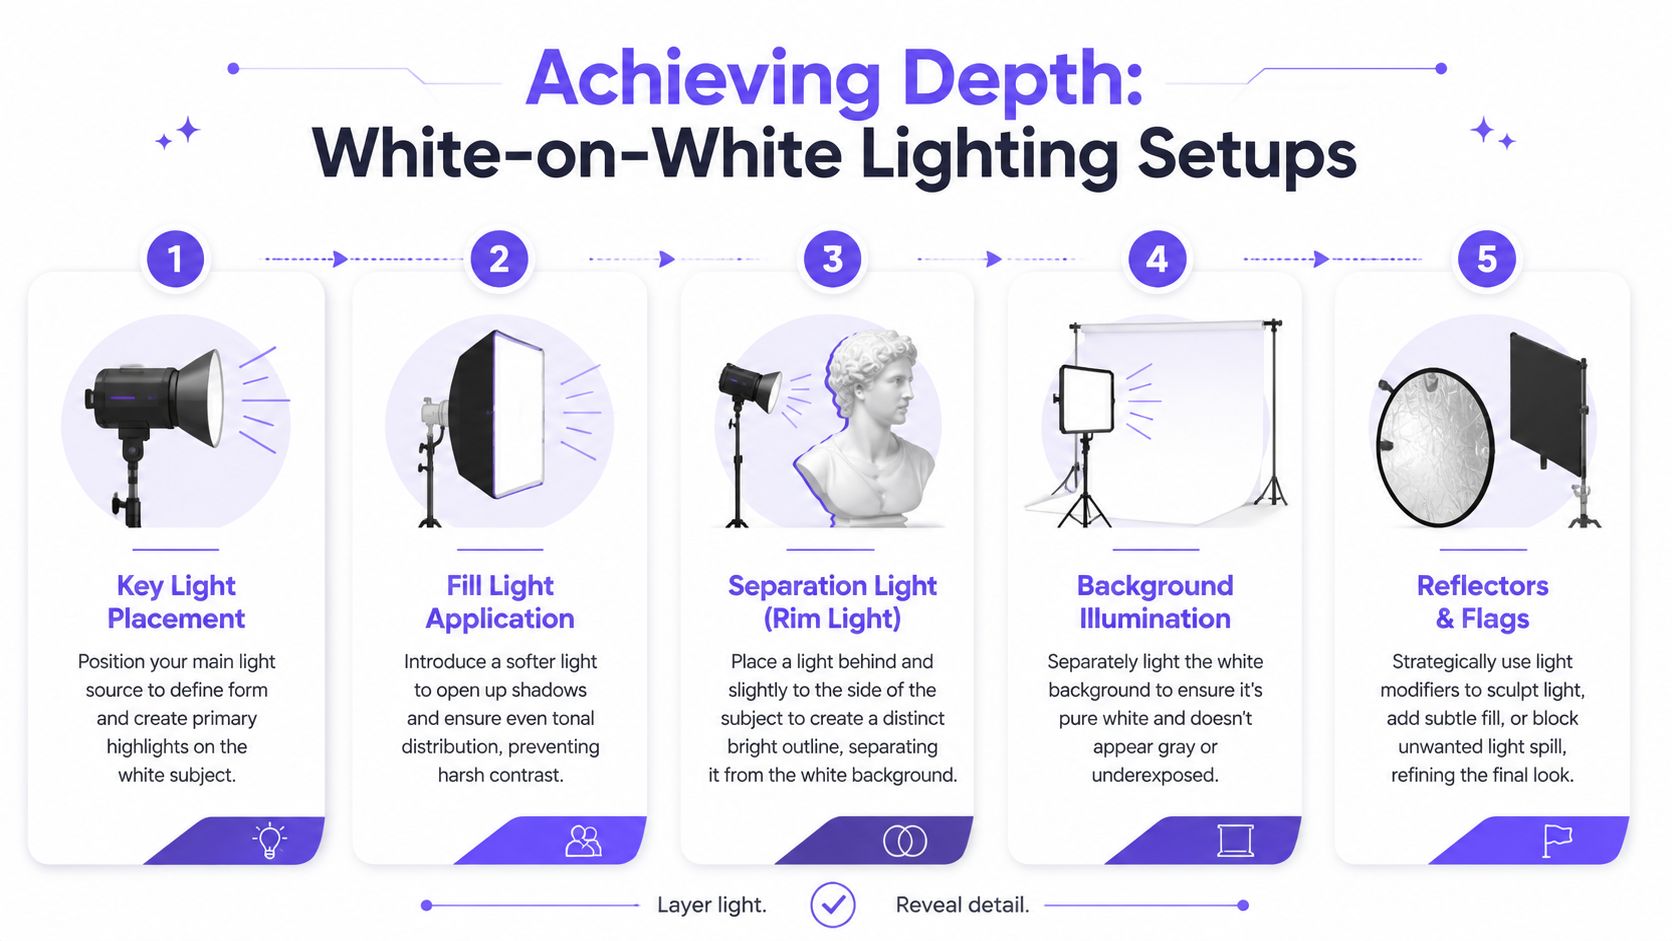
A setup that works reliably
improve video audio and lighting
For apparel on model, mannequin, or hanger, keep the lighting roles separate:
- Key light shapes the garment from slightly off-axis.
- Fill light softens contrast without erasing seams and folds.
- Background lights illuminate the set independently.
- Flags or negative fill hold edge contrast where the garment starts to disappear.
- Subject distance from the backdrop reduces spill contamination.
The most common mistake is chasing a perfect white background by over-lighting the set. That usually burns the edges first. The second mistake is letting the backdrop sit too dull, which leaves the frame gray and lifeless.
Use bigger, softer sources
White garments tend to look better under larger diffused sources because highlight transitions stay smoother and surface texture remains believable.
Softboxes are usually easier to control than umbrellas. Feather the light so it wraps the garment instead of blasting the front panel flat.
Background control rules
Keep these rules simple:
- Move the garment off the backdrop: keep that 8 to 12 inch gap
- Light the background separately: do not rely on spill
- Watch side seams and outer sleeves: if they disappear, reduce spill before changing camera settings
- Check the floor or sweep tone: background white should feel even, not patchy or blown in one zone
If the background looks clean but the garment outline is disappearing, the set is too hot.
the best way to photograph clothing
If you want a faster workflow for derivative catalog assets after capture, tools built for AI product photography can help standardize output, but they still perform best when the original file has clean edges and consistent lighting.
Dial In Exposure Before the Rack Starts Moving
White-on-white scenes confuse camera meters. If you let the camera decide, it often drags the frame toward gray.
Shutterbug explains that bias clearly in its white-on-white exposure guide. In practice, the fix is simple: shoot manually, test carefully, and confirm with the histogram.
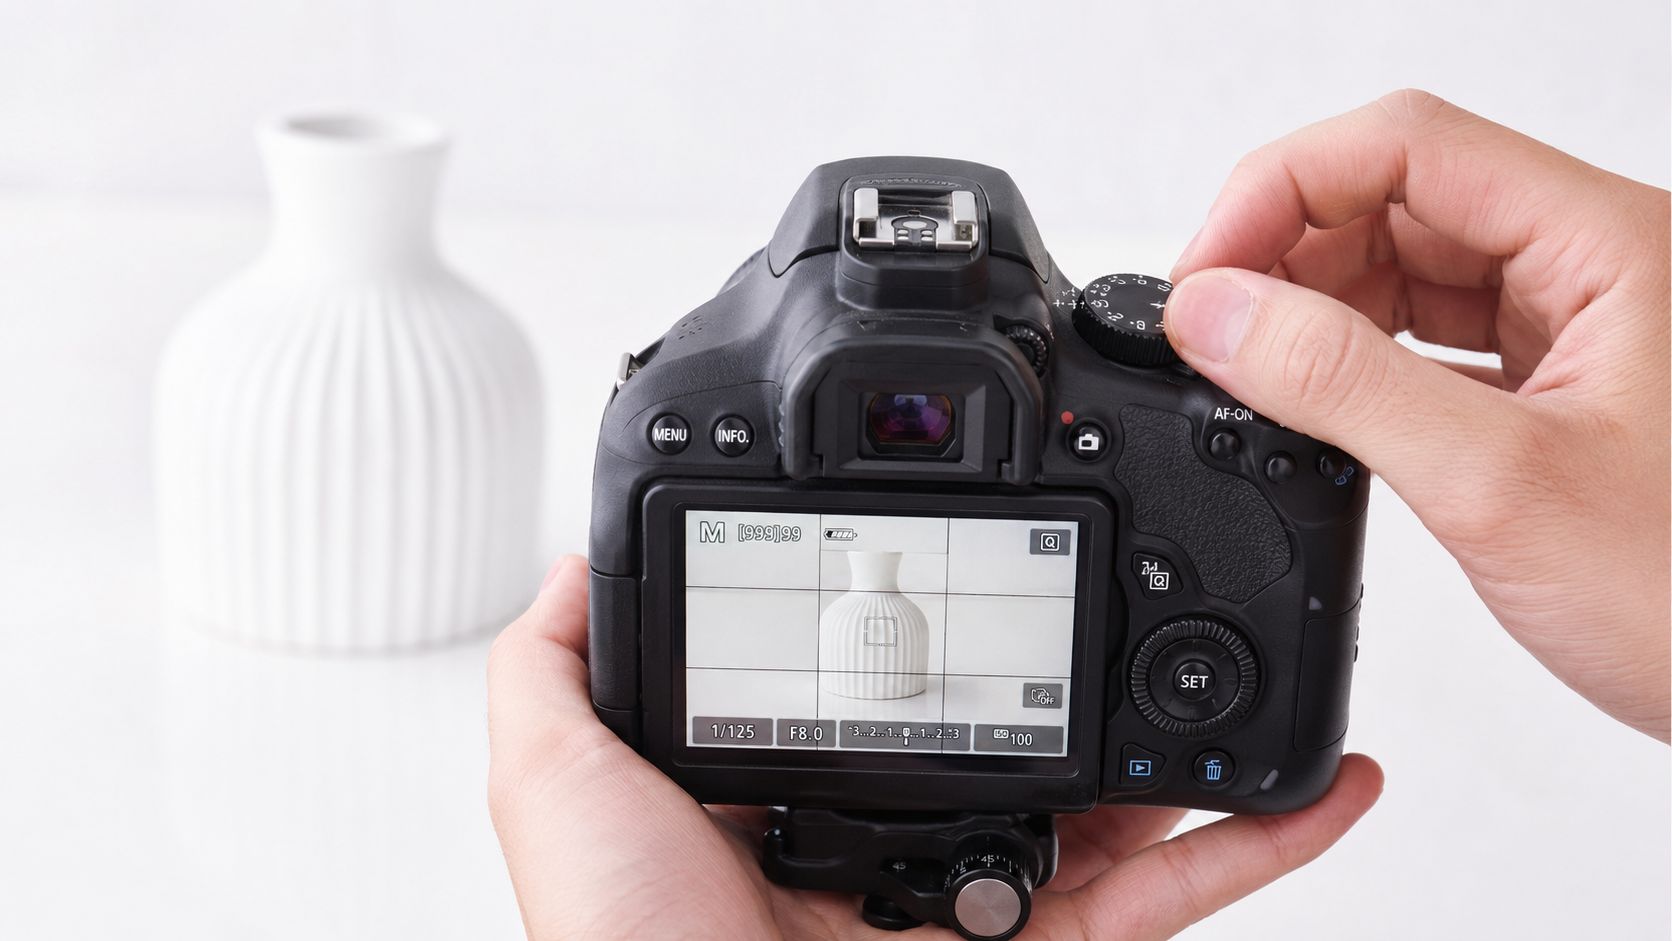
A solid starting point
For apparel, f/8 and ISO 100 is a dependable baseline, then adjust shutter speed to match your lighting output.
ecommerce photo editing workflow
That gives you:
- Enough depth for front-facing garments and key details
- Cleaner texture in white fabric
- Less noise in shadows and folds
- More predictable retouching later
If the camera is locked on a tripod and the product is static, slower shutter speed is usually the cleanest tradeoff.
Use the histogram, not the back screen
The rear display is too unreliable for white-on-white work. Ambient light and screen brightness make judgment calls inconsistent.
Use the histogram and zoomed playback instead.
Check for:
- Highlight detail still visible in the brightest fabric areas
- Background close to white without swallowing edge information
- Seams, plackets, and fold transitions still intact
- No dirty gray cast in the set
A useful capture routine:
- Shoot in Manual mode
- Shoot RAW
- Bracket your opening test frames
- Review edge zones at 100%
- Lock exposure once the set is right
Lock White Balance Early
White balance drift ruins apparel sets faster than most teams expect.
When one frame is slightly warm and the next is slightly cool, white products stop looking like a coherent collection. That creates extra retouching work and weakens the PDP experience.
Best practice for white garments
- Set a custom white balance when possible
- Use a gray card or color target in the same light as the garment
- Avoid auto white balance for production sets
- Recheck after any light move, modifier change, or subject repositioning
An 18% gray card is still one of the cheapest ways to keep a white apparel shoot consistent. Take the reading under the same light as the product, lock it in, then move into production.
If two white garments from the same set need noticeably different color correction, the problem usually happened during capture.
There's another practical angle here that's worth watching, especially for apparel teams handling white garments:
video discussion on white-garment separation
Keep the Background Clean, Not Aggressive
Background control is where many white-on-white apparel images fall apart.
Teams often try to solve the look by forcing the entire frame brighter. That approach usually creates halos, edge contamination, clipped sleeves, and dead fabric texture.
The better approach is to separate the jobs:
- The set should capture a strong near-finished file
- The background should be cleaned precisely in post
- The garment should be protected throughout the edit
This is especially important for whites that lean cream, ivory, warm white, or soft off-white. The background can be pure white without making the product look incorrectly bright or neutral.
Retouch for Accuracy and Consistency
A good white-on-white file is finished in post. That does not mean fixing everything later. It means finishing deliberately.
For Amazon listings, the background must be pure white at RGB 255, 255, 255, according to Picjam's guide on how to take product photos for Amazon. That requirement is one reason experienced teams separate garment detail work from background cleanup instead of trying to solve both with one broad adjustment.
Retouching order that keeps fabric detail intact
Use a consistent sequence:
this analysis of white-background photography workflows
- Normalize exposure and white balance across the full set.
- Mask the garment cleanly before major background work.
- Lift the background to pure white without creating halos.
- Adjust garment density and contrast locally to hold texture.
- Remove lint, minor wrinkles, edge spill, and distractions once tonal work is locked.

This order prevents cleanup debt. It also makes batch consistency easier across a collection.
What not to do
Avoid:
- Global highlight pushes that flatten the garment
- Broad contrast moves that dirty the set
- Over-sharpening white texture
- Color corrections that make the product drift blue, gray, or yellow
- Rebuilding missing edges that should have been solved with lighting
If your team is using AI fashion photography to scale apparel image production, clean masks, stable white balance, and preserved texture still matter. Better inputs produce more reliable outputs.
Practical Ecommerce QA Checklist
Before assets go live, run a final review that focuses on commercial clarity, not just visual taste.
Image QA checklist for white-on-white apparel
Garment clarity
- Are outer edges fully visible at full size and thumbnail size?
- Do seams, plackets, cuffs, hems, and collars still read clearly?
- Does the fabric texture look believable rather than smoothed out?
- Does the silhouette match the real product?
Color accuracy
- Does the garment read as the correct white tone?
- Is the white balance consistent across all images in the set?
- Do detail crops match the hero image in tone and density?
Background quality
- Is the background clean and even?
- Are there halos, gray patches, hotspots, or floor tone shifts?
- Is the file compliant where marketplace standards require pure white?
Styling and presentation
- Are collars, cuffs, sleeves, and hems styled consistently?
- Are there visible wrinkles, lint, dust, pins, or puckering?
- Does the product look premium and true to its price point?
Catalog consistency
- Are crops, margins, and product scale aligned across the range?
- Do front, back, and detail frames follow the same visual standard?
- Will the full collection page look coherent when these images sit together?
If the answer to any of those is no, fix it before upload. White-on-white images break trust quickly because customers have very little else in the frame to focus on.
Final Takeaway
A strong white-on-white apparel shoot is not about making the frame brighter. It is about controlling separation.
Prep the garment properly. Style for shape. Light the product and background independently. Lock exposure and white balance before volume starts. Retouch the background without sacrificing texture. Then run QA like an operator, not just a creative team.
That is what makes white apparel look premium online.

Picjam team
The Picjam team blends AI, product, and creative expertise to eliminate the cost and delay of traditional photography for modern eCommerce brands.